Advanced
MQTT 5.0
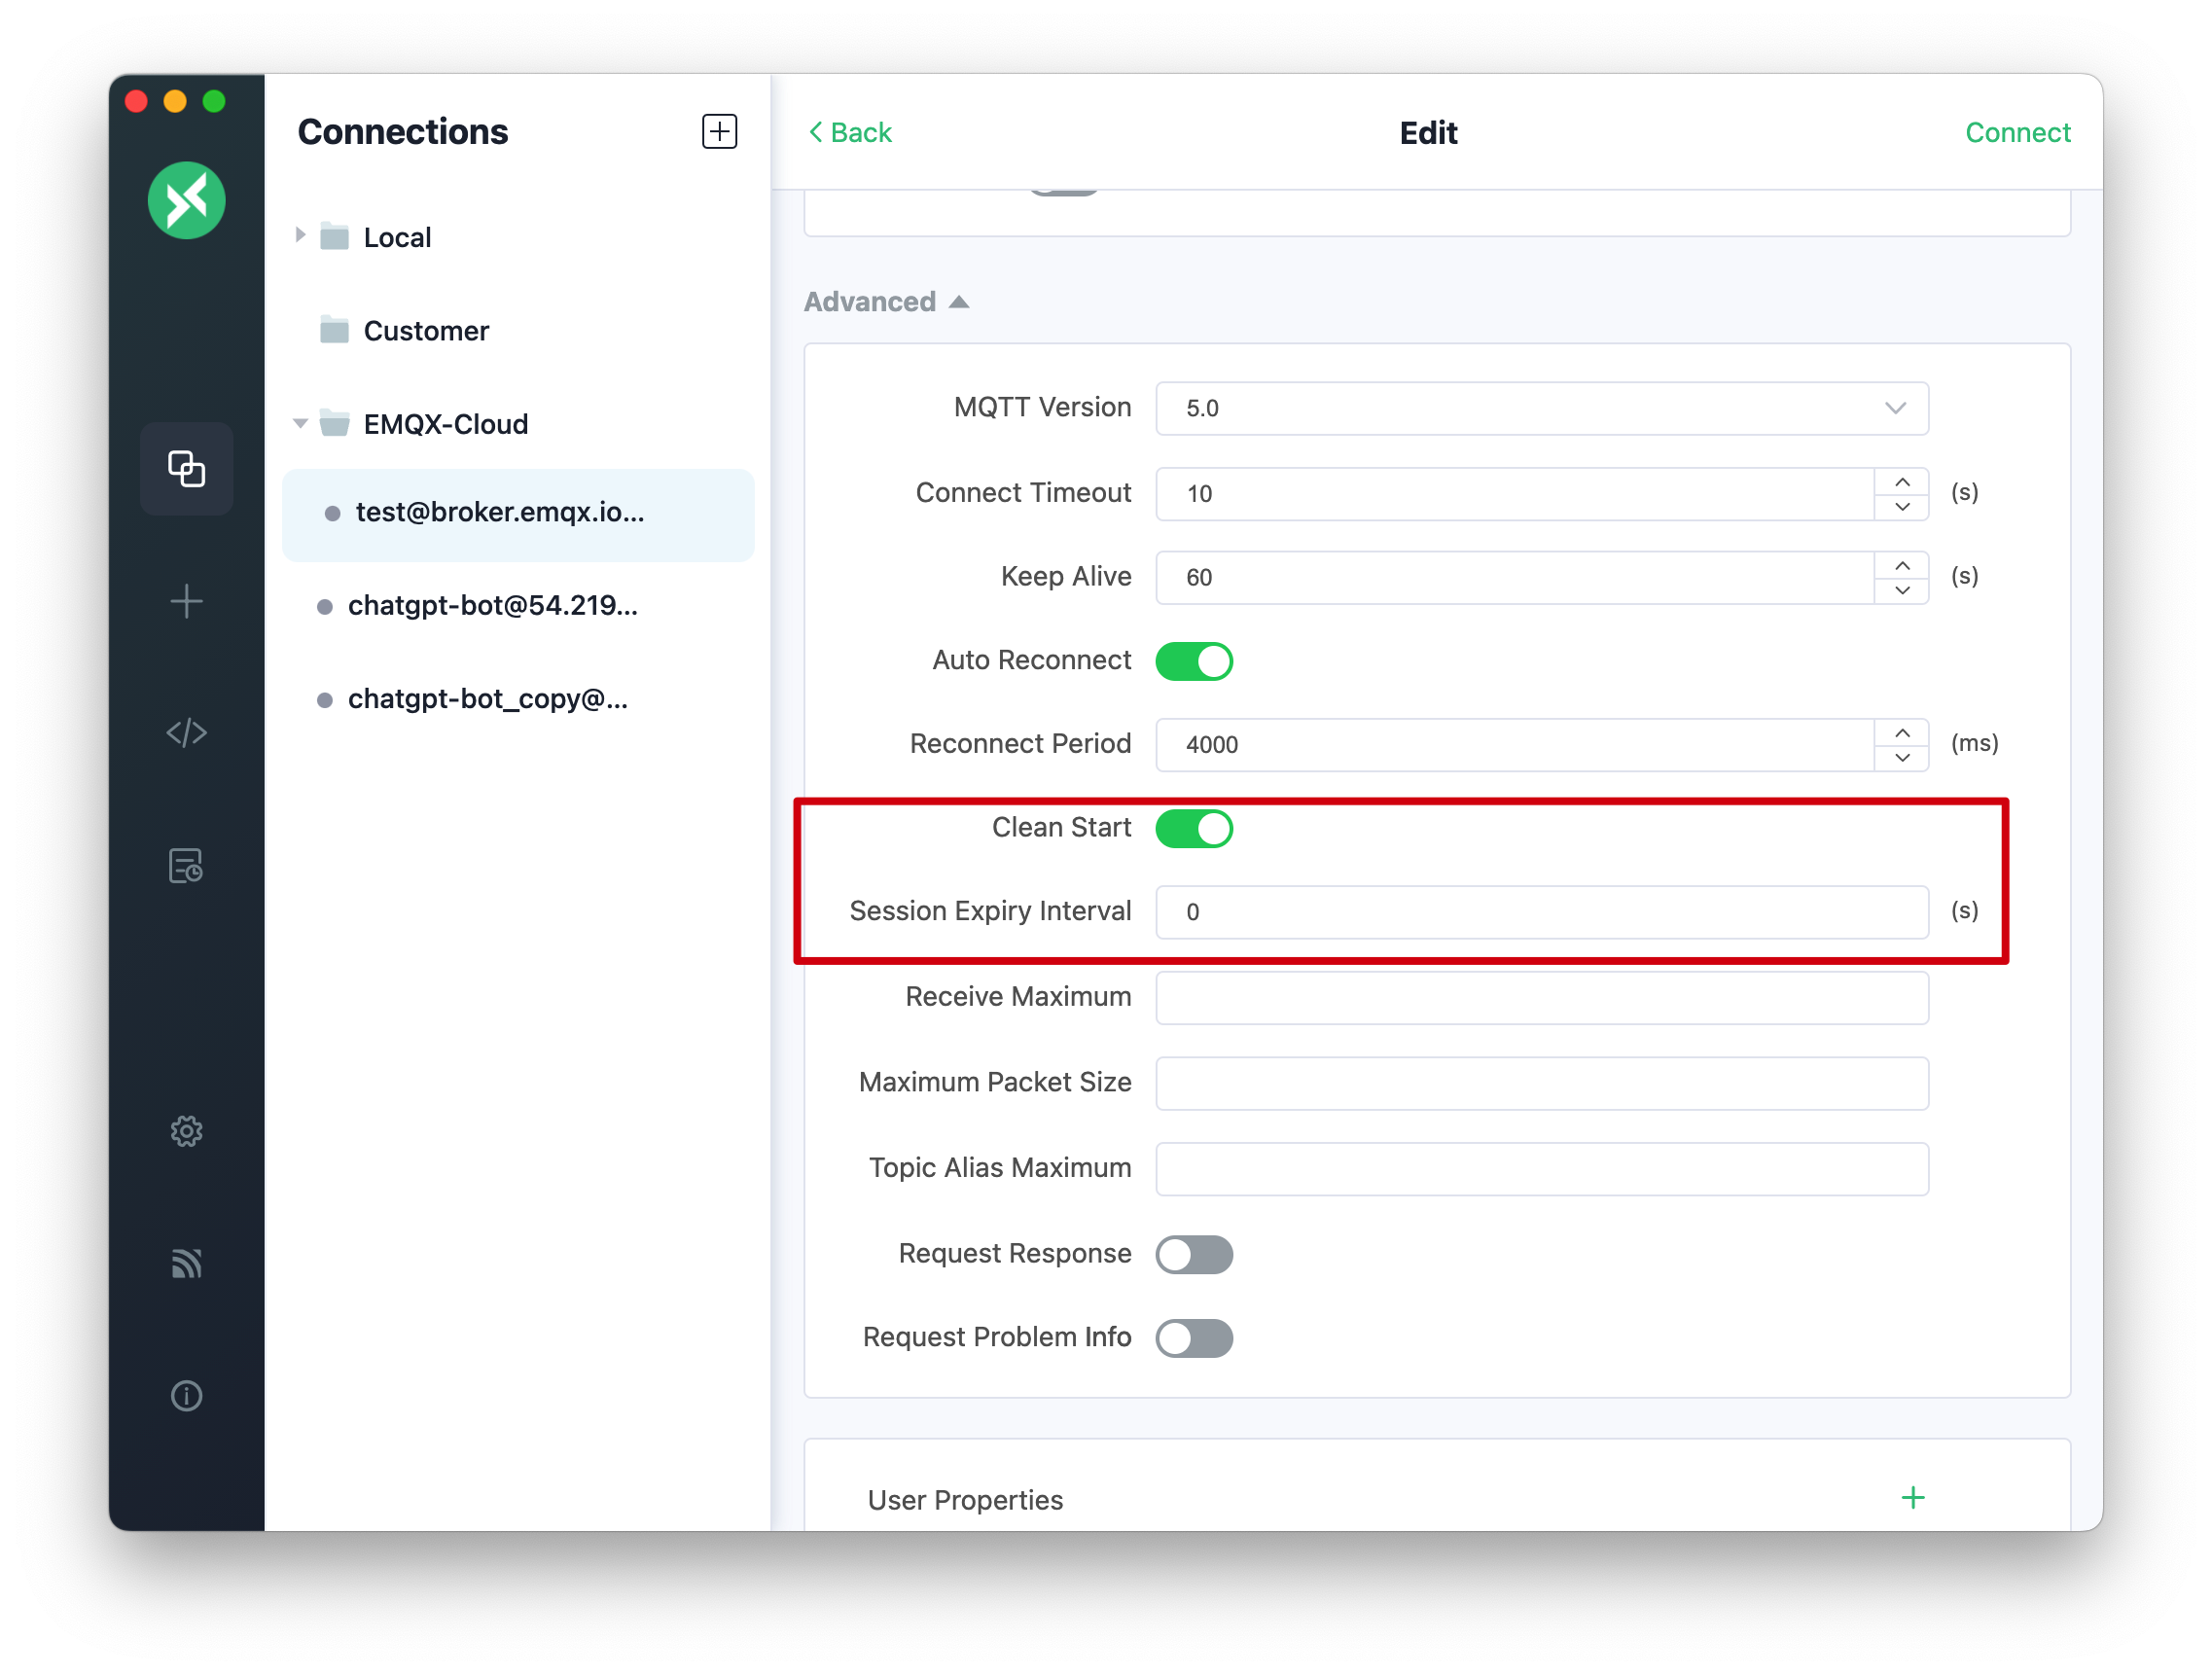
Clean Start and Session Expiry Interval
MQTT 5.0 introduces two features, Clean Start and Session Expiry Interval, which provide more flexibility compared to the Clean Session in MQTT 3.1.1.
In MQTTX, if Clean Start is enabled, it needs to be paired with a set Session Expiry Interval to take effect. By default, if Clean Start is disabled, the Session Expiry Interval is set to 7200 seconds (two hours).
If you need to set it to never expire, you can click the clear button on the right side of the input box; clearing the value will set the session to never expire. However, if the Session Expiry Interval is disabled, MQTTX automatically sets the Session Expiry Interval to 0, meaning that as soon as the connection is disconnected, the session ends immediately.
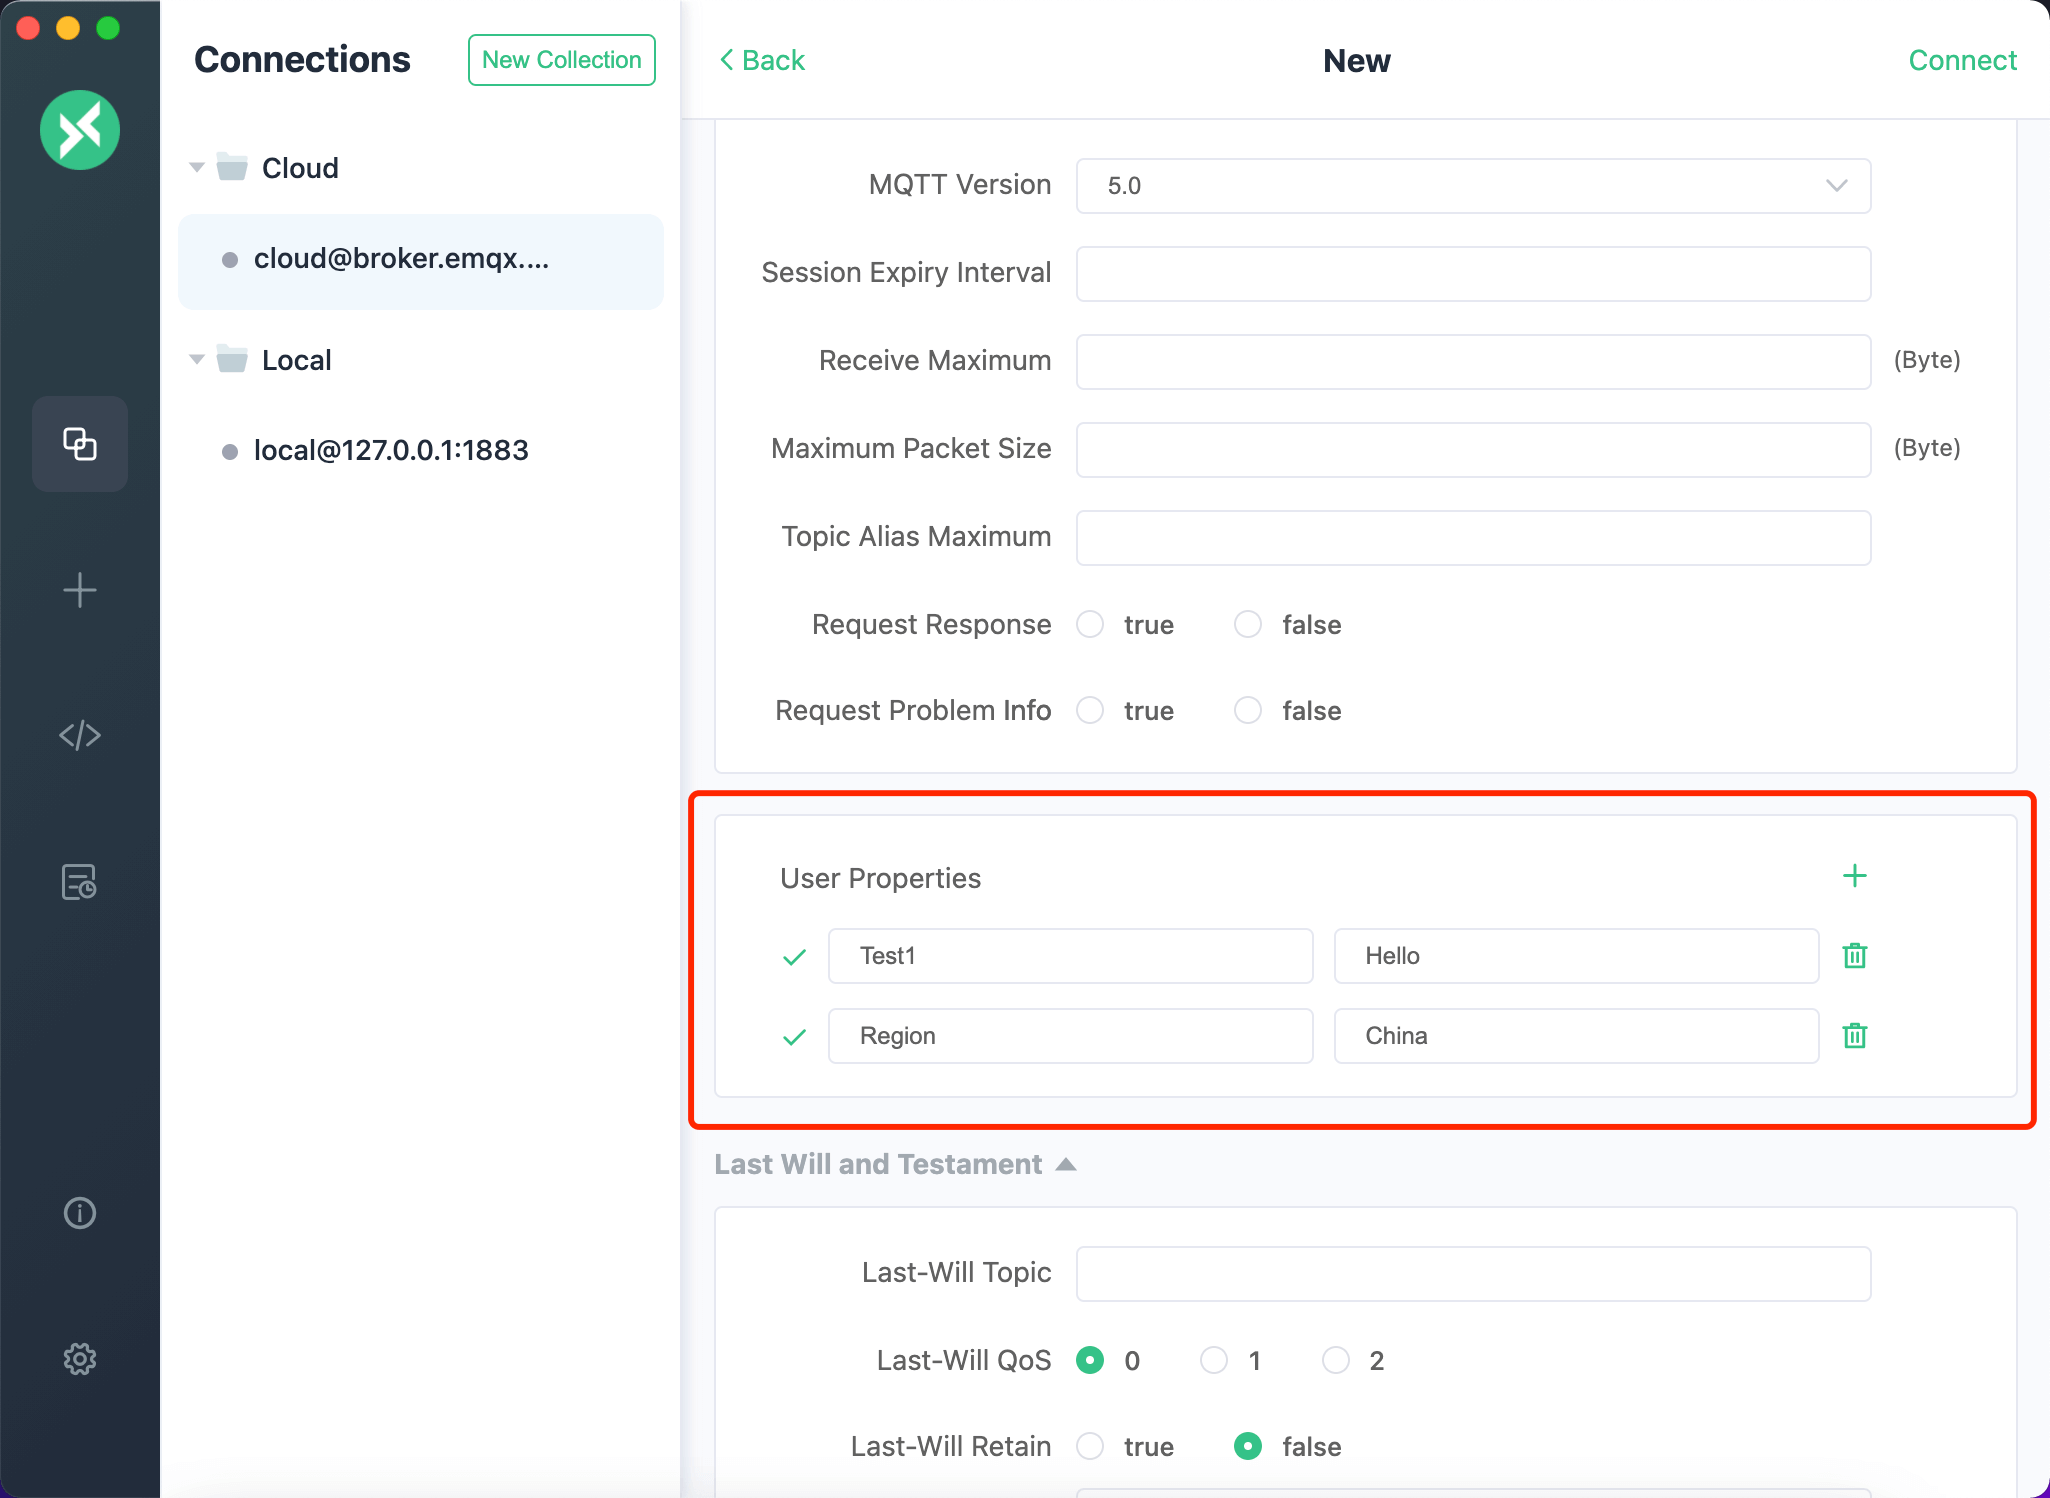
User Properties
To begin configuring User Properties, navigate to the New Client page by clicking on the New button. Firstly, ensure that the MQTT version selected is 5.0.
You will then notice a card at the bottom of the page specifically for User Properties configuration. This card displays a configurable input box for key-value pairs. To add User Properties, click on the Add button found at the upper right corner of the card. You may also delete configurations by clicking on the Delete button at the end of each line.
To finalize your configuration, enter the necessary key-value pairs, including the name and the corresponding content of the property. Upon establishing a successful connection, the MQTT server will then access the content of the client's User Properties.
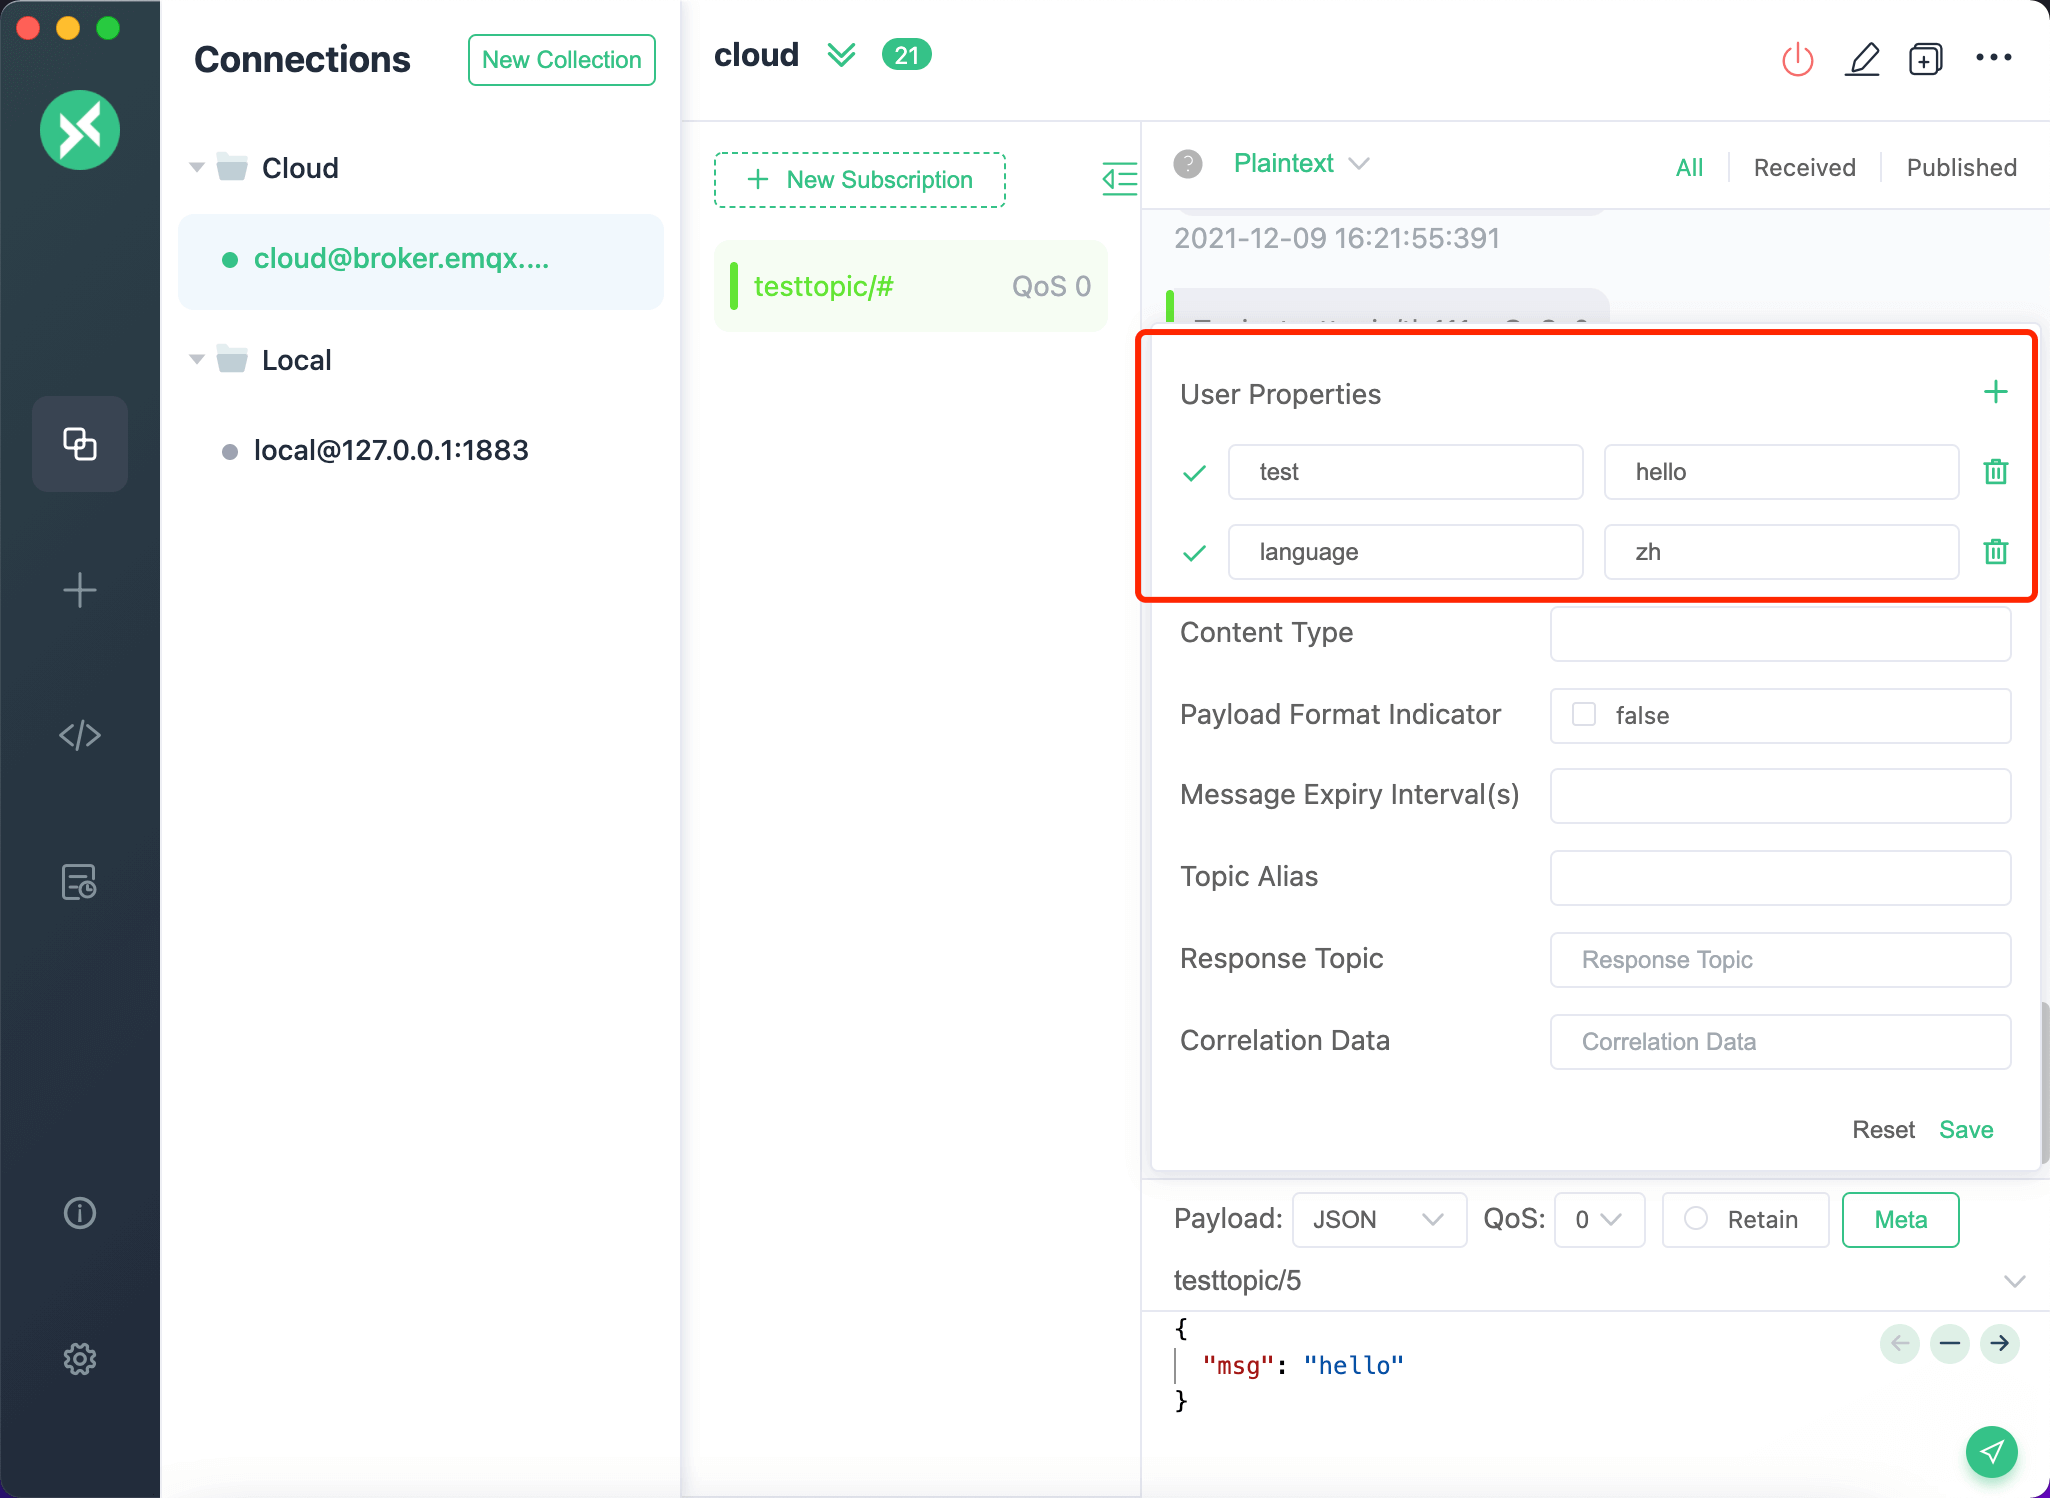
Note: User properties configuration is not only available when initiating a client connection. You can also configure user properties when publishing messages. When establishing a new connection with an MQTT 5.0 client, you'll notice a Meta button at the bottom right of the publish message area. Clicking this button will reveal a card that allows you to configure properties at the time of publishing. The user properties configuration can be found at the top of this card.
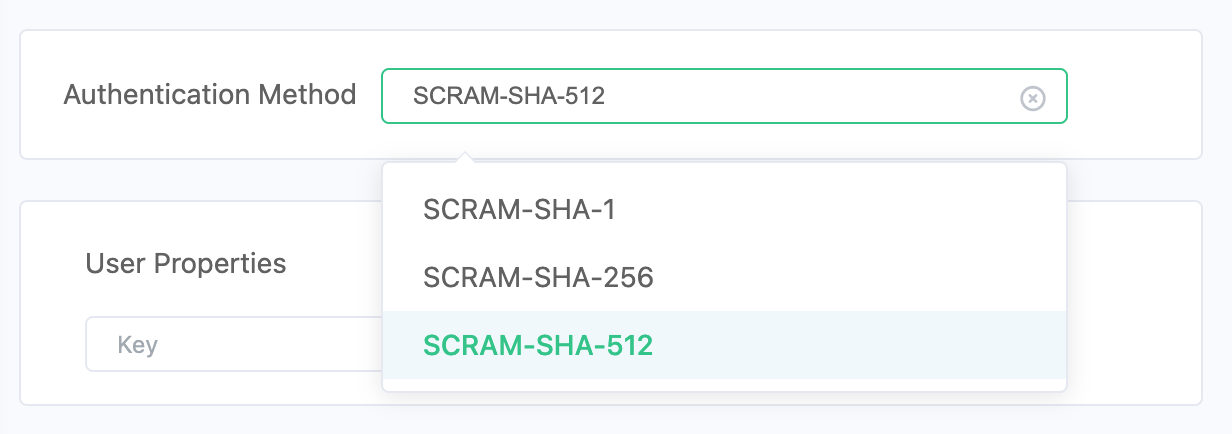
SCRAM Enhanced Authentication
MQTT 5.0 supports SCRAM (Salted Challenge Response Authentication Mechanism) enhanced authentication. When your MQTT broker (such as EMQX) has SCRAM authentication enabled, you can select the desired authentication method from the Authentication Method dropdown in the connection configuration. MQTTX supports:
- SCRAM-SHA-1
- SCRAM-SHA-256
- SCRAM-SHA-512
Simply select your preferred SCRAM method and connect to the broker using your username and password.
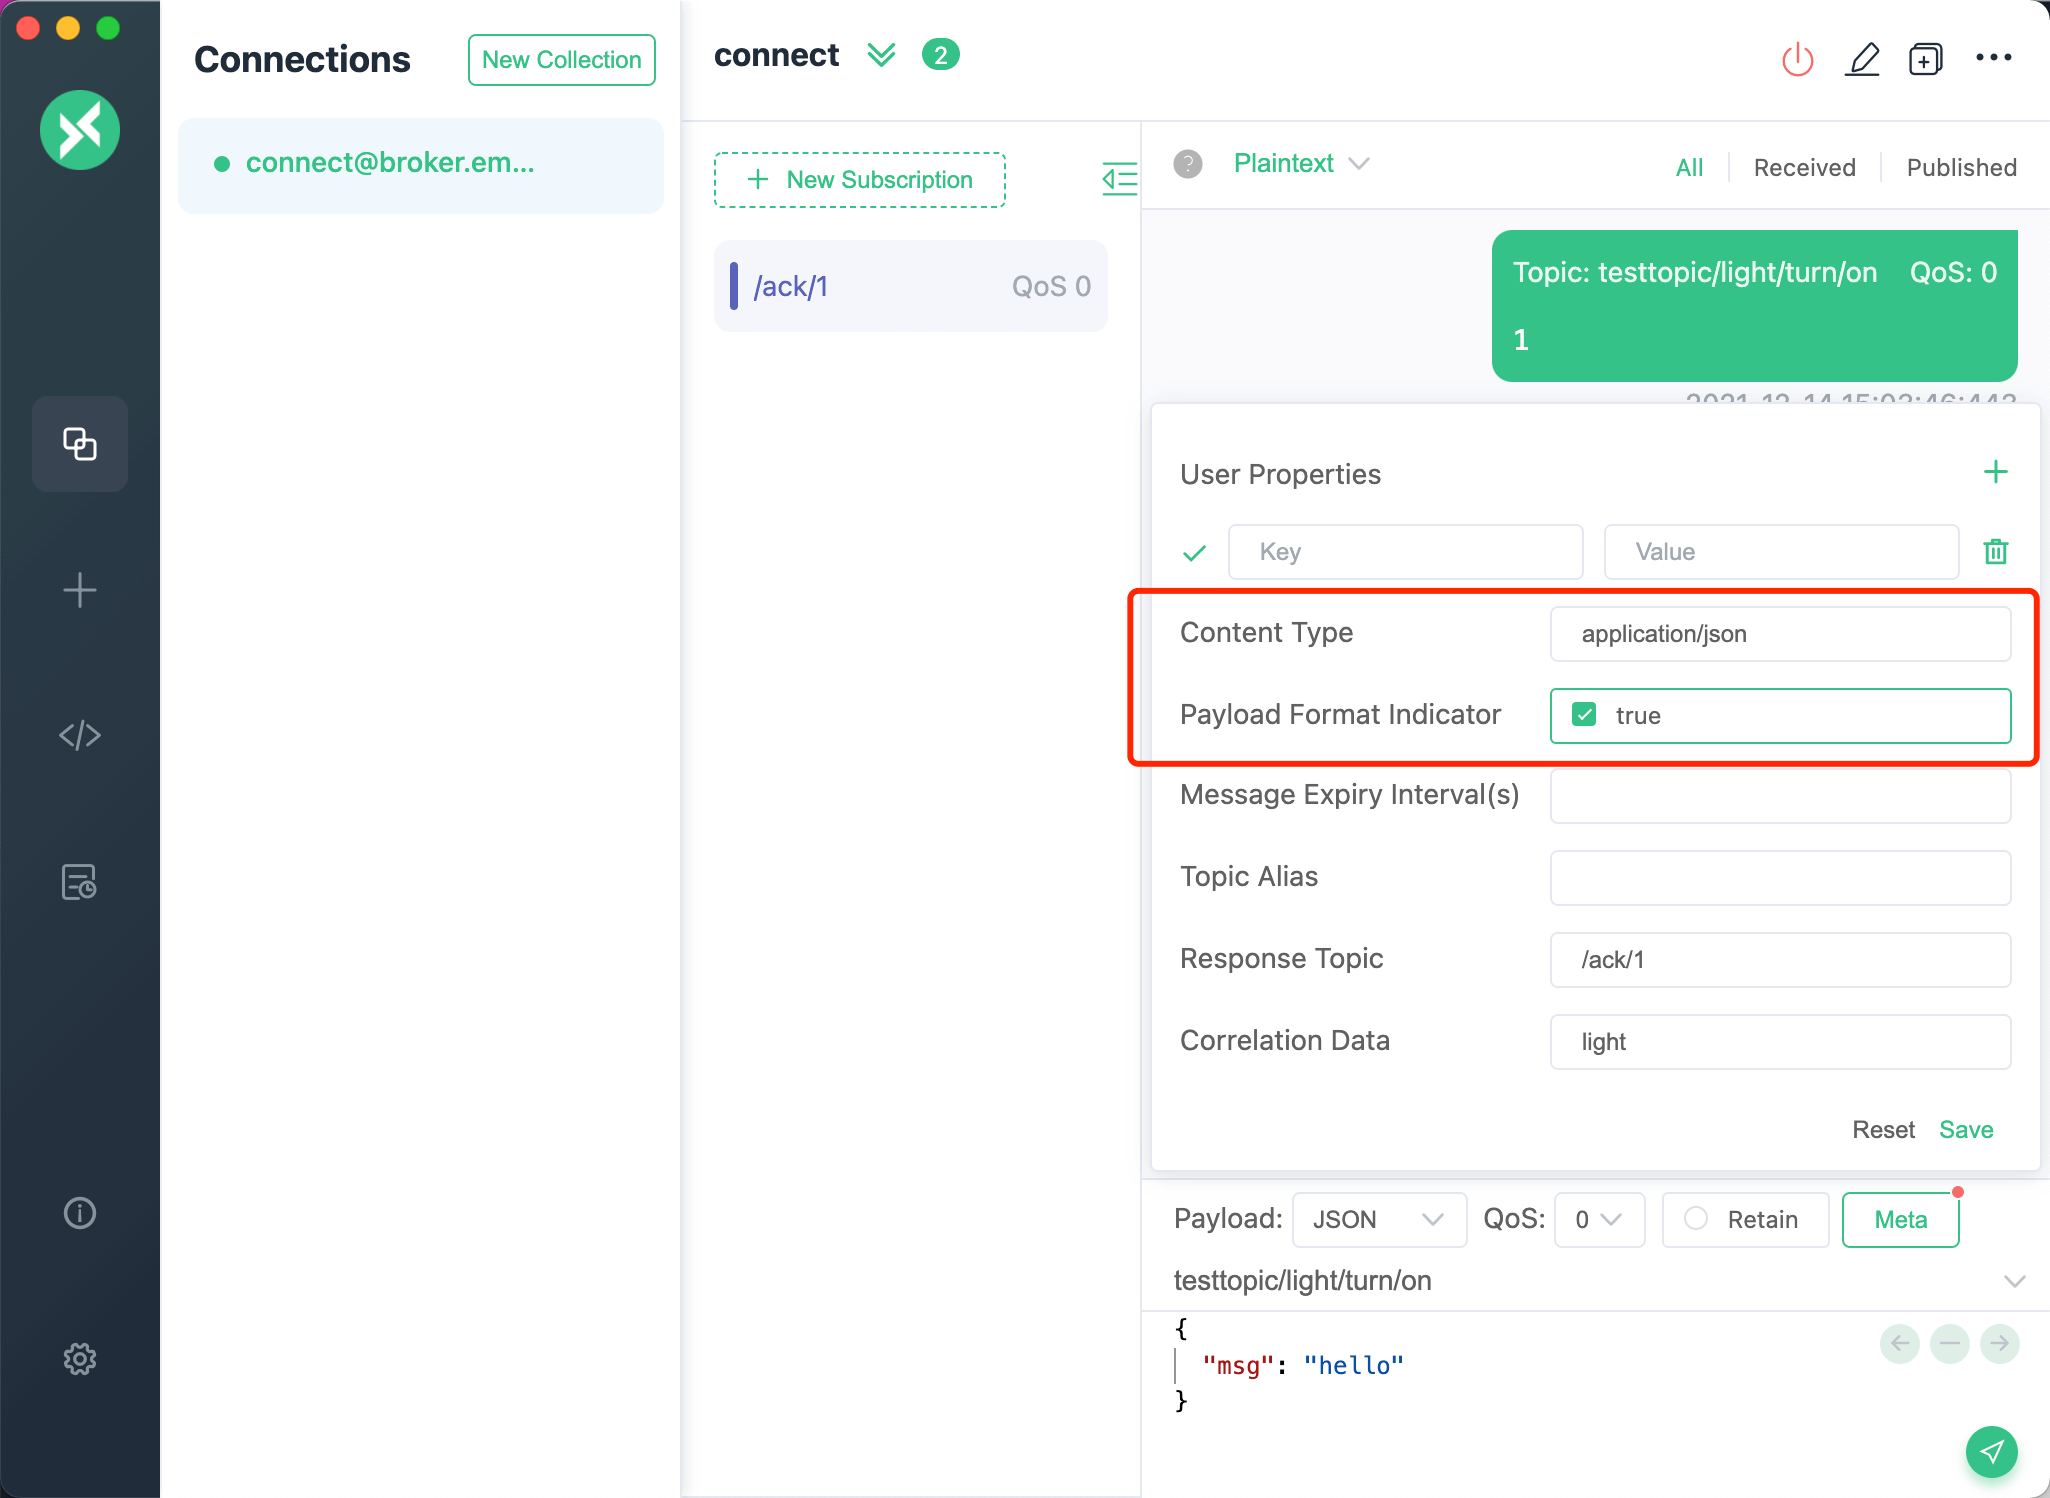
Request Response
To configure a Request Response, click the Meta button and input a Response Topic, such as /ack/1, in the provided field. Next, input comparison data (for example, "light"), and subscribe to /ack/1 with the currently connected client.

Content-Type and Payload Format Indicator
Setting the Content-Type and Payload Format Indicator requires a few steps. Start by clicking the Meta button, then enter the Content-Type in the input field. Following this, select Set Payload Format Indicator value, and finally, publish the message.
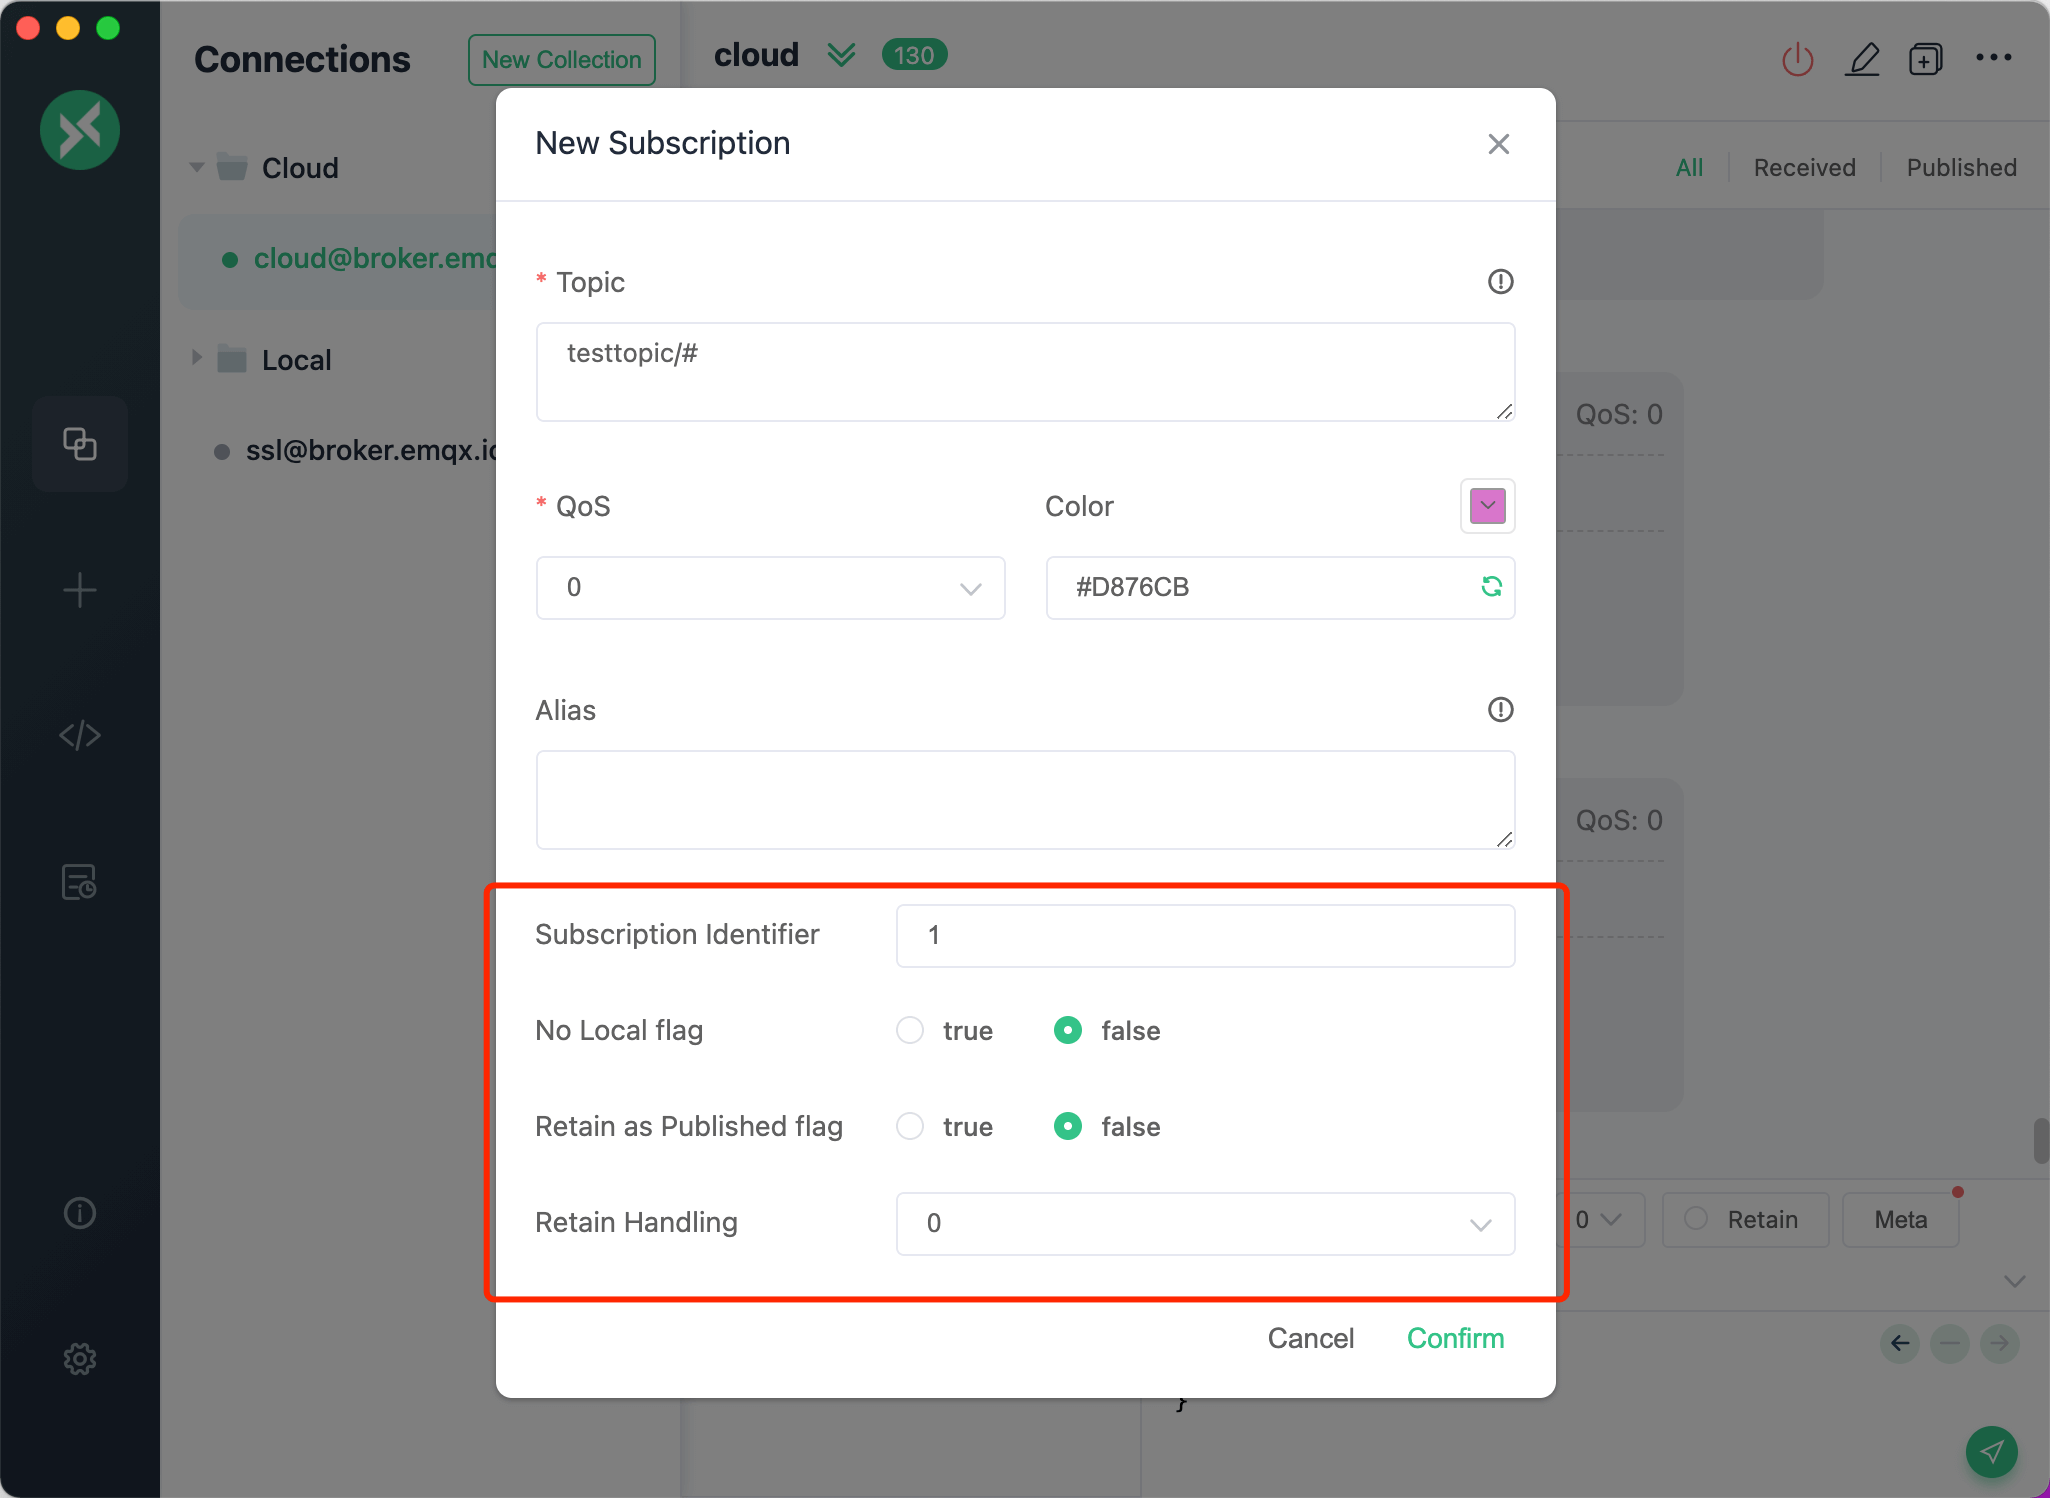
Subscription Identifier and Options
To access the Subscription Identifier and Subscription Options, open the pop-up box for the Subscription topic. Here, you can set the Subscription Identifier and configure Subscription Options which include No Local, Retain as Published, and Retain Handling.
Users can specify a numeric subscription identifier in the subscription message. This identifier will be returned when the message is distributed. By establishing a mapping of subscription identifiers to message handlers, clients can direct messages to the appropriate message handler via the subscription identifier when a PUBLISH message is received. The server's behavior can be adjusted through the configuration of these subscription options.
Settings
The settings can be accessed by clicking the button located at the bottom of the left menu bar or by using a shortcut. macOS users can use command +, while other users can use control +,. The settings page includes several options categorized into General, Appearance, and Advanced sections.
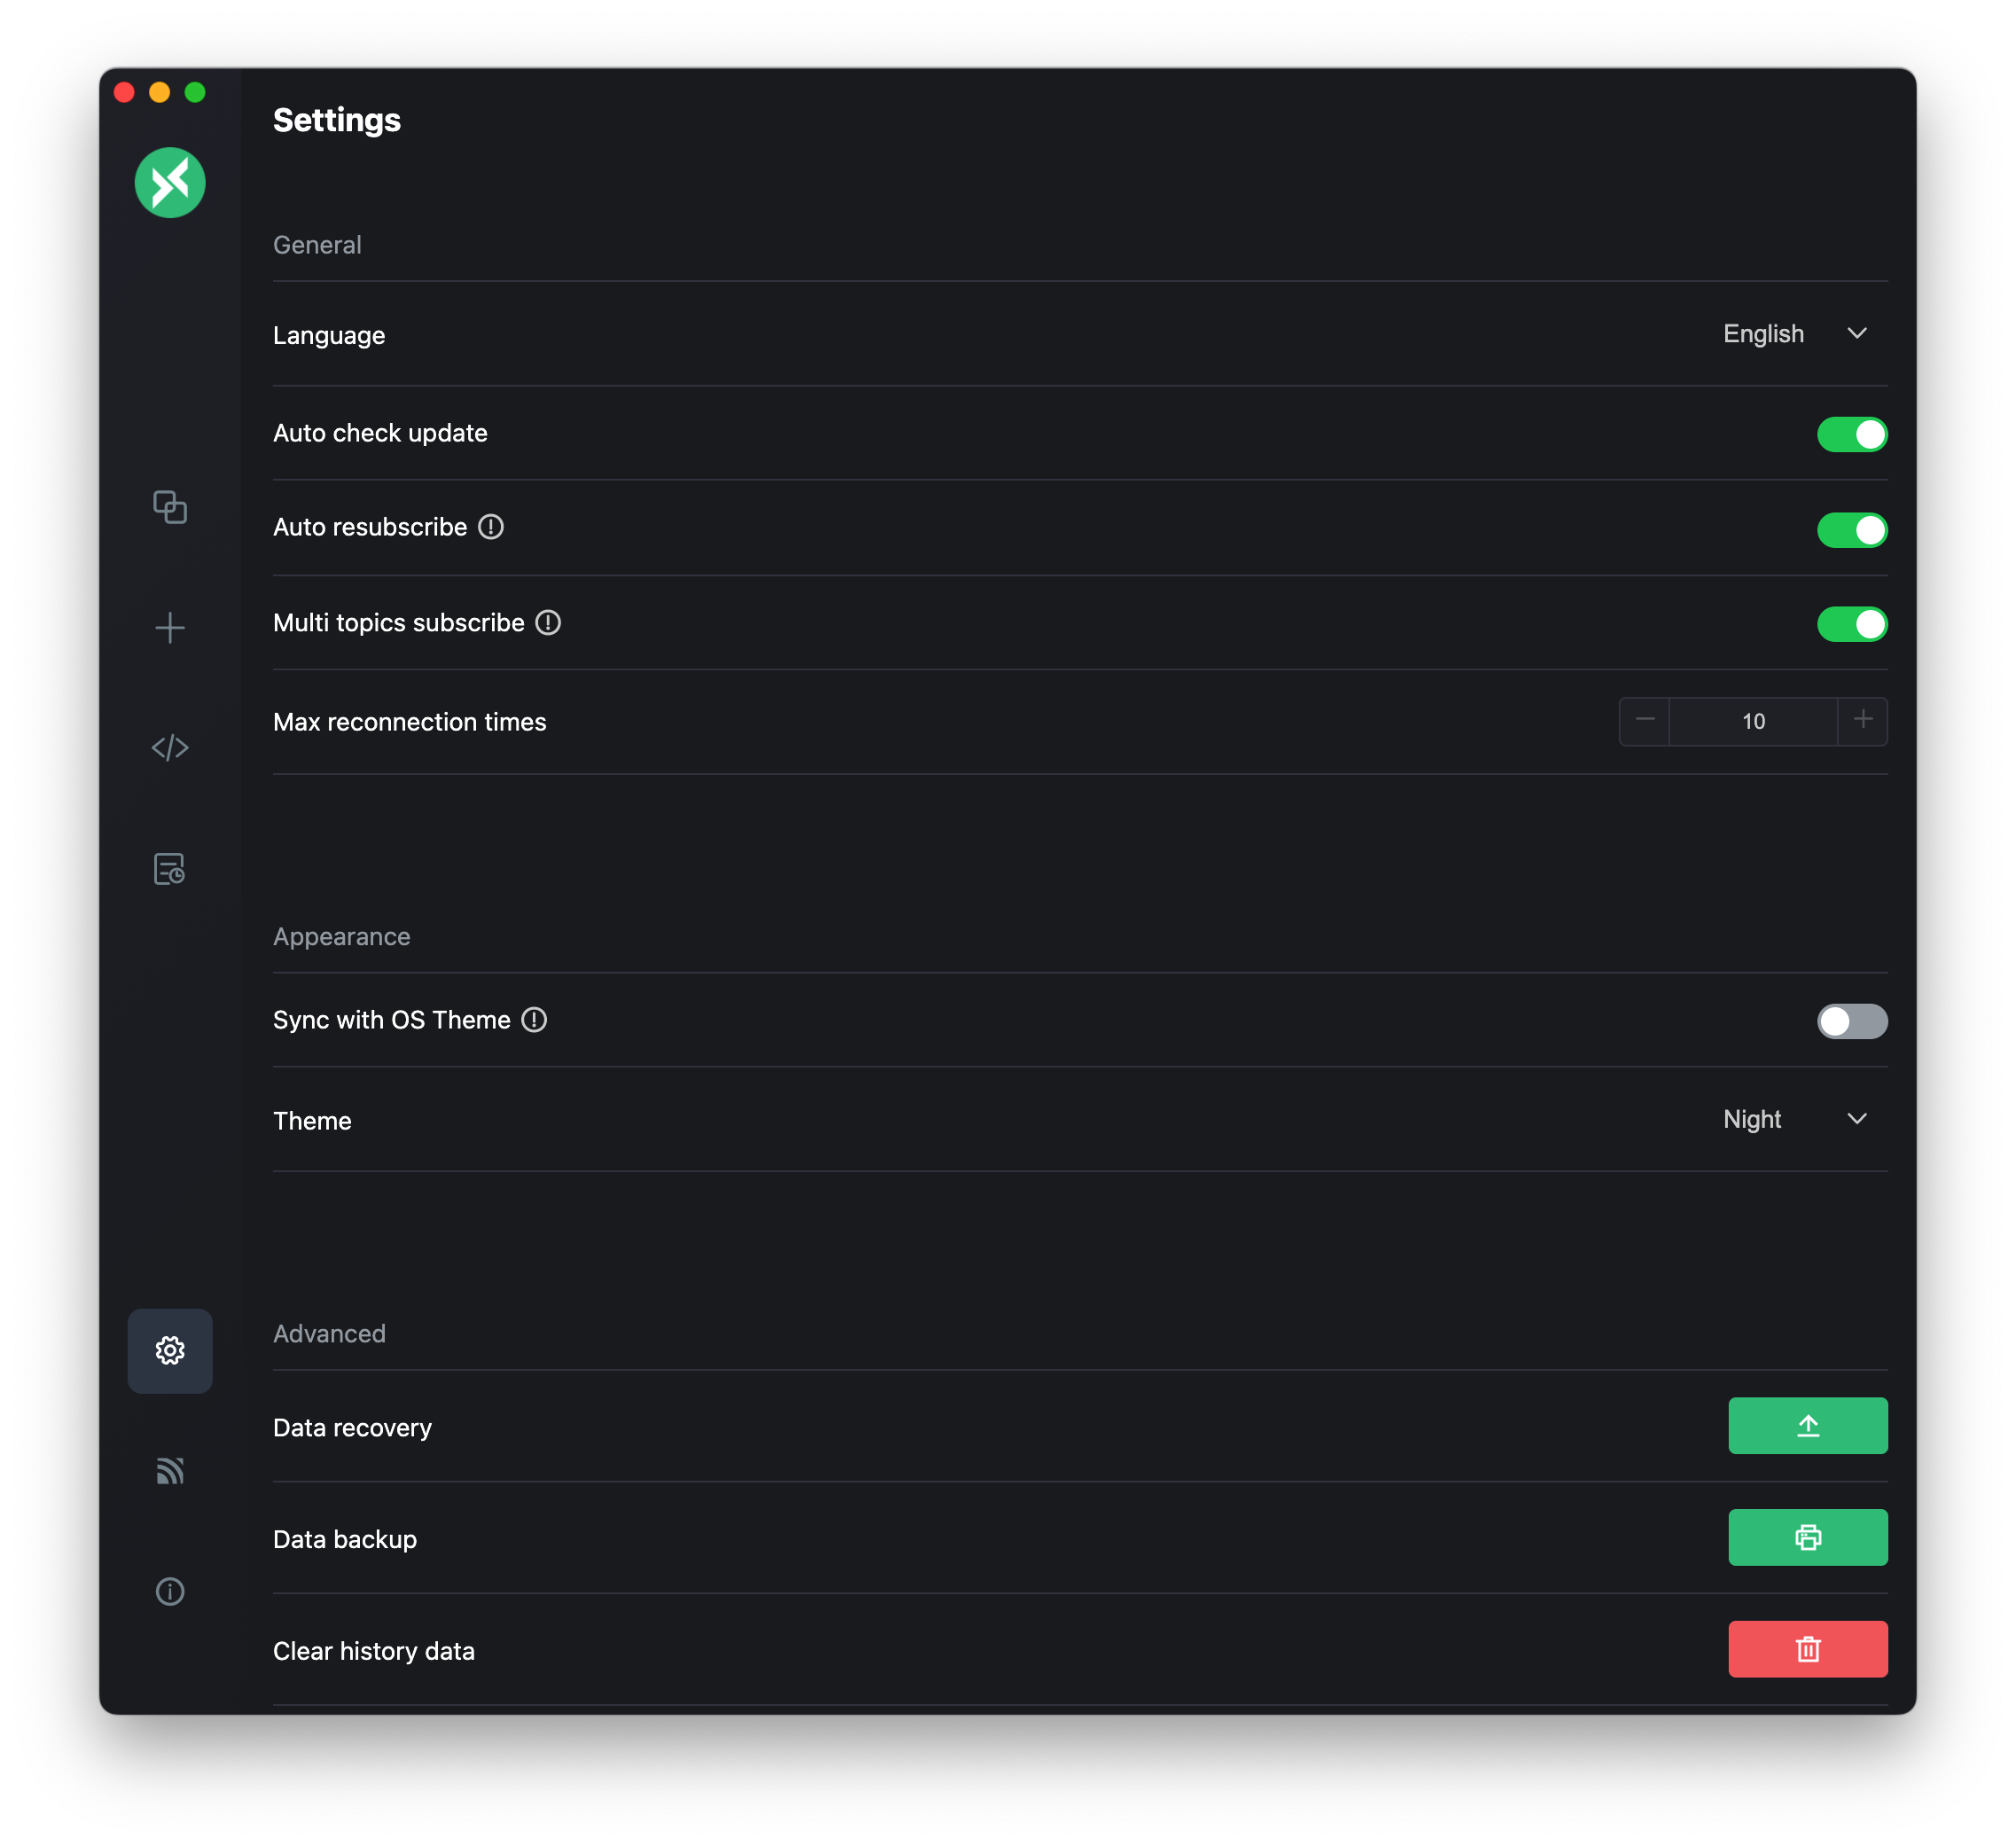
General
The General settings allow for basic operational customizations of MQTTX. Here, you can select your preferred language, enable or disable automatic updates, enable multi-topic subscriptions, and set the maximum number of reconnection attempts to maintain connection continuity under unstable network conditions.
Appearance
The Appearance settings allow you to customize the look of your MQTTX interface. You can choose from three themes: Light, Dark, and Night. Alternatively, there is also an option to synchronize the MQTTX theme with your operating system for a consistent user experience.
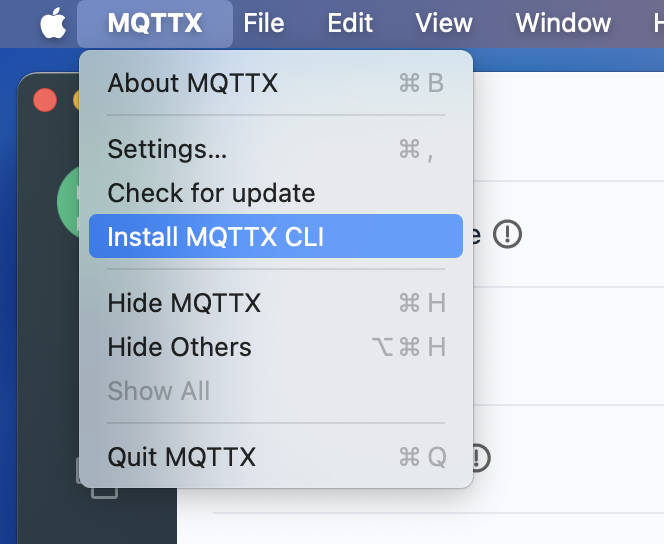
Install MQTTX CLI
From v1.10.1 onwards, the MQTTX desktop client supports a one-click installation of the MQTTX CLI tool. Users only need to click the install button to automate the entire setup process through a user-friendly graphical interface, avoiding manual downloads and configurations. This feature ensures that the latest version of the MQTTX CLI is easily accessible, enhancing usability in various operational environments.
Installation Steps:
- Navigate to the settings page, find the MQTTX CLI section, and click the install button.
- Alternatively, select the 'Install MQTTX CLI' option from the top menu.
Once clicked, the client automatically downloads and installs the required package for your system. You might need to enter a password to grant installation permissions. After installation, the mqttx command is ready to use from any command-line window.
Note: For Windows users, after clicking install, you need to manually download the MQTTX CLI executable file and use it in the corresponding directory.

Advanced (Data Management)
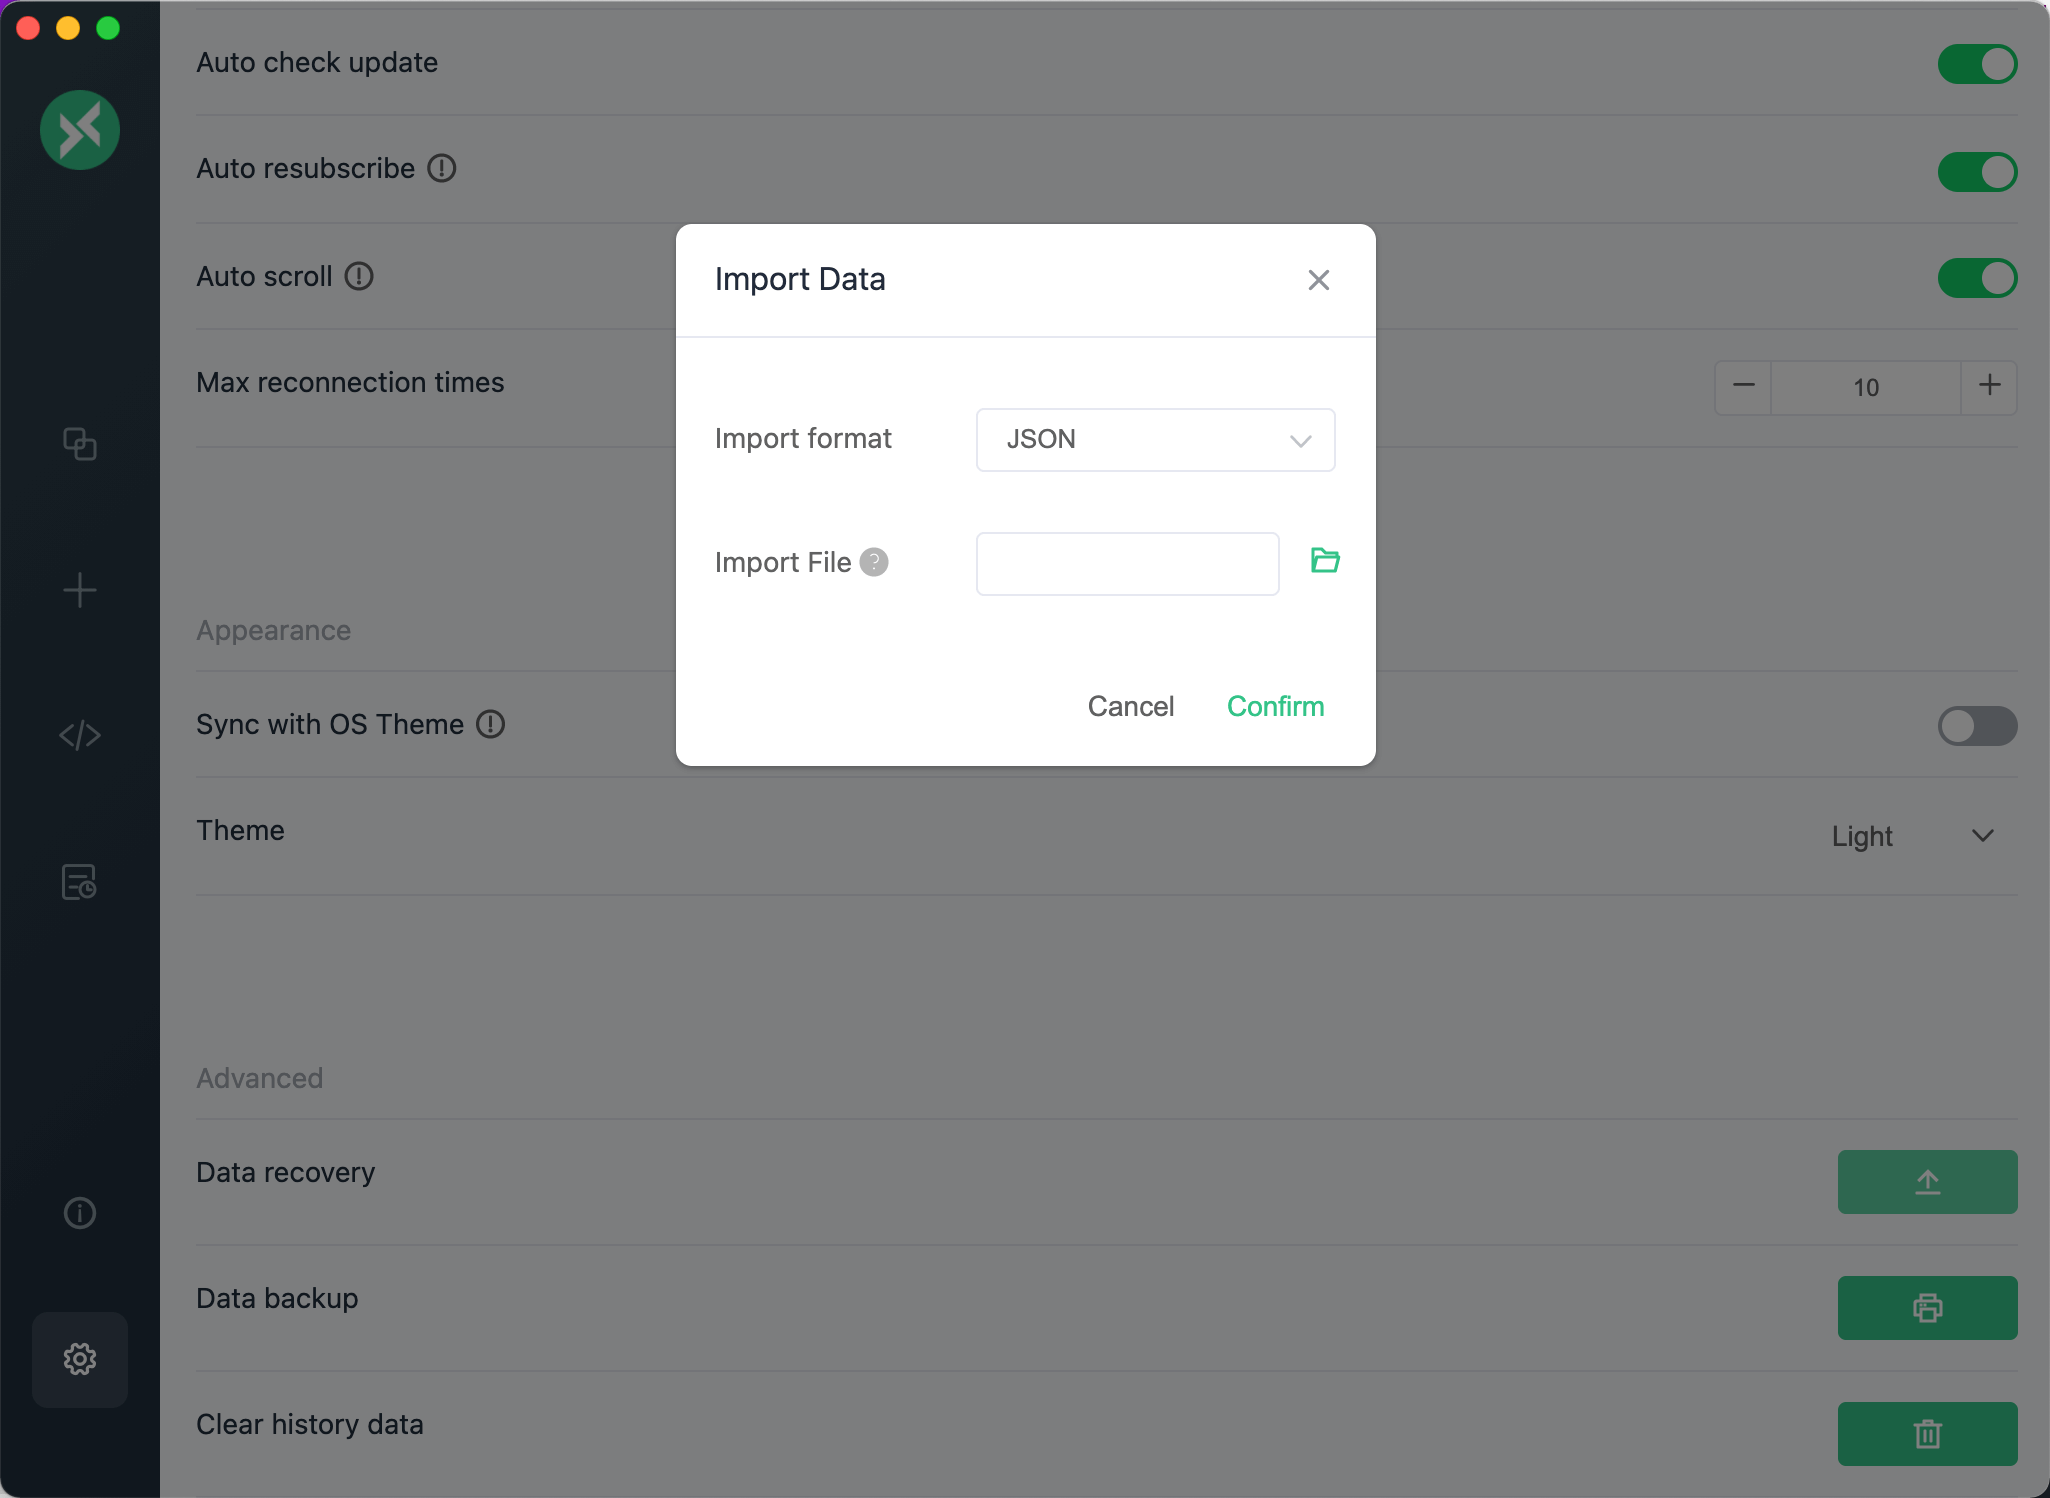
In the Advanced settings, you find more specific customization options, including data backup, recovery, and history clearing.
For data backup, all connection data, including all received and sent messages, are exported, ensuring the safety of your connection information and message history. During data recovery, you'll select the path of the file to import. Once you've confirmed the file path, your data is restored. Supported file formats for these operations include JSON, XML, CSV, Excel, and YAML.
If necessary, you can clear your history to manage your data usage or protect your privacy.
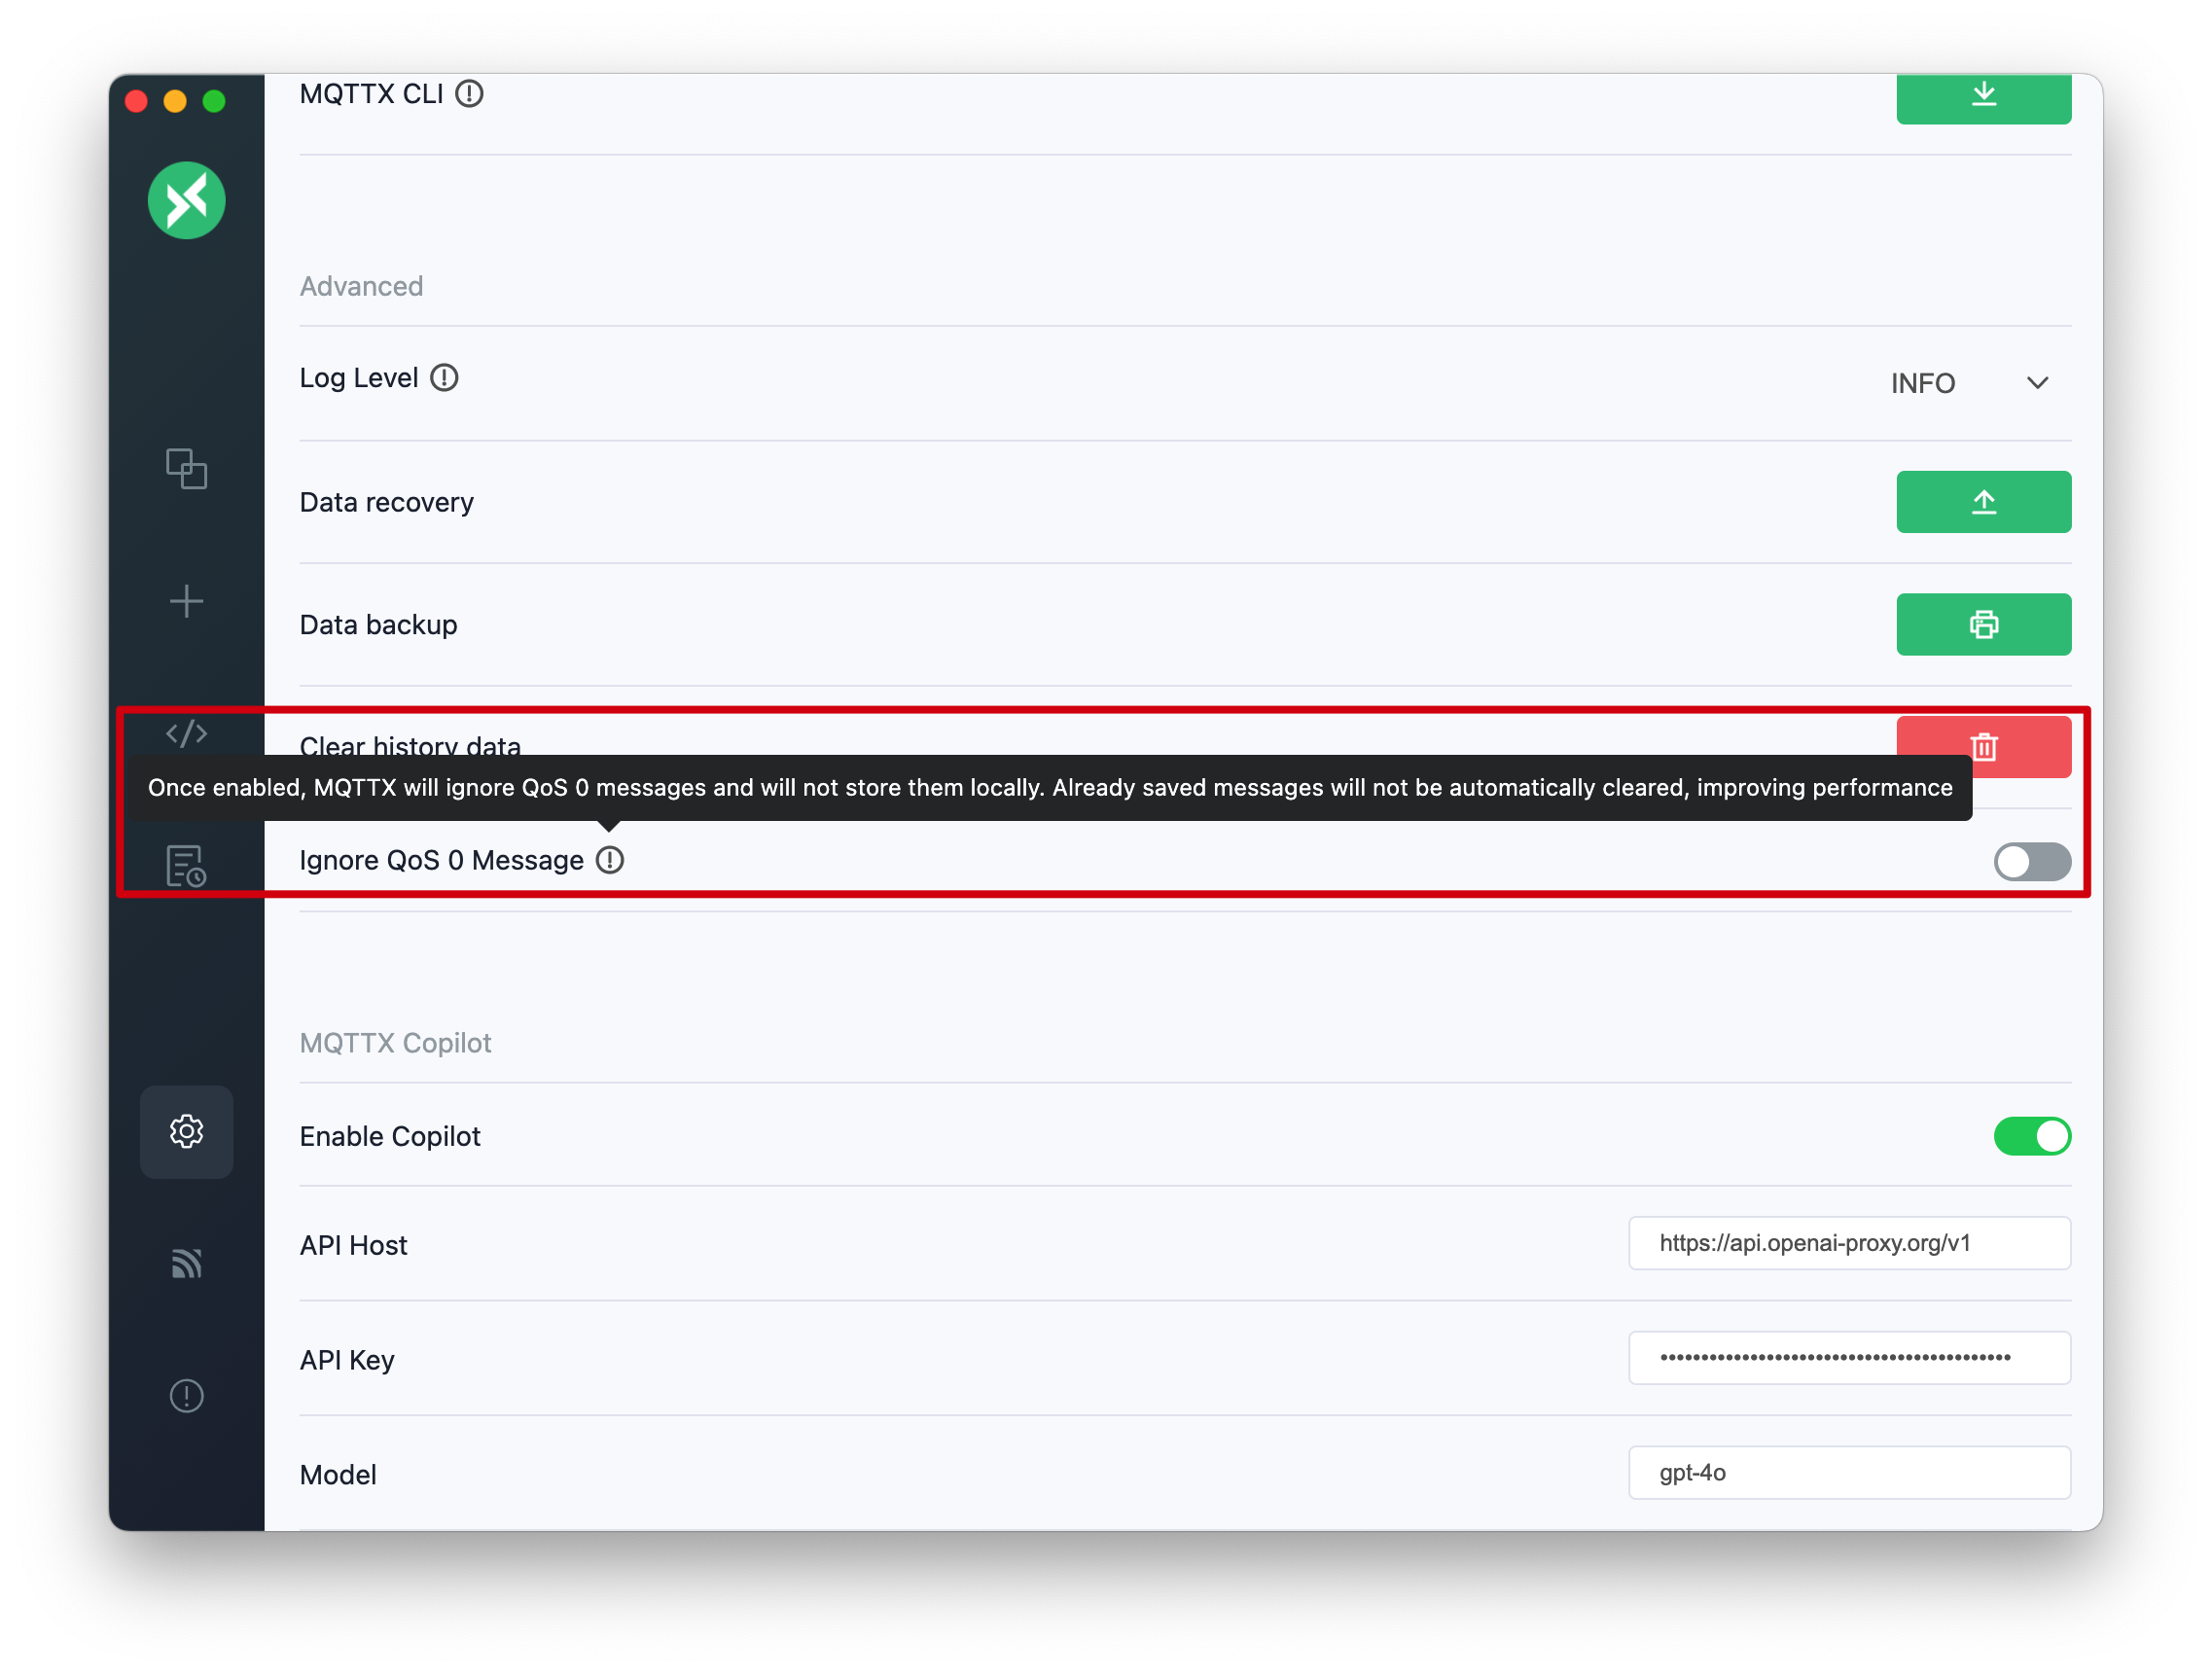
Ignore QoS 0 Message
In the settings, you can choose to enable or disable the feature to ignore QoS 0 messages. QoS 0 (Quality of Service level 0) messages are the most basic form of message delivery, offering no guarantee of delivery and no retries. For certain application scenarios, you may want to ignore these messages to reduce unnecessary network traffic or processing overhead.
Steps to Configure
- Open the settings page.
- Locate the "Ignore QoS 0 Message" option.
- Toggle the switch to "On" or "Off" as desired.
Feature Description
- Enabled: MQTTX will ignore QoS 0 messages. These messages will only be displayed on the page but not stored locally, thus improving performance and reducing unnecessary storage overhead.
- Disabled: All QoS 0 messages will be received and processed normally.
Note: Previously saved QoS 0 messages will not be automatically cleared.
Script
Function
This feature allows users to write customized function code according to specific needs or scenarios, freely adjusting and transforming the content and format of the Payload for more refined data management and processing. If combined with the timing sending function, it can realize automation testing of simulated data reports, etc.
Examples of custom functions can be found in the scripts-example/function folder. If you have better and more practical scripts in use, you can submit your code here so that more people can use it.
JavaScript
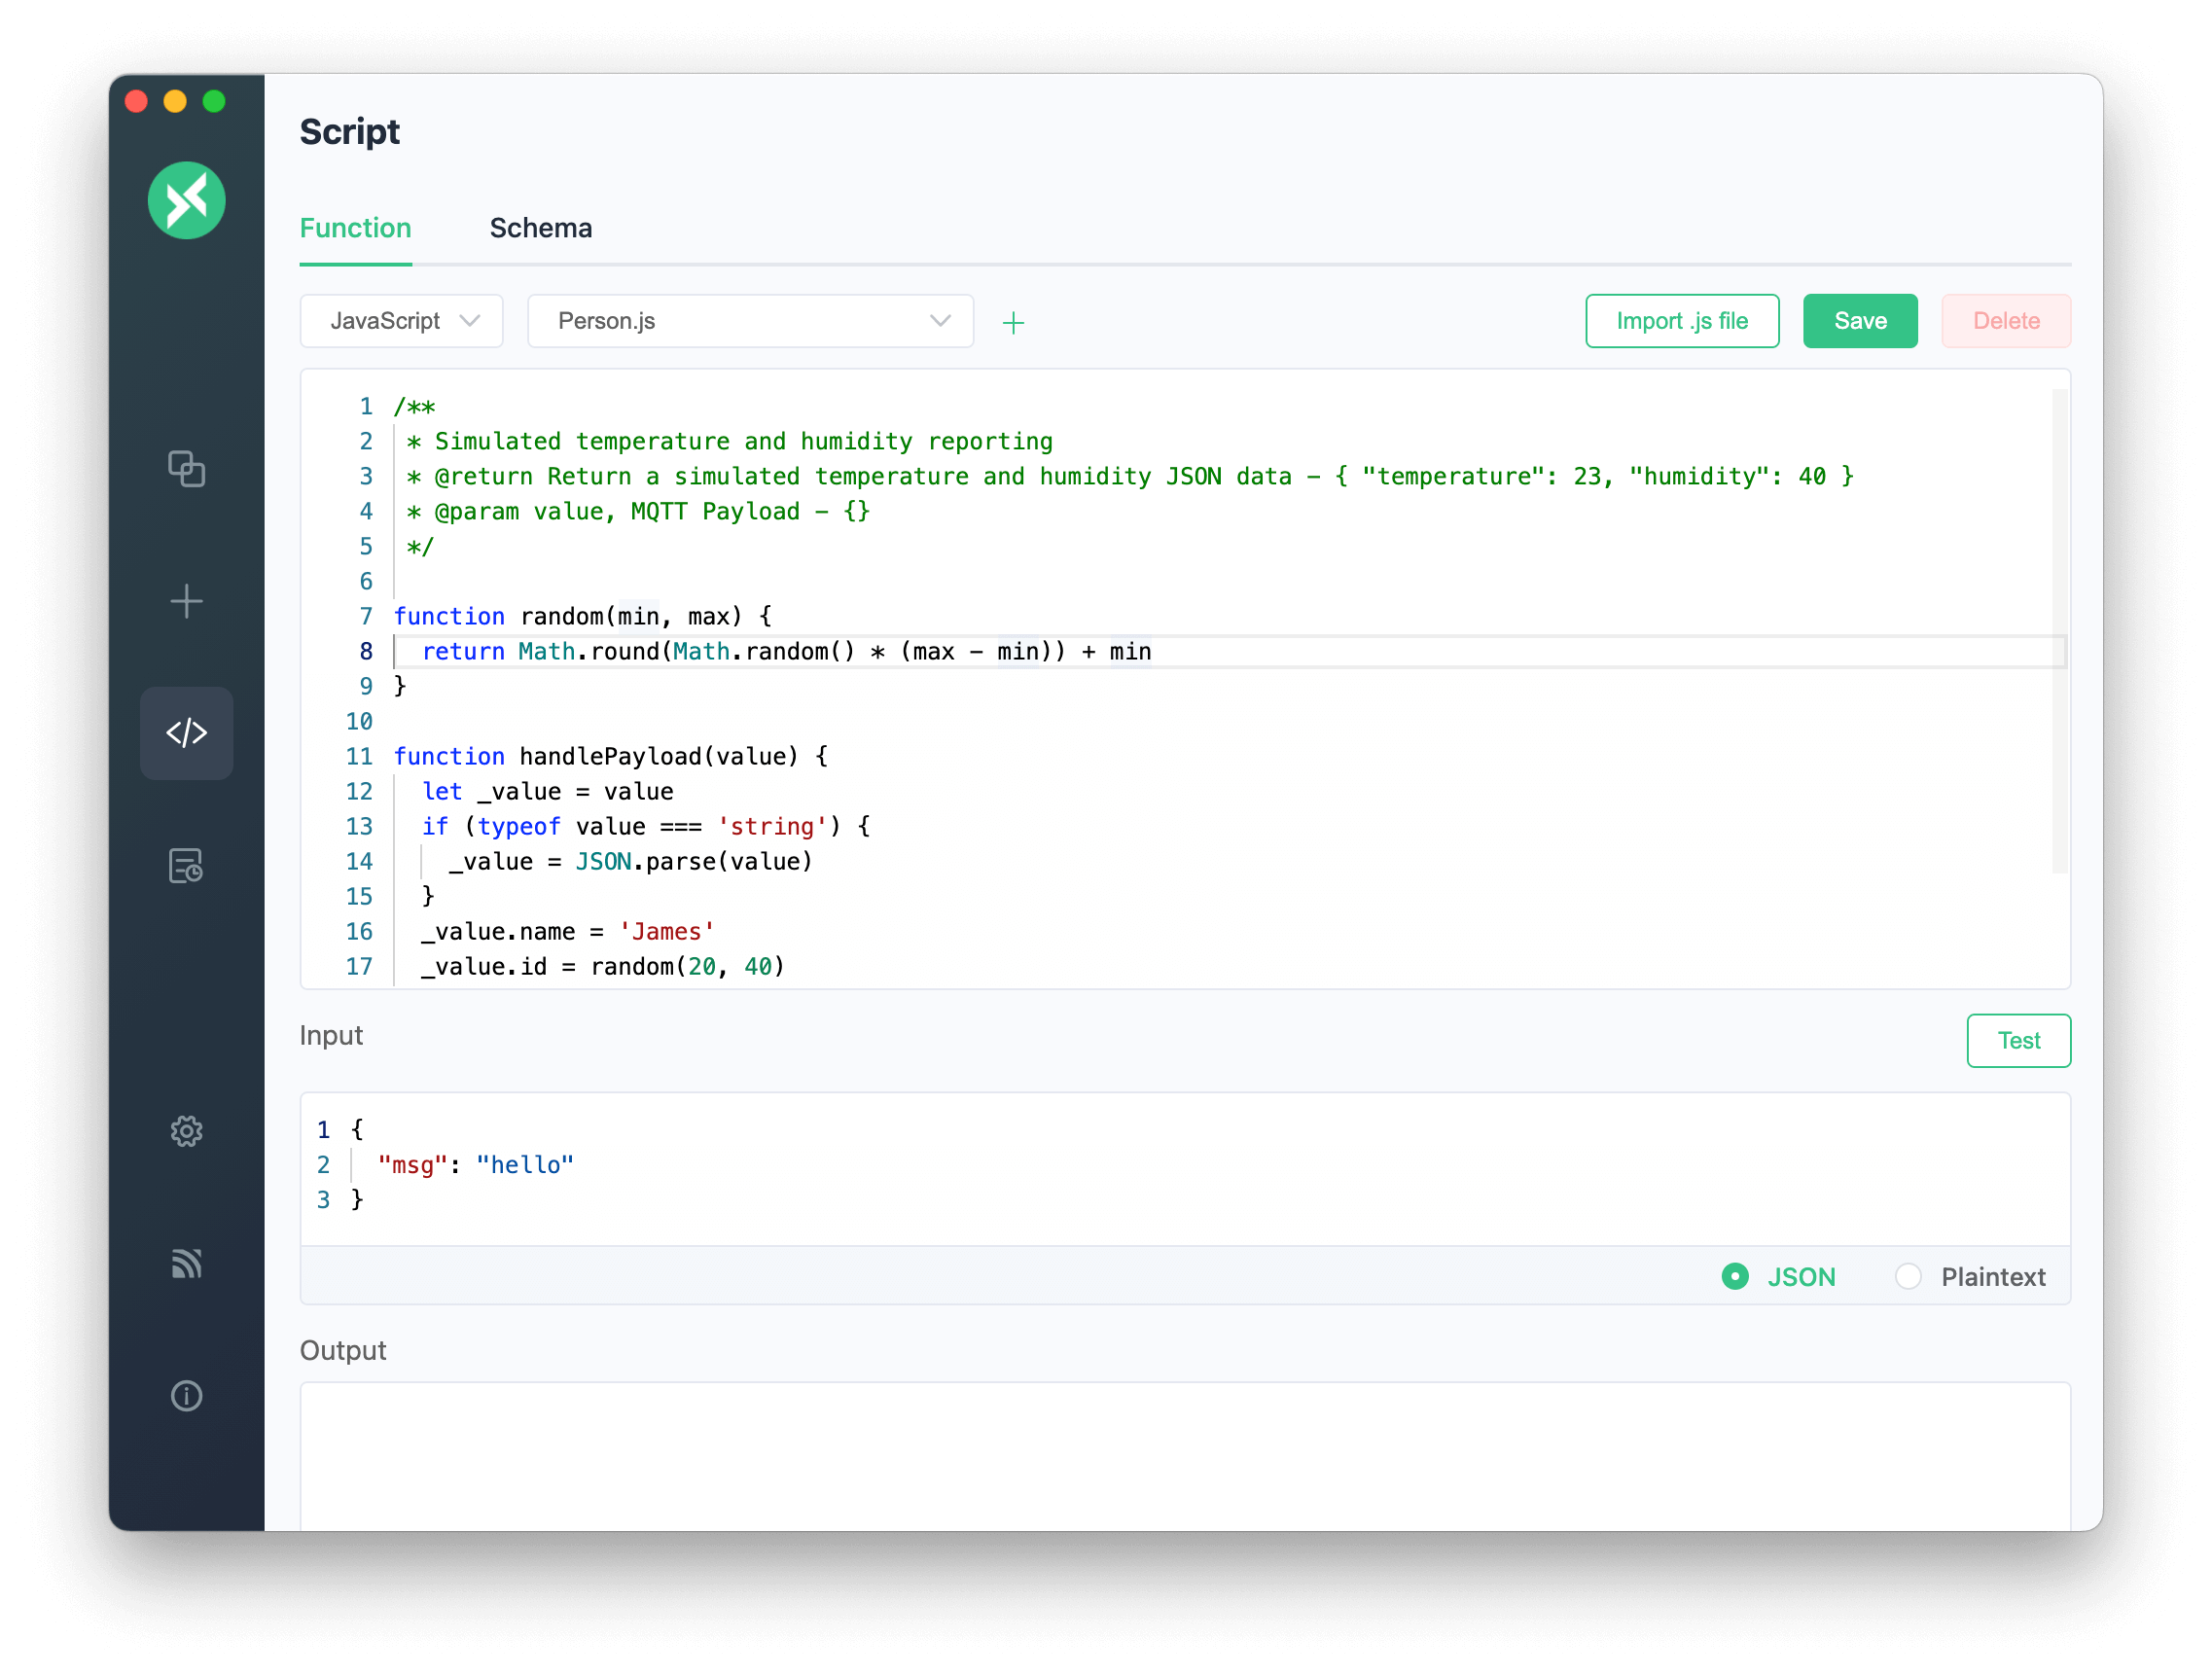
Click the Script button in the left menu to enter the script editing page. In the Function page, users can write JavaScript code in the code editor at the top. There is only one global execute API, users need to write a custom function that accepts a value parameter, which is the Payload. The function can customize and modify value, and finally execute the custom function through execute.
There is also an Input and Output box below, where you can enter the expected input value. Click the Test button on the right to view the execution result in the Output box. The format of the input value includes JSON and Plaintext, which is convenient for users to debug the custom function in advance. After testing, you can click the Save button in the upper right corner, enter the custom function name and save the custom function. After saving, it can be used on the connection page, and the saved custom functions can also be edited and deleted.
The default JavaScript function example is as follows:
/**
* @description: Default script
* @param {any} value - Payload
* @param {string} msgType - Message type, the value is 'received' or 'publish'
* @param {number} index - The index of the message, only valid when the script is used to publish messages and enable timed messages
* @return {any} - Payload after script processing
*/
function handlePayload(value, msgType, index) {
  return value.msg
}
execute(handlePayload)
Schema
This feature allows users to write custom Schema files according to actual needs to encode and decode the sent and received Payload. In specific applications, users can write specific encoding and decoding rules according to data characteristics or specific application scenarios. This process is similar to designing a specific "language" for Payload and defining the translation rules of this "language" by writing encoding and decoding files. In this way, whether sending or receiving Payload, you can encode or decode according to these rules to ensure the correct understanding and effective transmission of data.
Examples of Schema can be found in the scripts-example/schema folder. If you have better and more practical encoding and decoding in use, you can submit your code here so that more people can use it.
Protocol Buffers
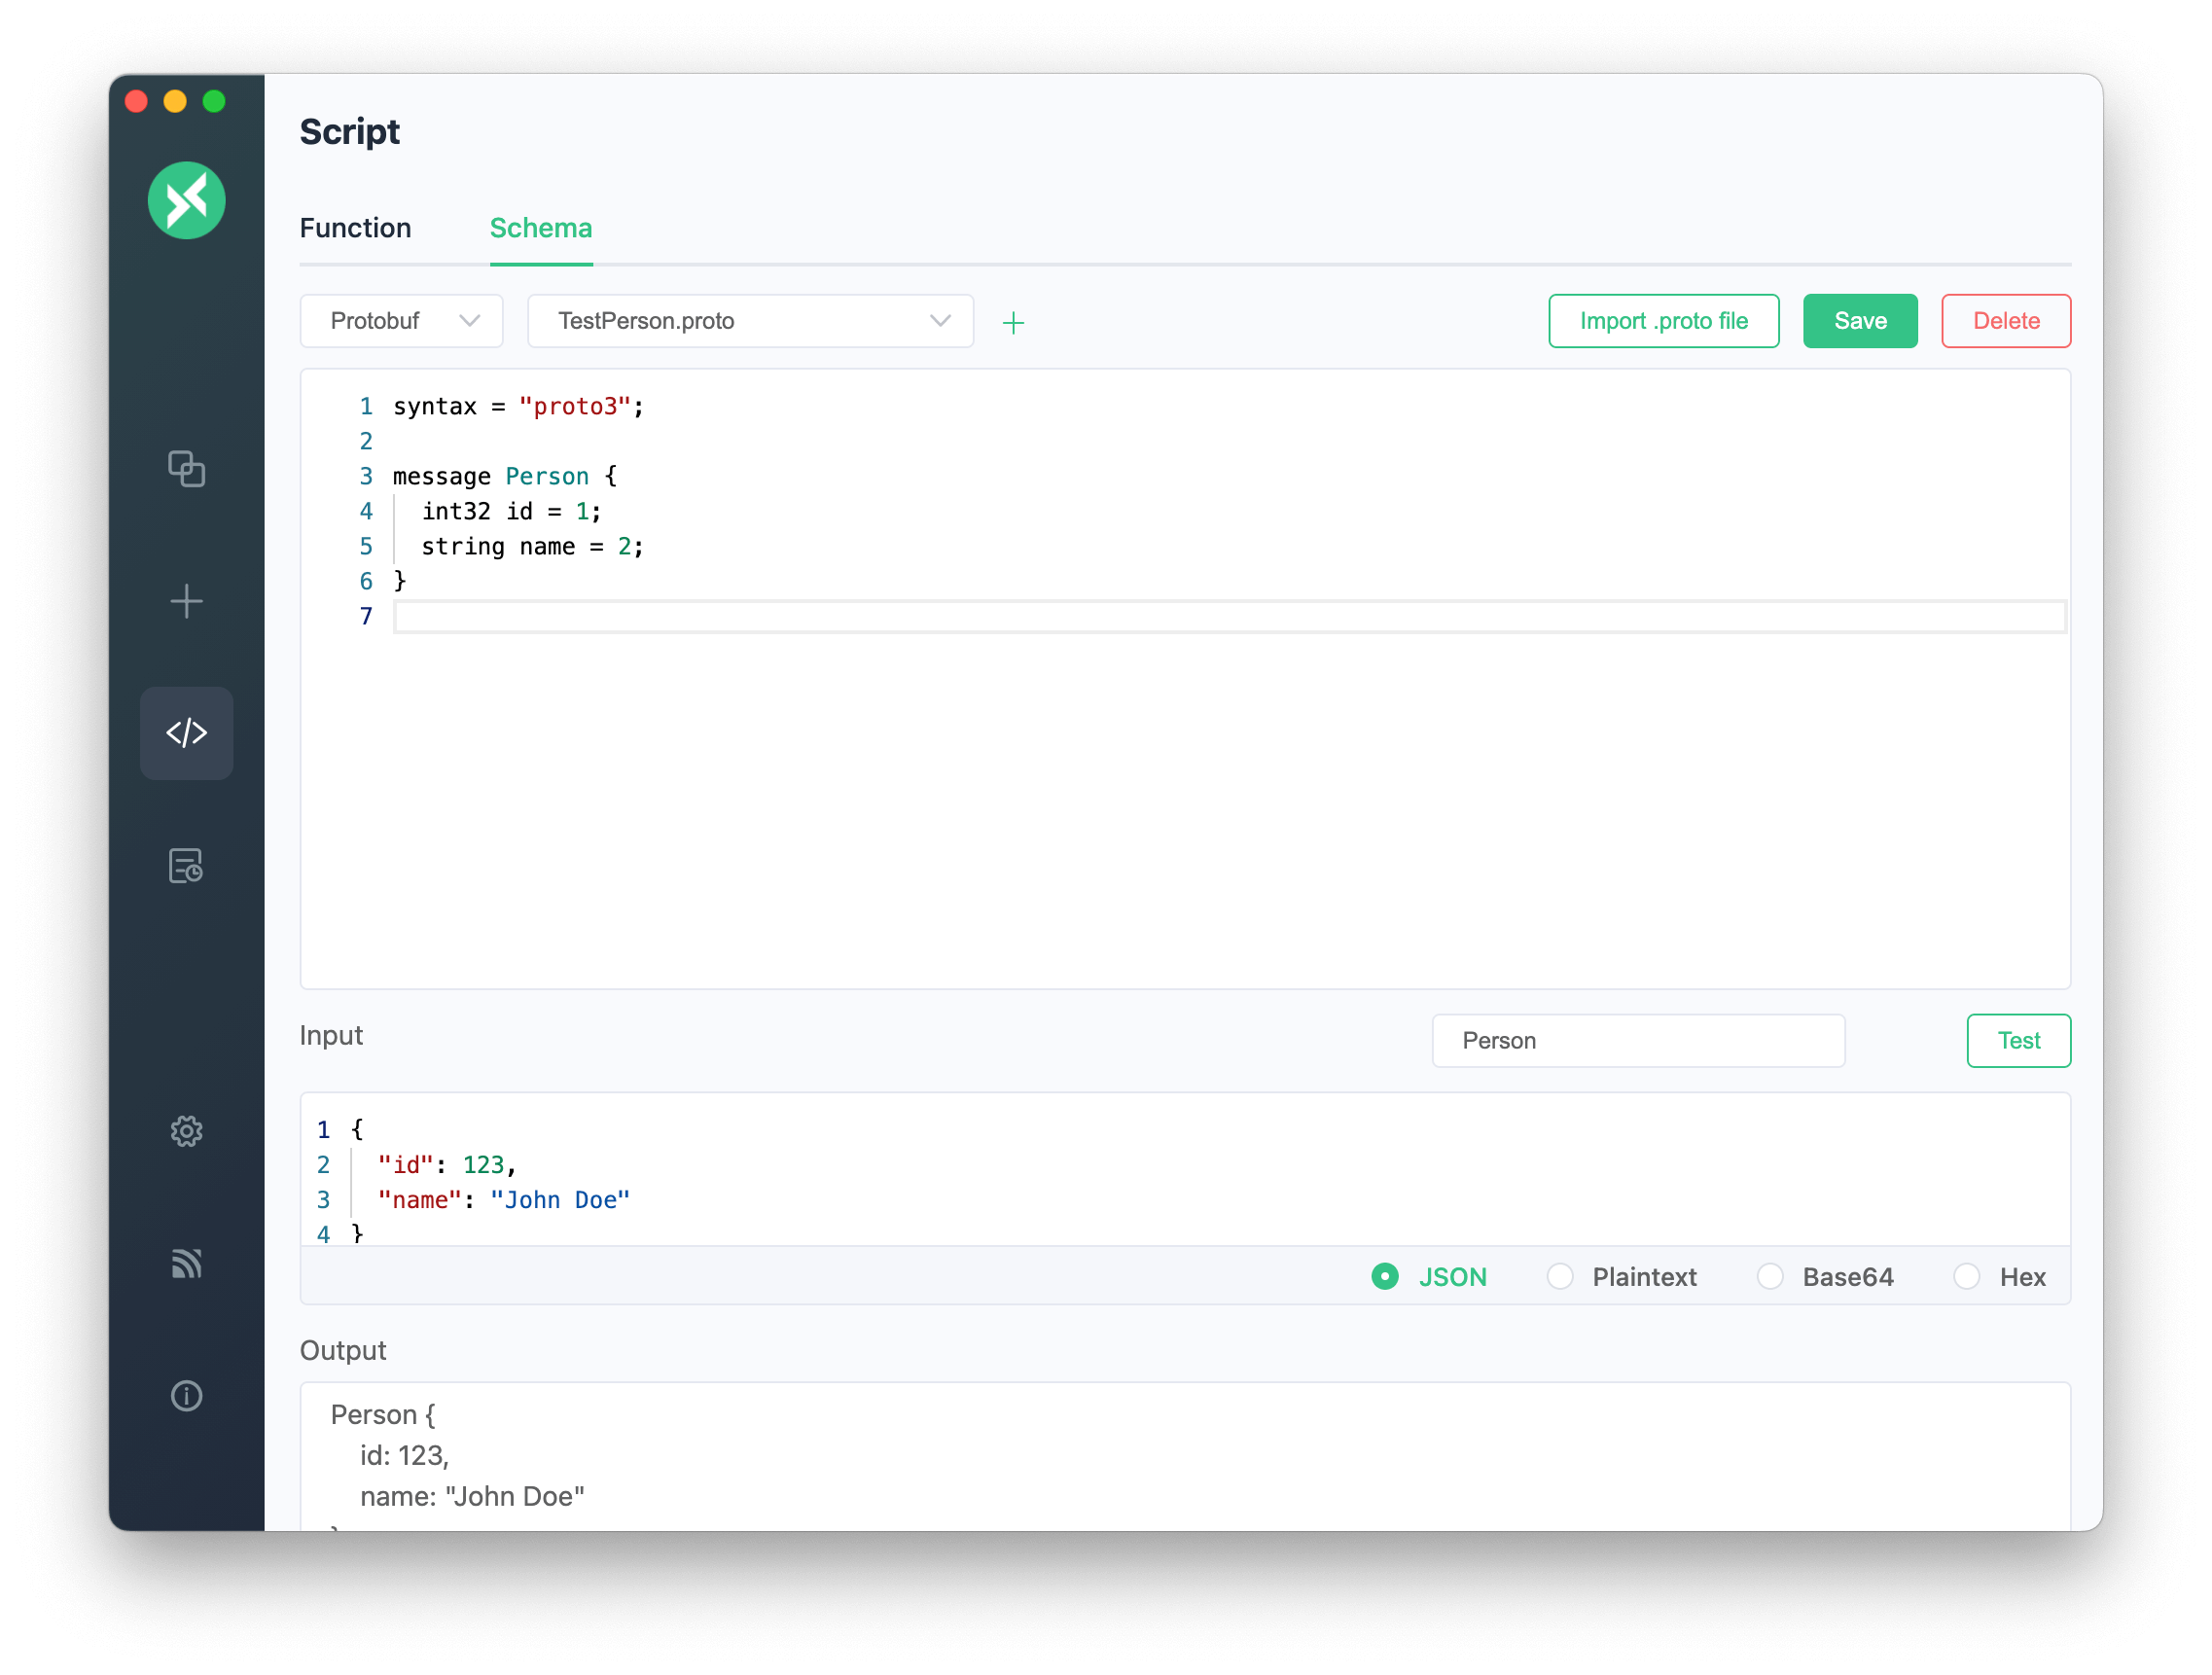
Click the Script button in the left menu to enter the script editing page. On the Schema page, users can select Protobuf from the dropdown box at the top, then write the proto file in the code editor.
There is also an Input and Output box below, where you can enter the expected input value. After entering the name of the defined message type, click the Test button on the right to view the execution result in the Output box. The format of the input value includes JSON, Plaintext, Base64, and Hex, which is convenient for users to debug the custom Schema in advance. After inputting JSON or JSON strings encoded with Base64 and Hex, and testing is completed, click the Save button in the upper right corner, enter the Schema name and save the Schema. After saving, it can be used on the connection page, and the saved Schema can also be edited and deleted.
The default Protocol Buffers Schema file example is as follows:
syntax = "proto3";

message Person {
  int32 id = 1;
  string name = 2;
}
Using Avro Schema
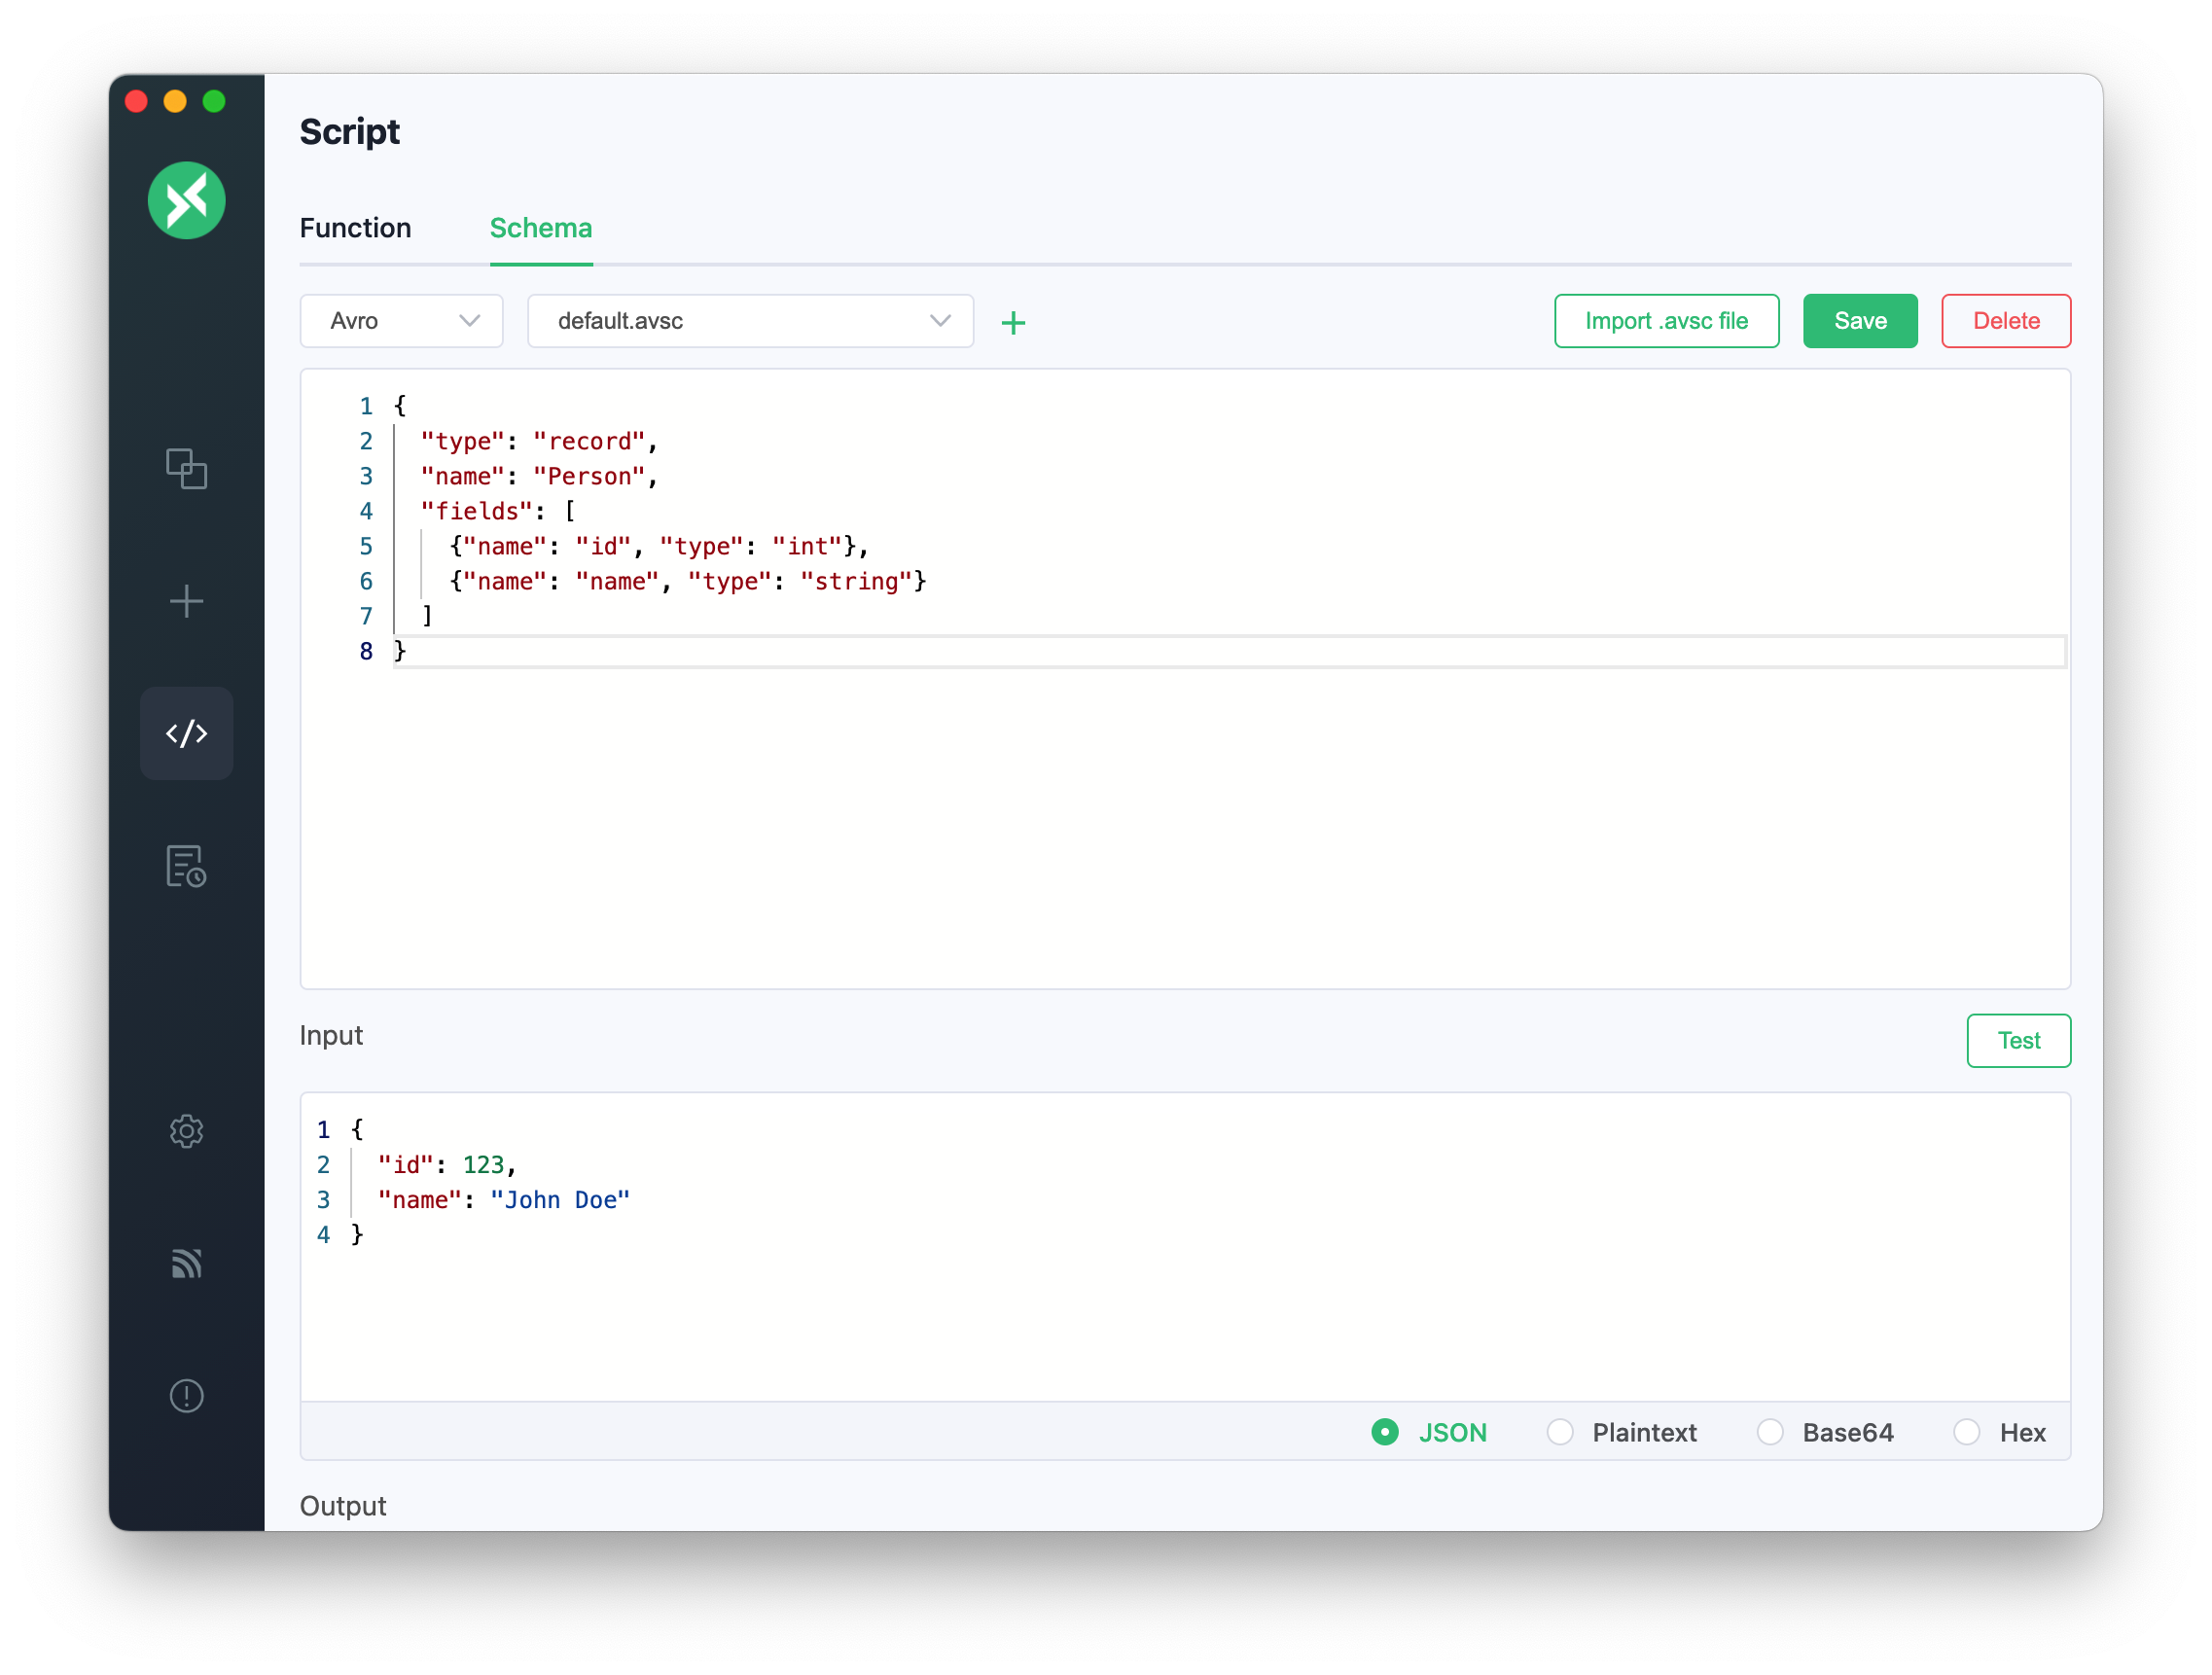
Click the Script button in the left menu to enter the script editing page. On the Schema page, users can select Avro from the dropdown box at the top, then write the avsc file in the code editor.
There is also an Input and Output box below, where you can enter the expected input value. Click the Test button on the right to view the encoding and decoding execution result in the Output box. The usage method is essentially the same as with Protobuf.
An example of using an Avro schema file is as follows:
{
  "type": "record",
  "name": "Person",
  "fields": [
    { "name": "id", "type": "int" },
    { "name": "name", "type": "string" }
  ]
}
Workflow
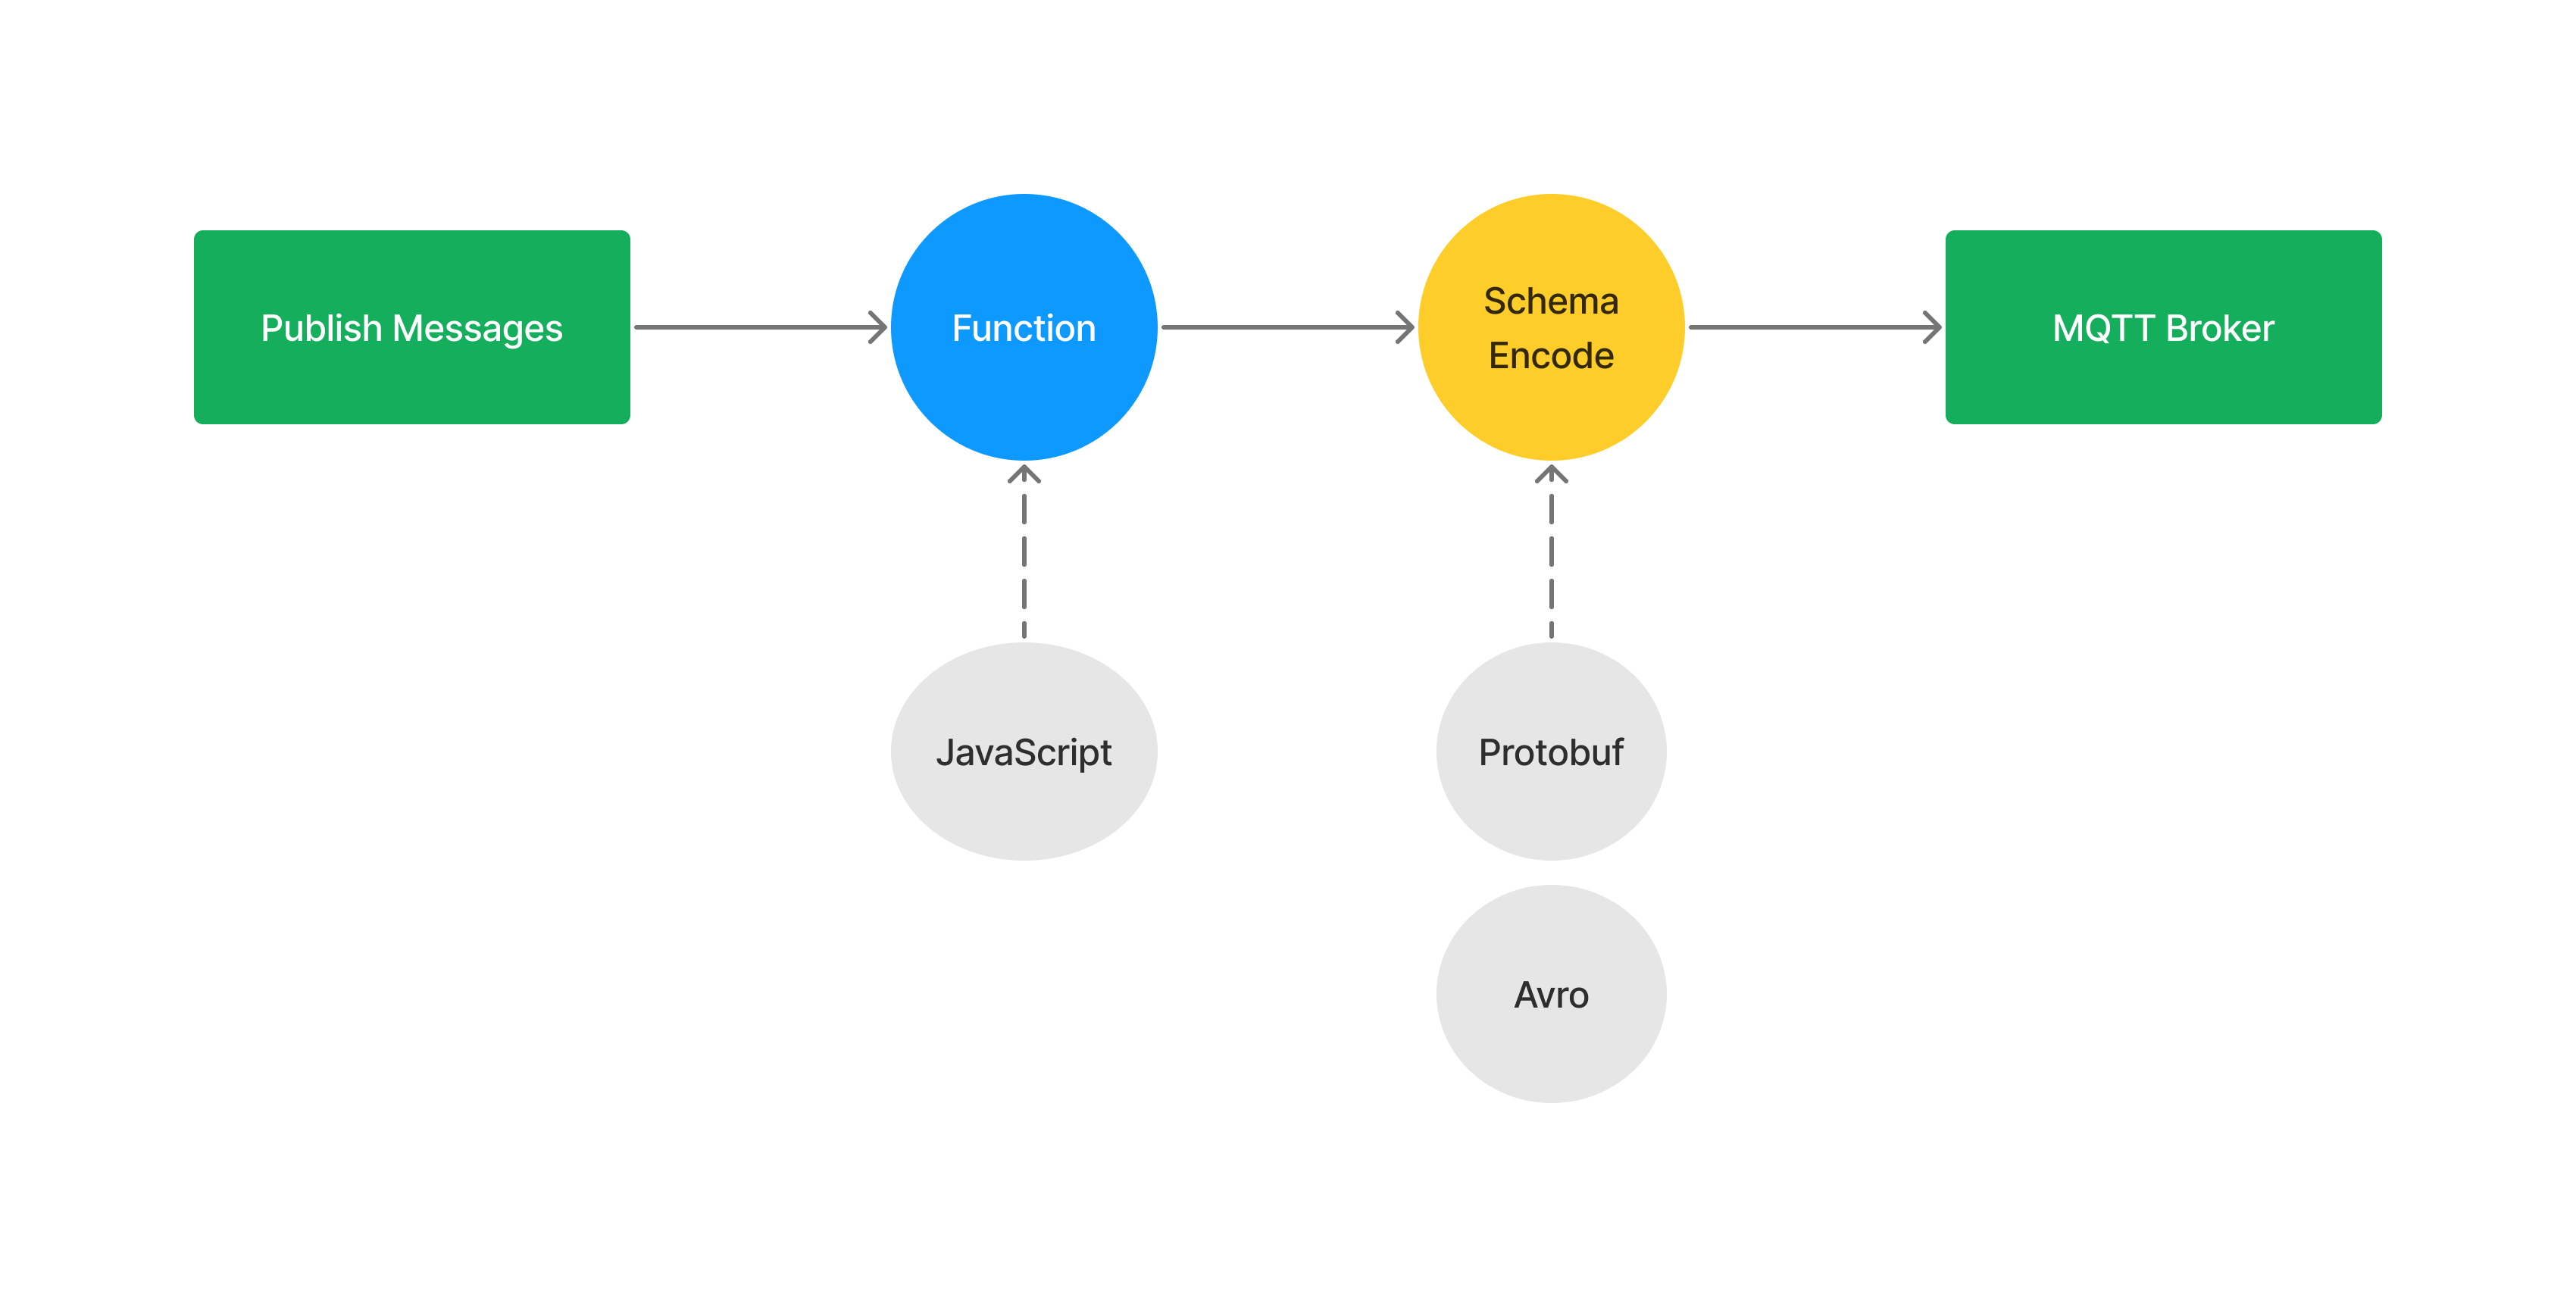
If the user uses both the custom function and Schema features of the script, MQTTX will use an efficient script workflow, covering both the publishing and subscribing stages.
In the publishing stage, the script workflow first calls custom functions to process the input data. The messages generated after these custom functions are displayed. Subsequently, the processed messages are encoded using the Schema.
In the subscription stage, the script workflow first receives the incoming encoded messages. After receiving the messages, the Schema is immediately called to decode. The decoded messages are sent to the custom functions for processing. After processing, the processed messages are displayed.
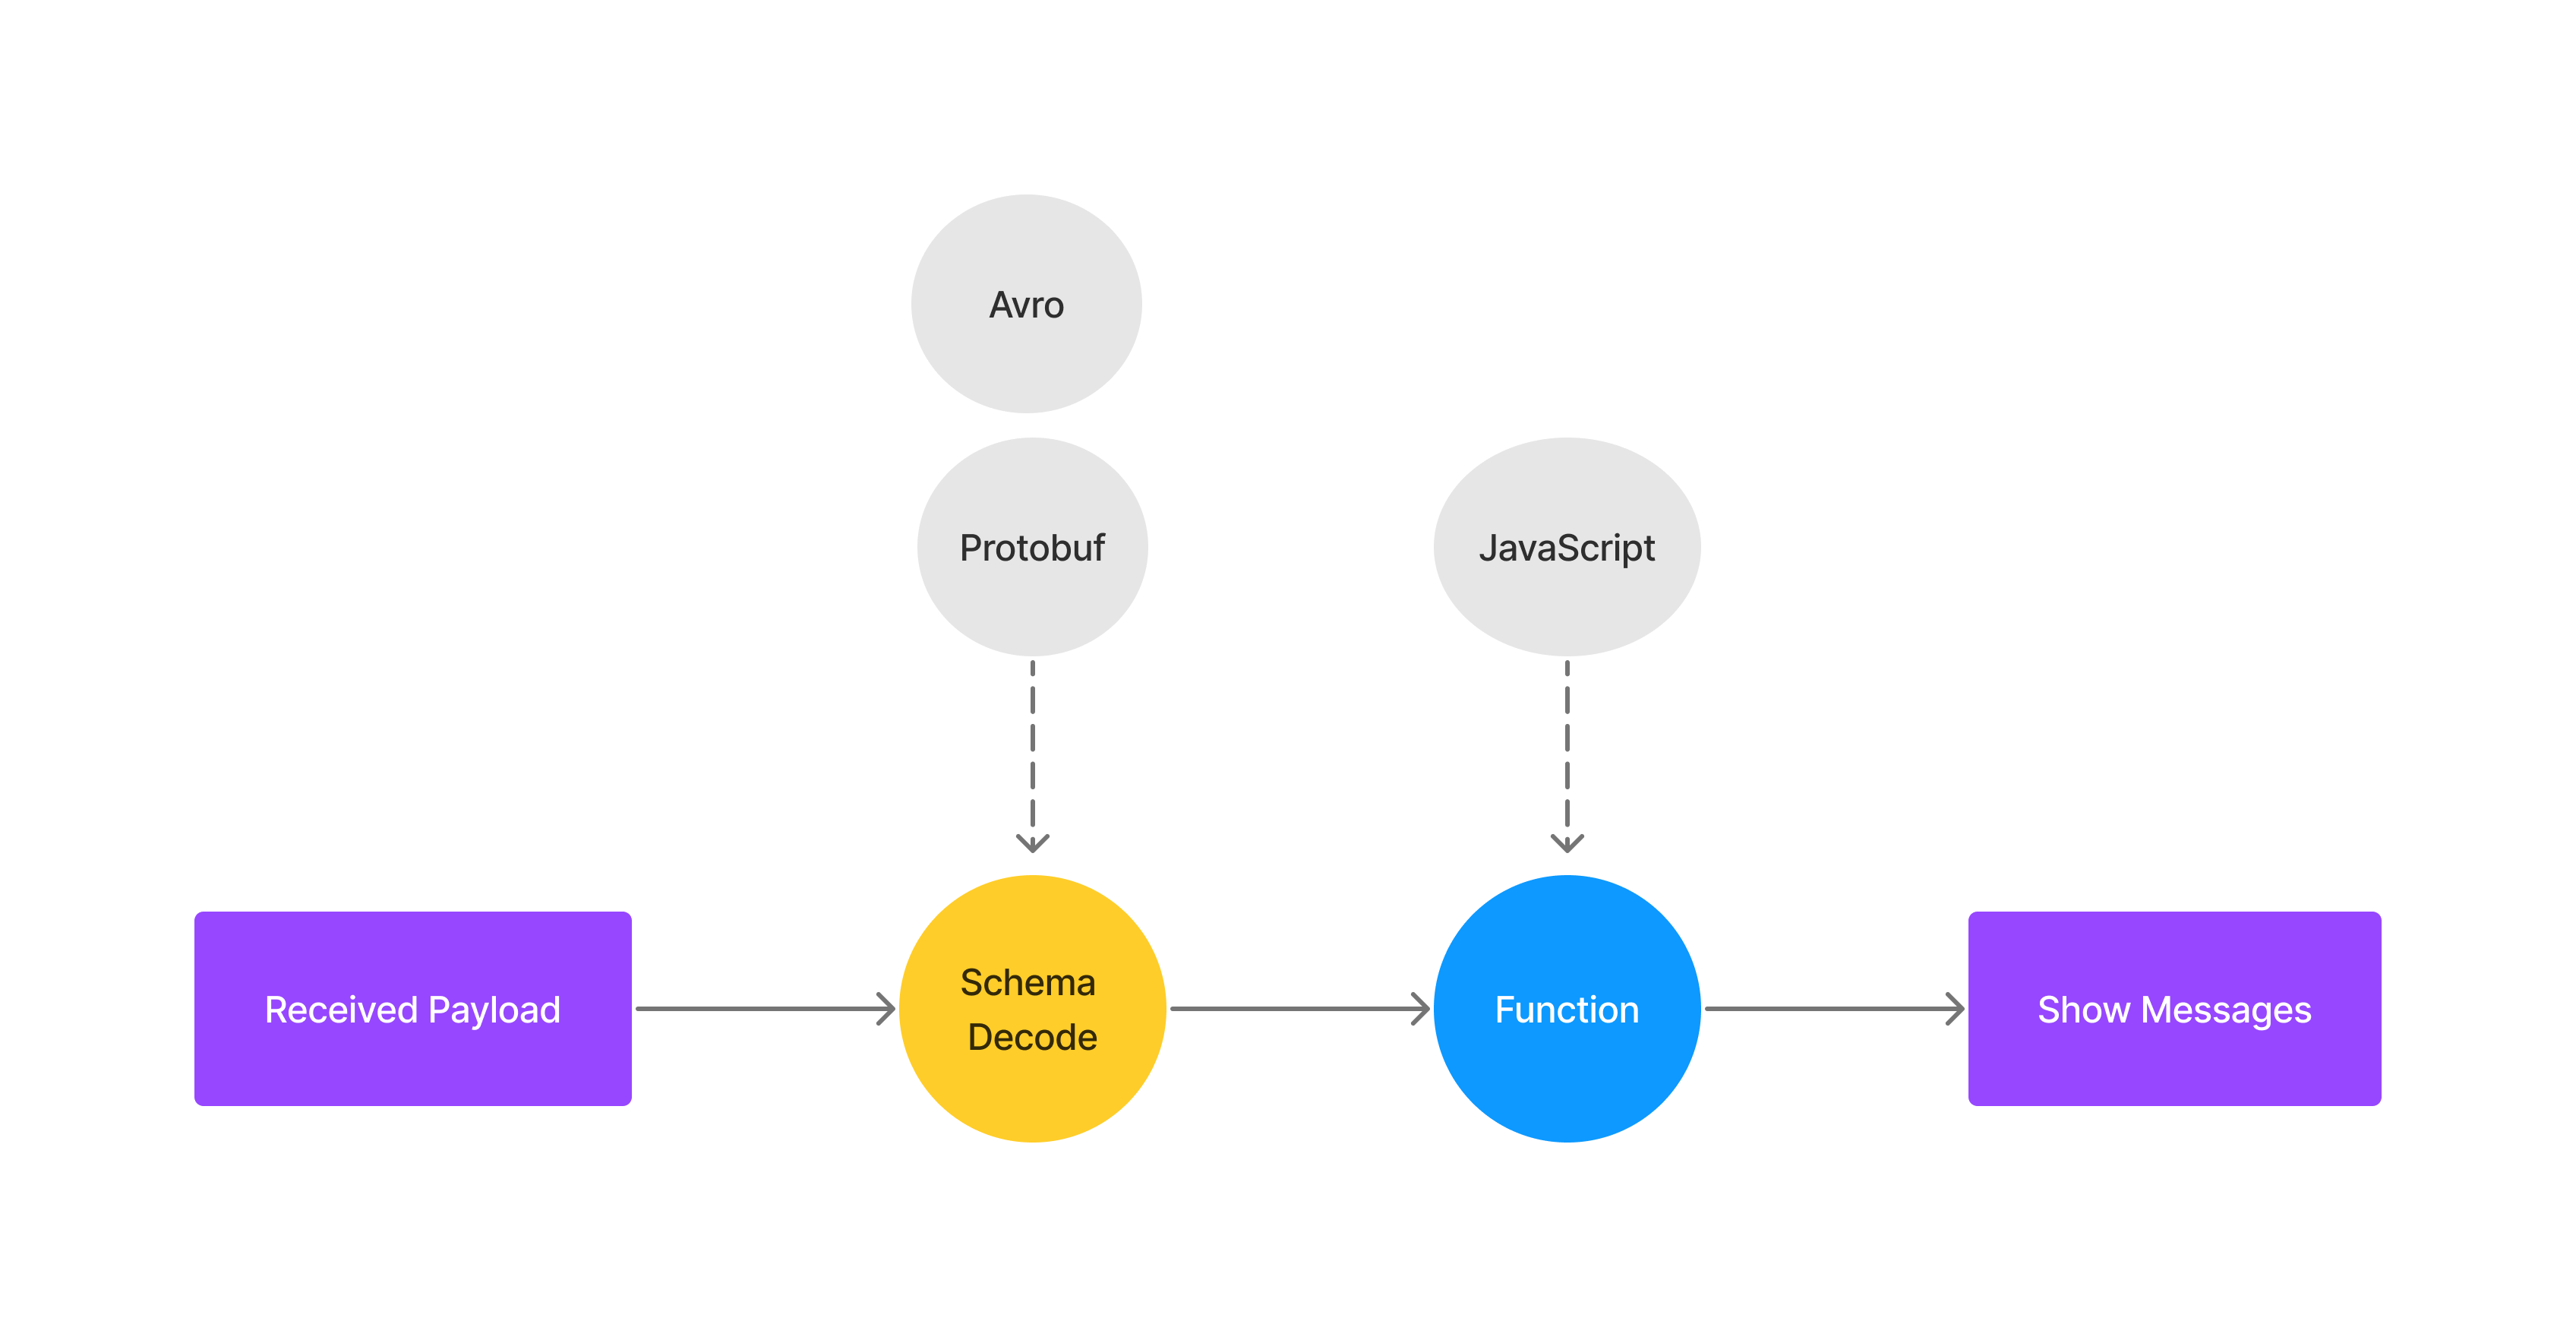
This script workflow design allows users to flexibly process data during publishing and subscribing stages, and ensures the safety and integrity of messages during transmission.
Usage
- Navigate to the connection page, click the drop-down menu in the upper right corner of the page. In the drop-down menu, select the
Run Scriptoption.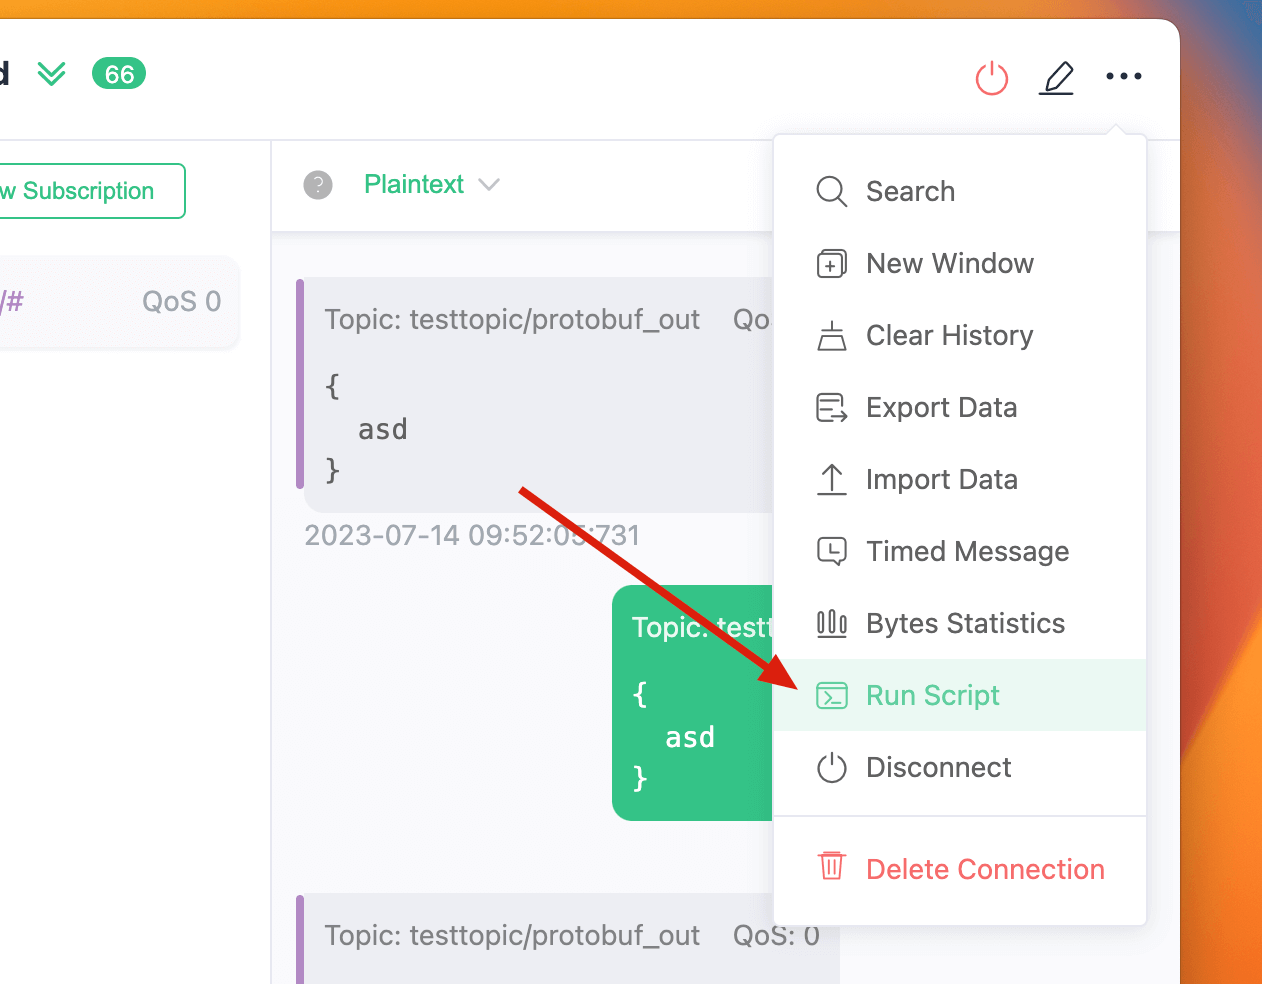
- This will pop up a script window, choose from which script should be applied, options include publish, receive and all. Then, select the custom function or Schema you want to use.
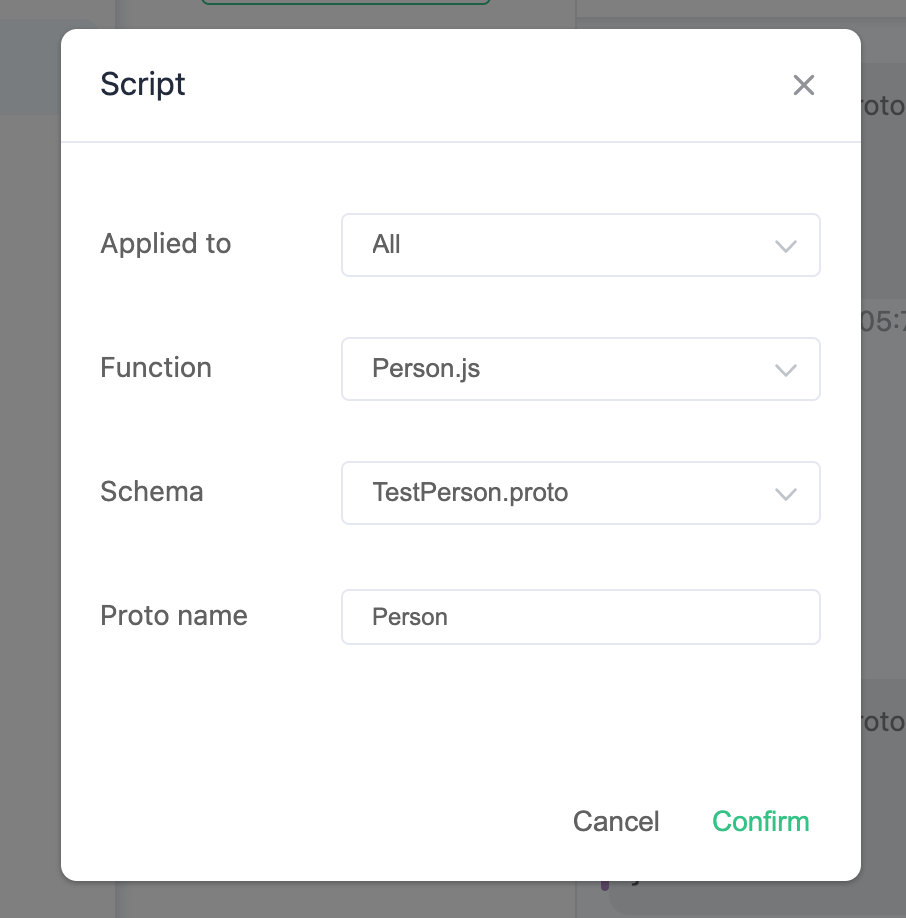
- In the schema selection box, choose the schema you want to use. Currently,
ProtobufandAvroschemas are supported.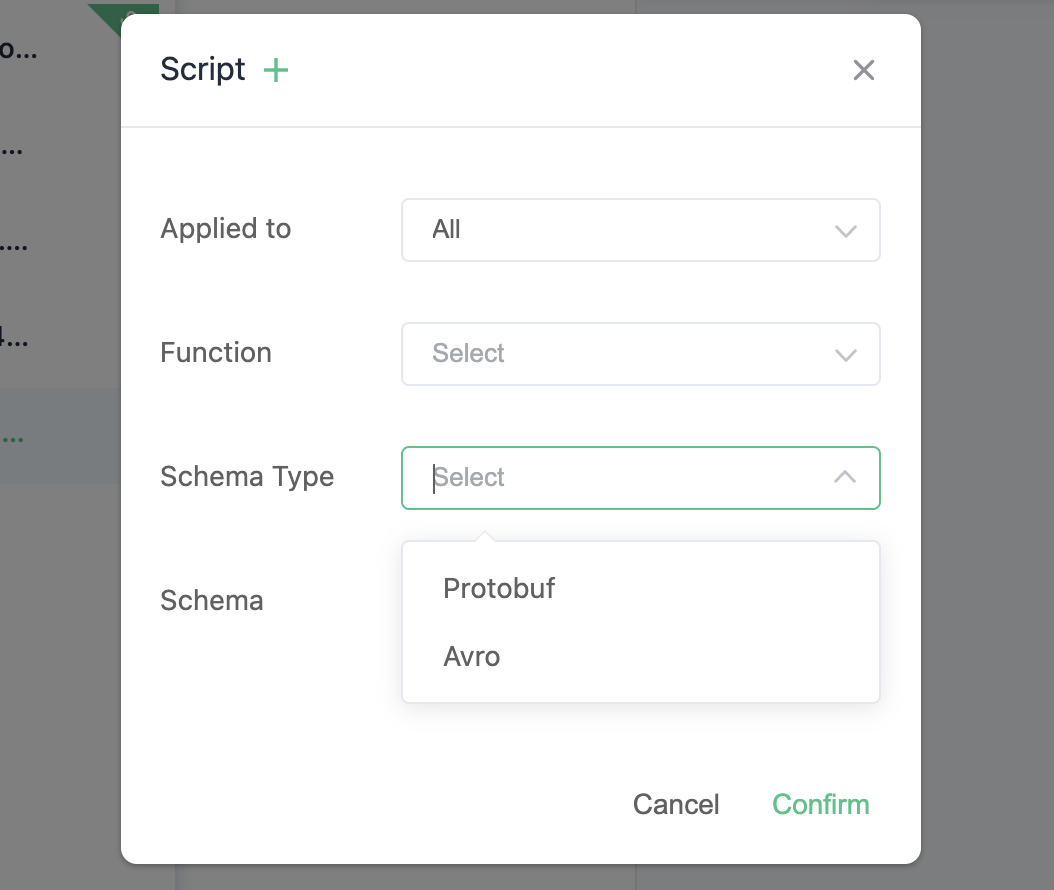
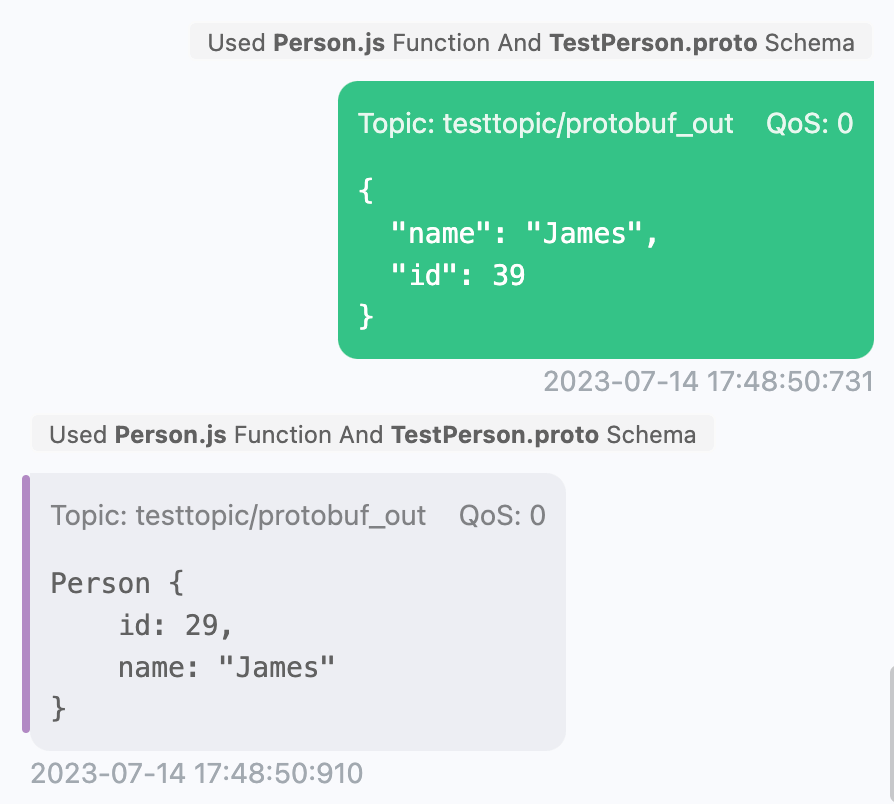
- If you see a script usage prompt on the publish or subscribe message card, it indicates that the script function has been successfully invoked.
- If you need to stop using the script, you can click the red
Stop Scriptbutton in the top status bar, which will stop the script.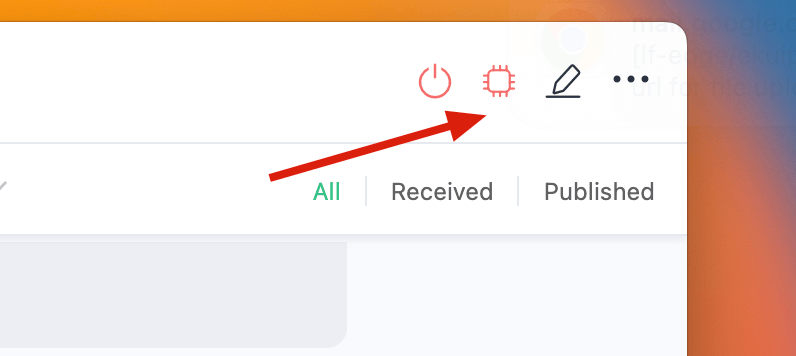
Logs
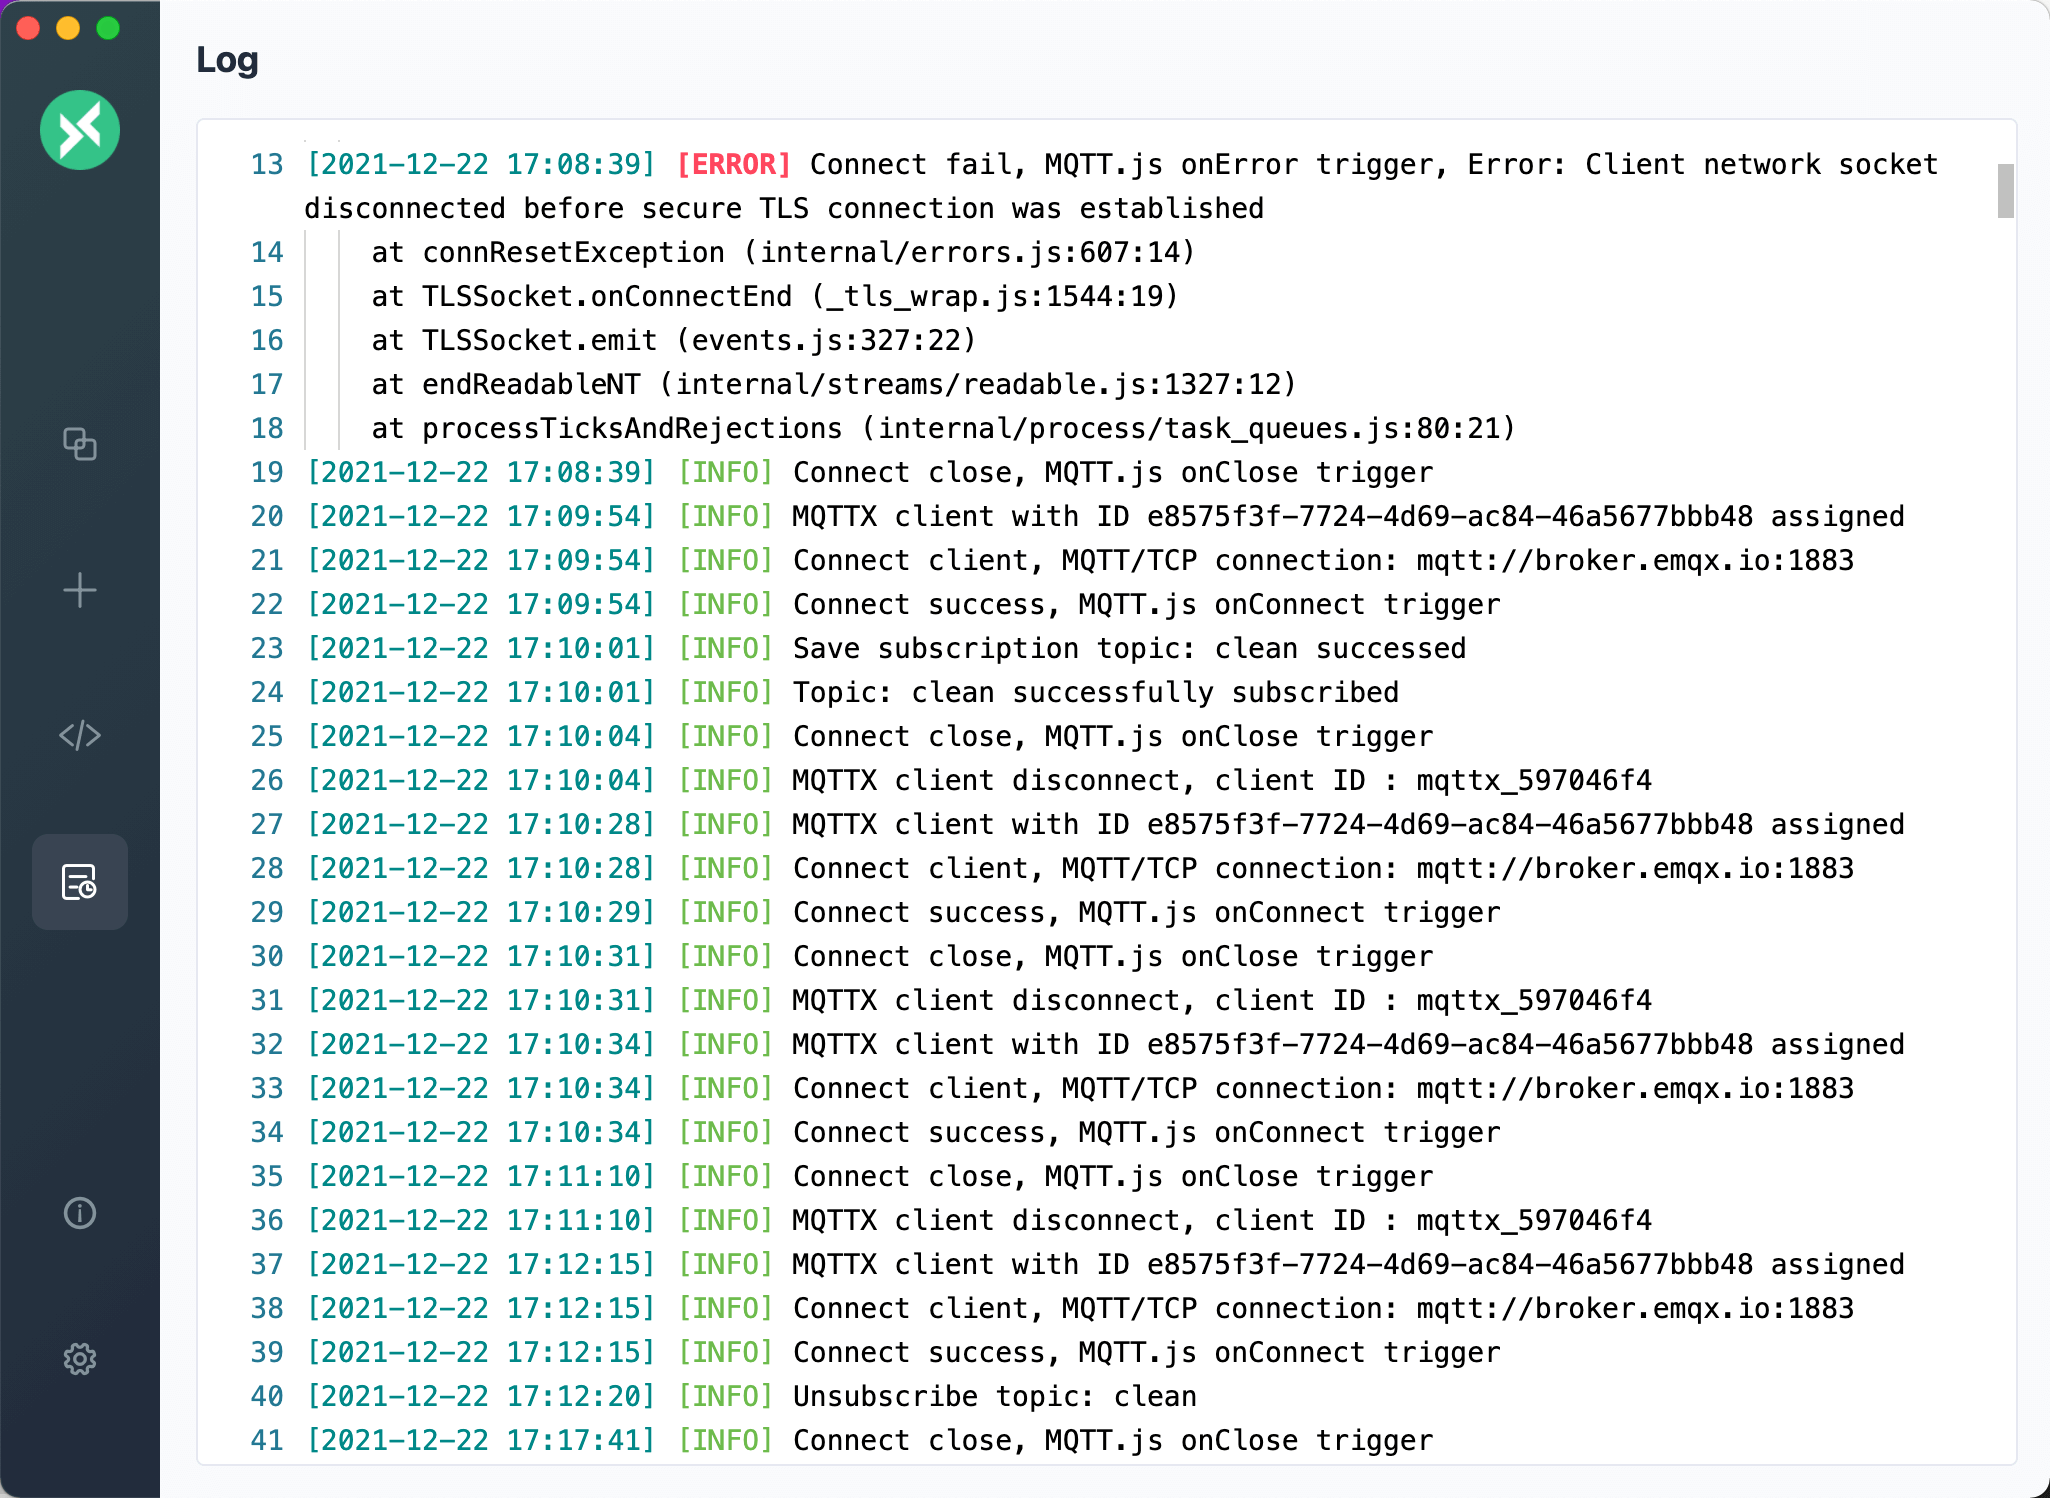
Starting with version v1.5.0, MQTTX has introduced a log function to help users debug connections and report errors. In a production environment, the log system displays information at four levels:
- DEBUG provides detailed debugging information, including MQTT.js packet details, to assist in troubleshooting.
- INFO provides feedback on user operational information.
- WARN issues warnings about unsafe actions or potential risks.
- ERROR generates an error message when a failure occurs.
By default, logs are written to the log file at the following locations depending on your operating system:
| OS | Log File Path |
|---|---|
| Linux | ~/.config/MQTTX/logs/log |
| macOS | ~/Library/Application Support/MQTTX/logs/log |
| Windows | %USERPROFILE%\AppData\Roaming\MQTTX\logs\log |
Each time MQTTX is closed, the current log file is renamed according to the timestamp in the format [YY]-[MM]-[DD]T[hh]:[mm].log.
Viewer
Starting from v1.11.0, MQTTX introduces the Viewer feature, providing MQTT data visualization capabilities to help users better understand and monitor message flows.
Topic Tree (Beta)
The Topic Tree displays MQTT topics and messages in a hierarchical structure, allowing users to clearly understand the relationships between topics and the flow of messages.
Note: The Topic Tree feature is currently in Beta and may have incomplete or unstable functionality.
The Topic Tree feature is in the Viewer menu under the New Connection section. To use it, create a connection and subscribe to relevant topics. Once the subscribed topics receive messages, the Topic Tree will update automatically.
The page has a search box, an operation button area, a topic tree display area, and a details panel on the right. In the operation area, you can one-click to expand/collapse all nodes, view the visualized display, and clear the topic tree.
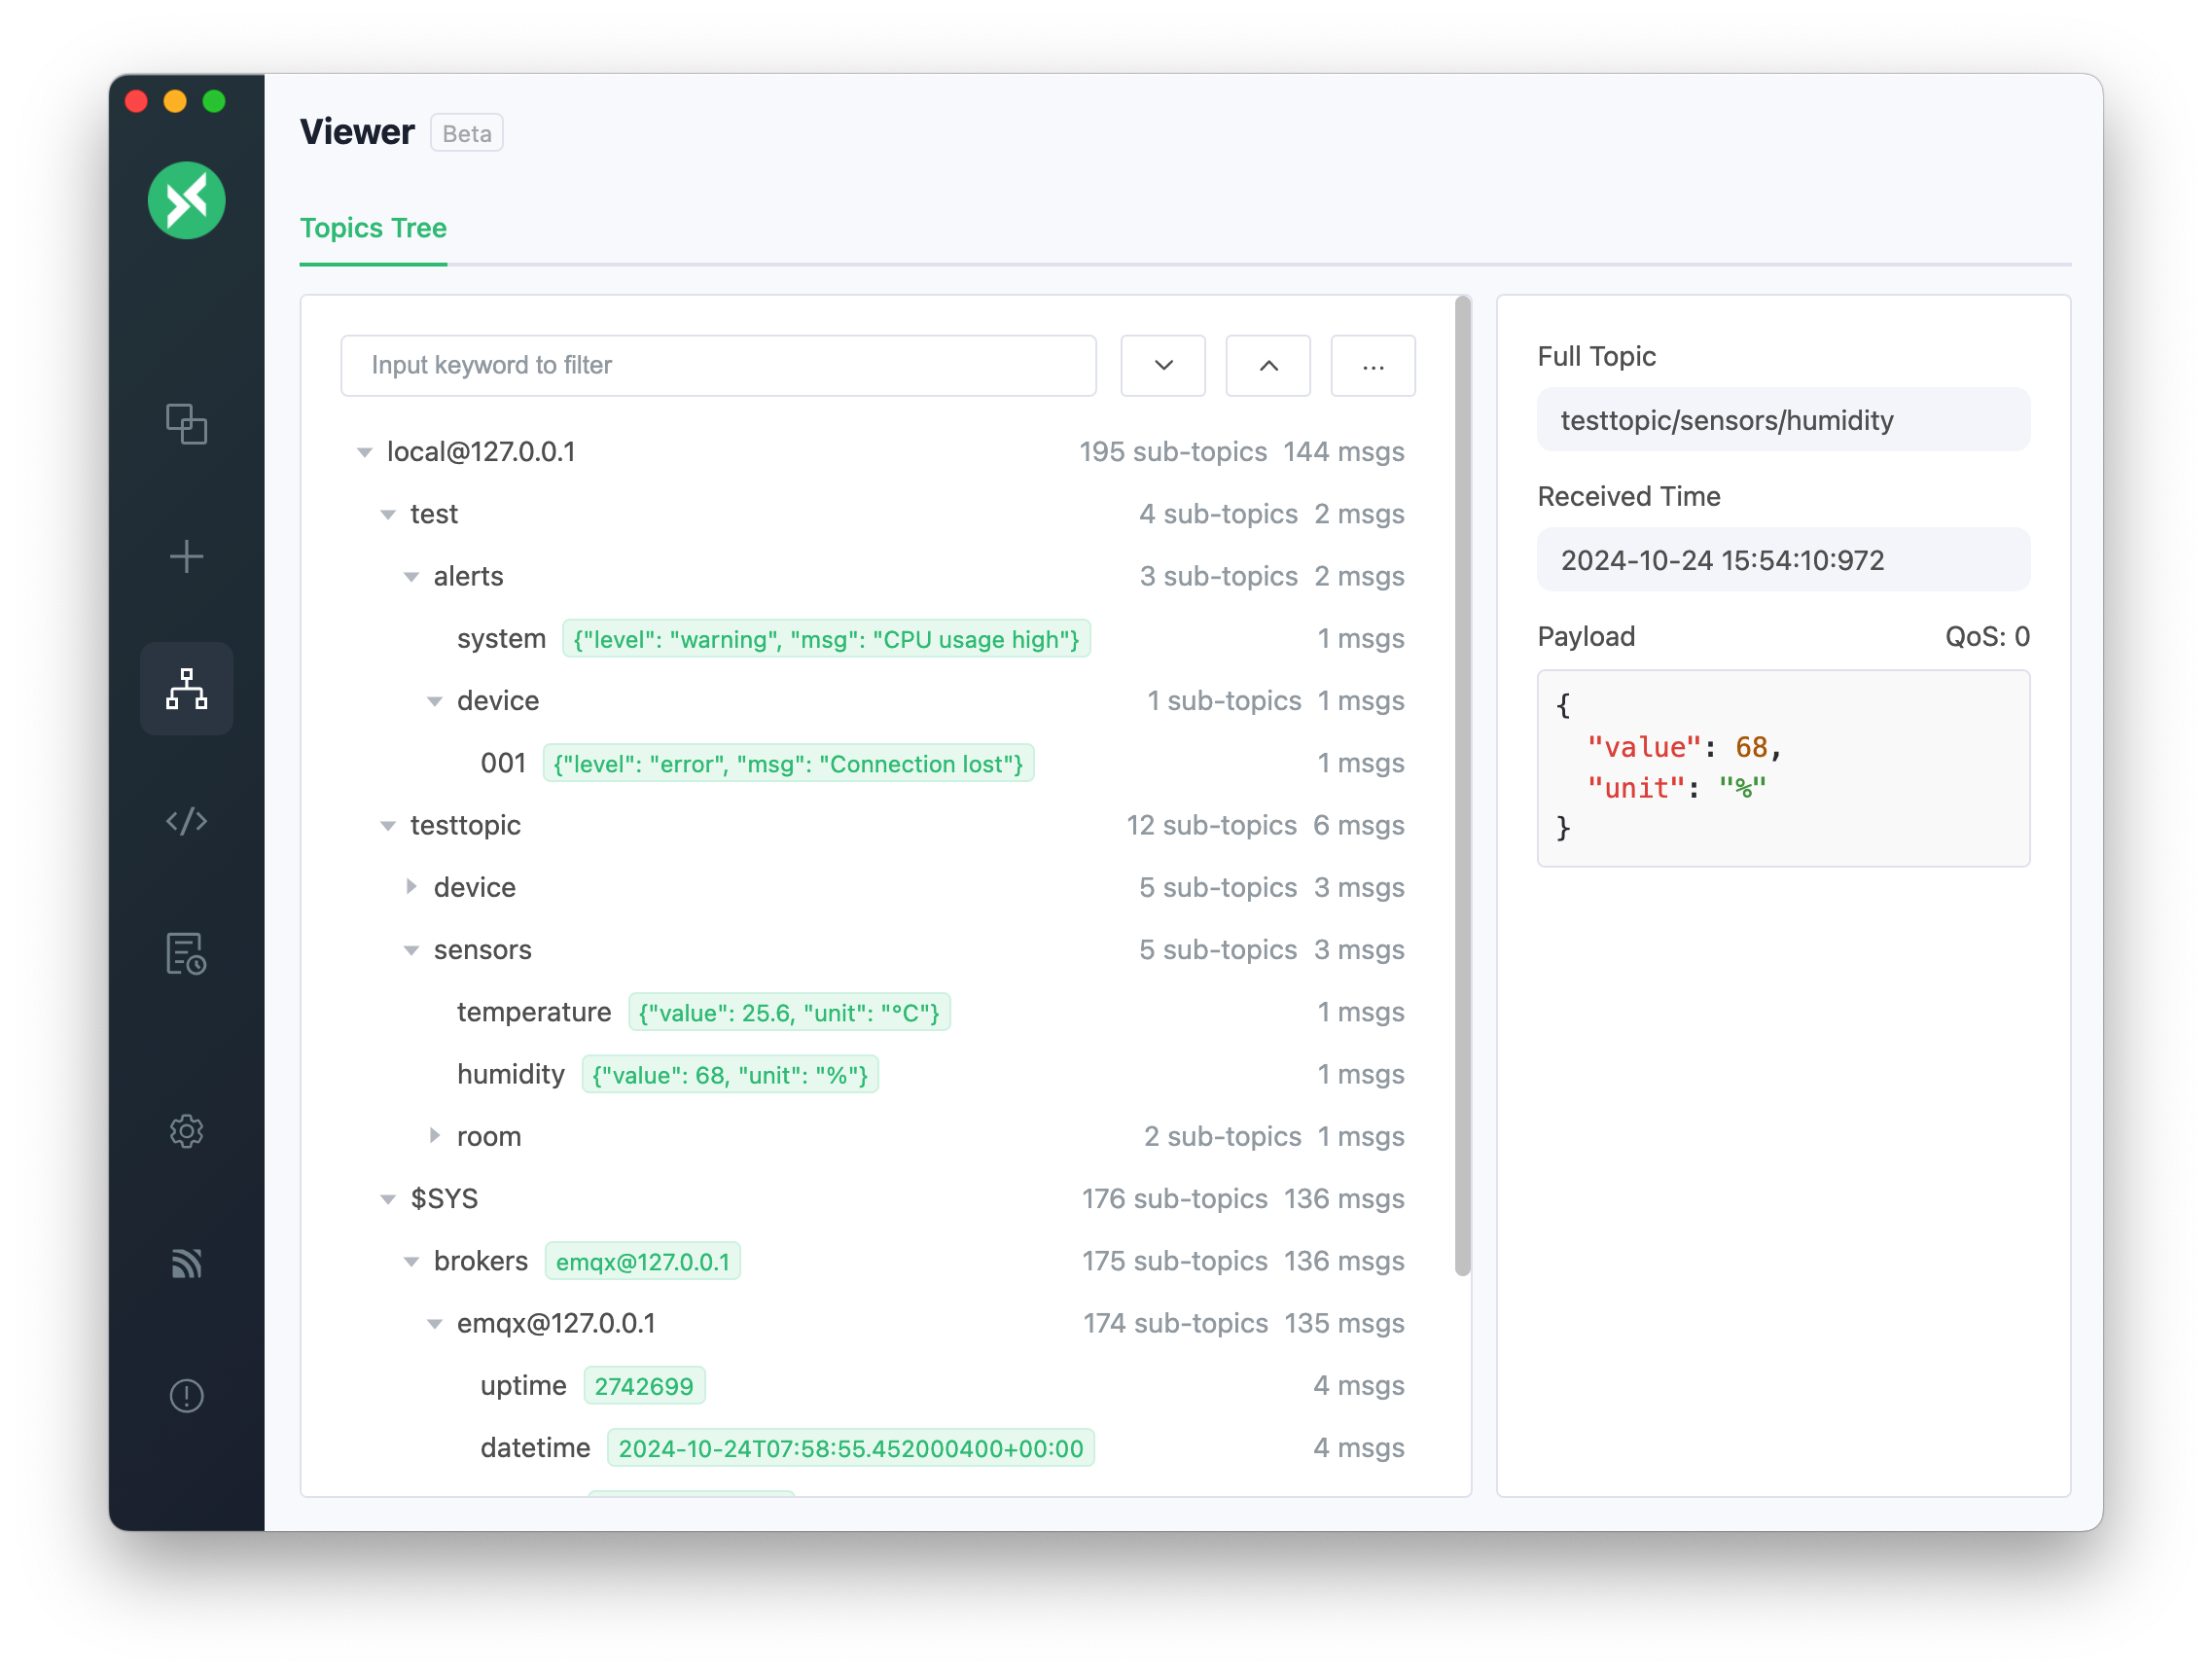
The nodes in the Topic Tree are divided into three types:
- Root node (Host node): Displays the client information receiving messages, including the client ID, Host information, connection name, and sub-topic nodes.
- Intermediate node: Contains sub-topic nodes. Clicking on it displays the current node's complete topic path and sub-topics.
- Leaf node: Displays the latest received message, including the complete topic path, reception time, Retain flag, and QoS value.
Each node name shows the number of sub-nodes and messages. Clicking the expand/collapse button before the node toggles the visibility of sub-nodes while clicking the node itself displays detailed information on the right.
Note: When you delete the corresponding connection or clear the messages in the connection, the content in the Topic Tree will also be cleared.
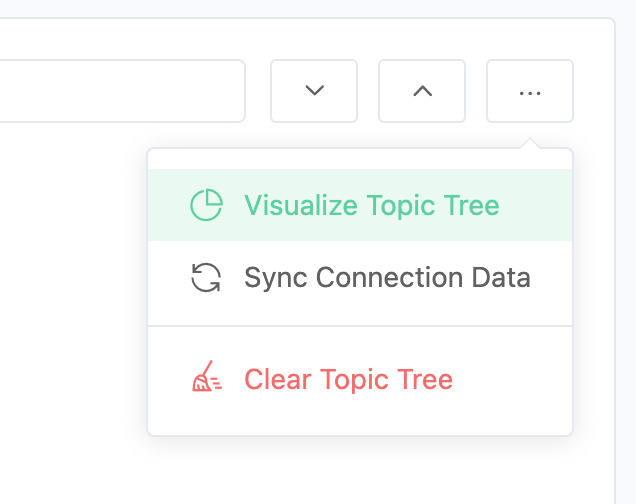
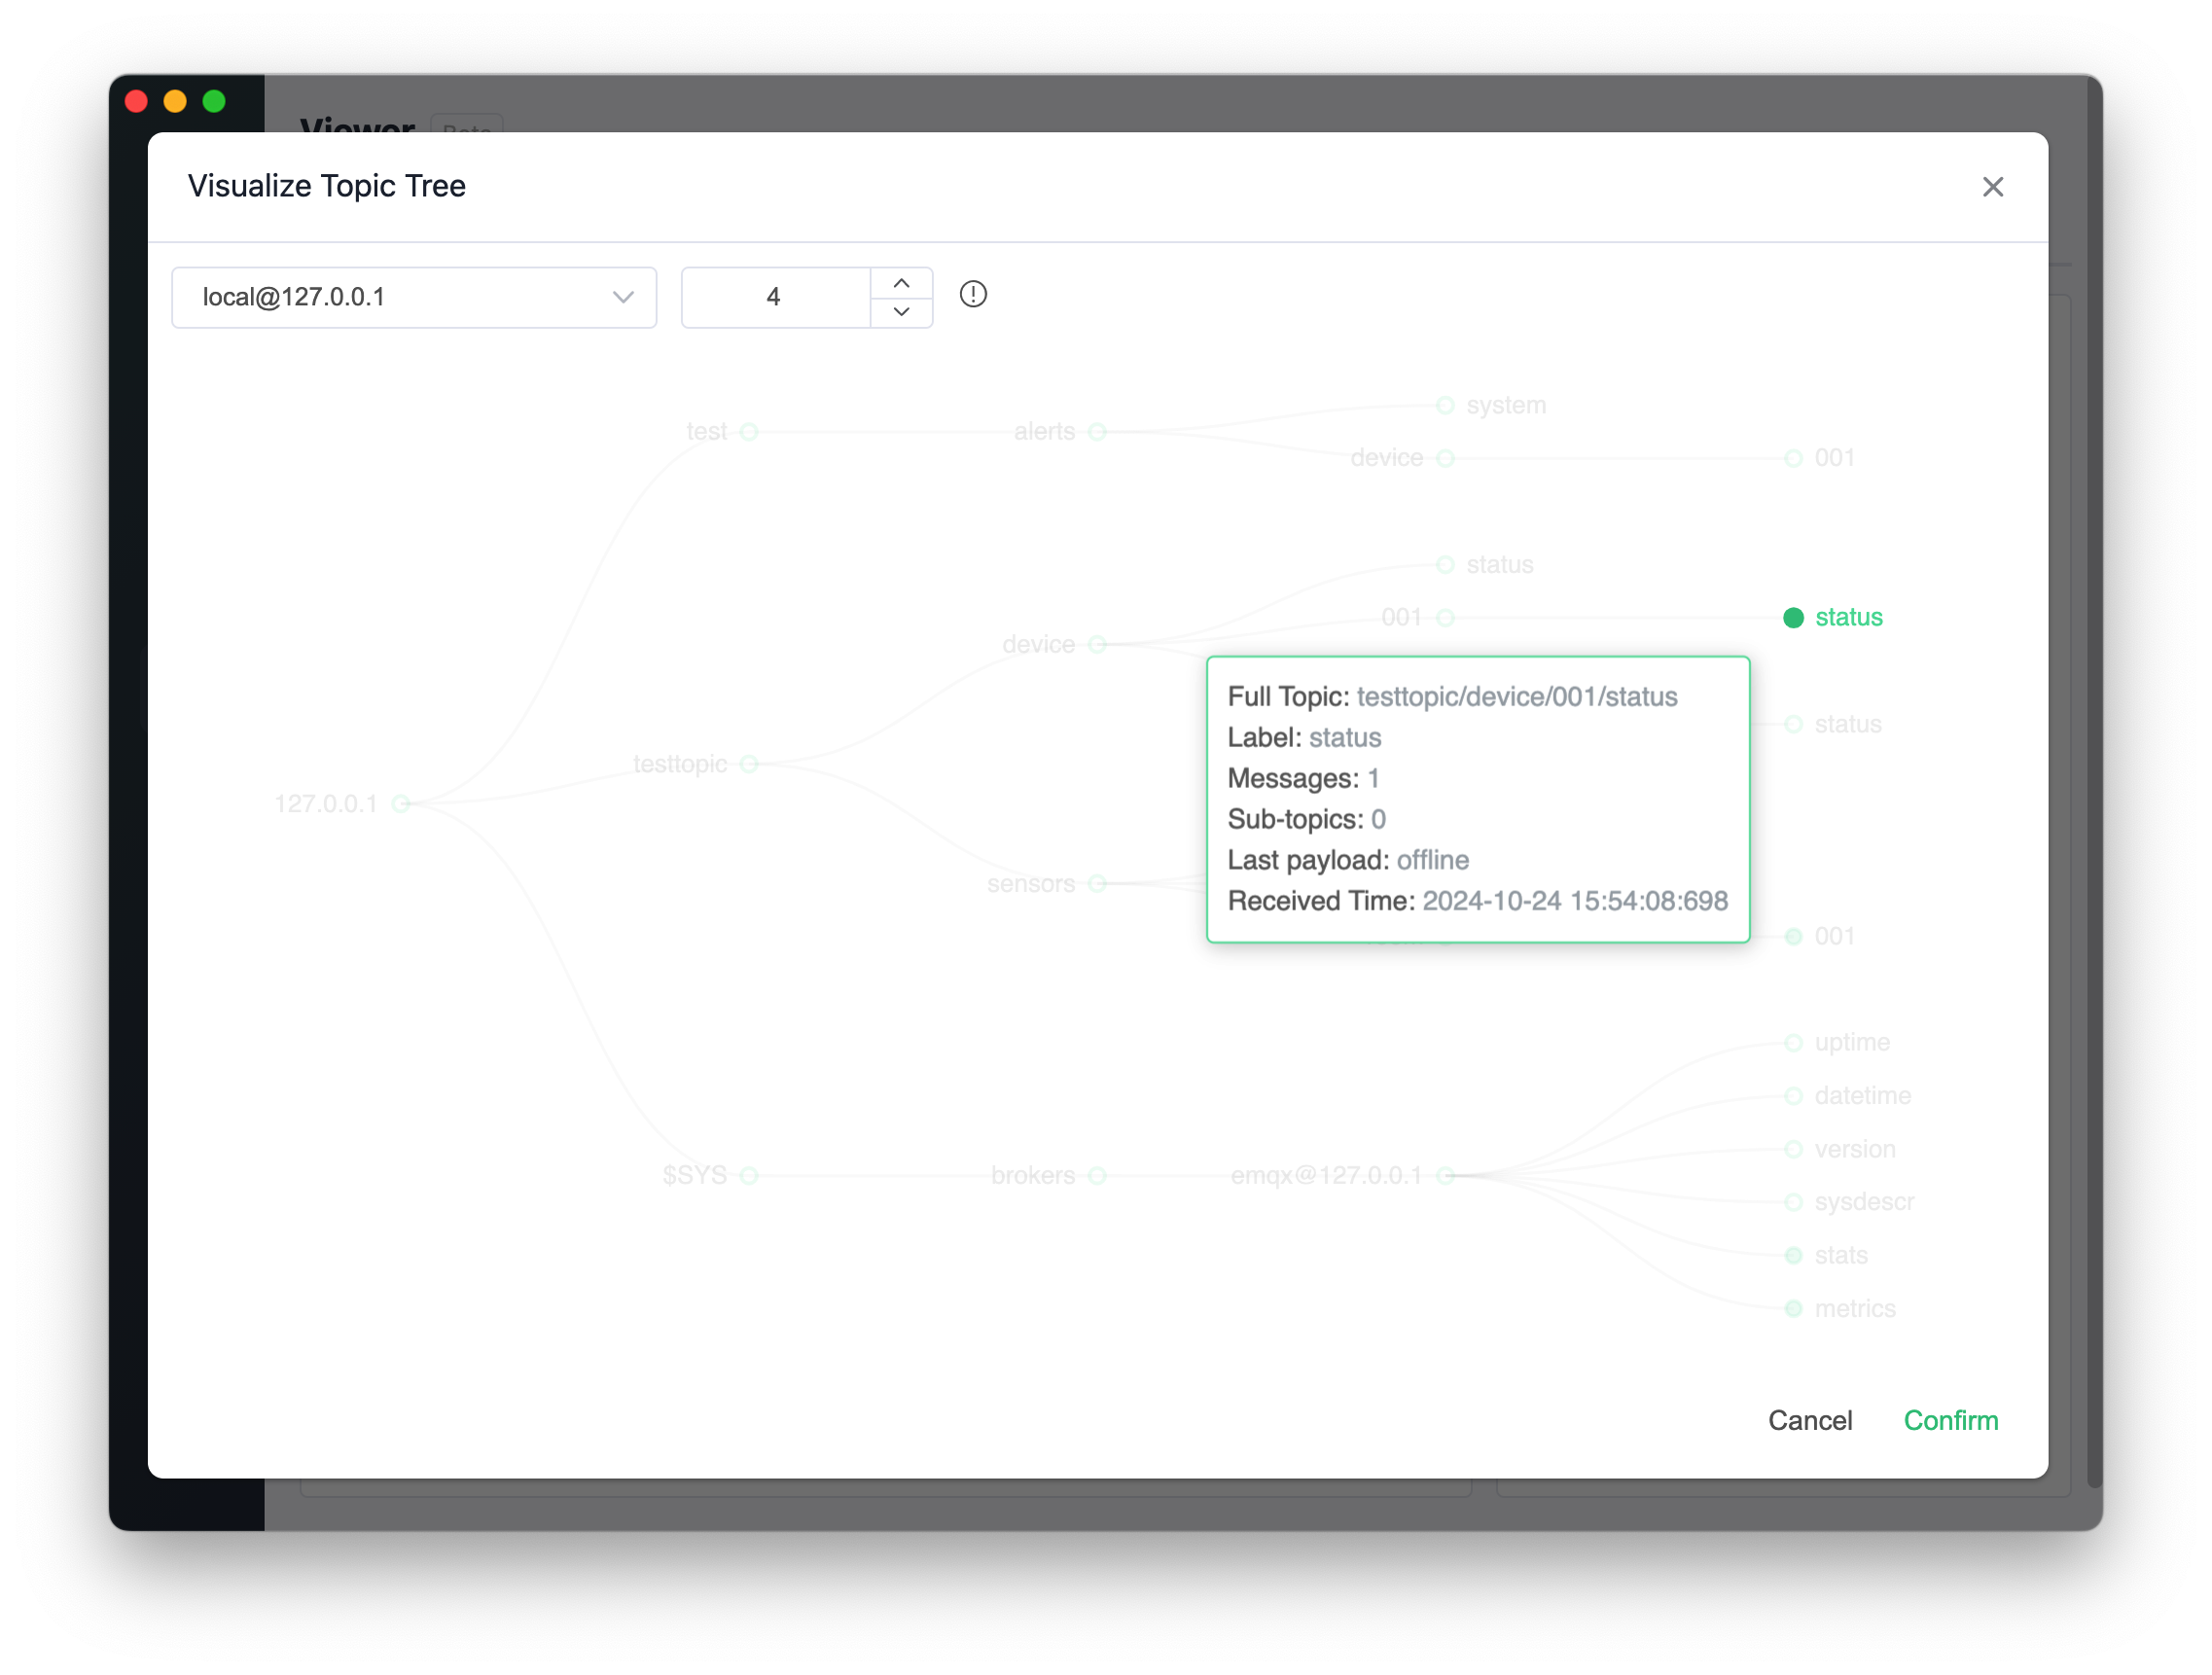
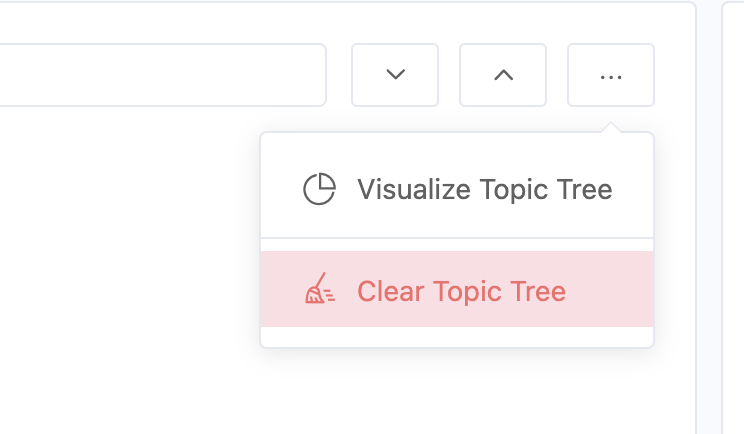
Visualize Topic Tree
Selecting Visualize Topic Tree from the More Operations menu displays the topic structure of the current connection graphically. This visual representation is more intuitive than the list format, making it easier to understand the distribution of topics.
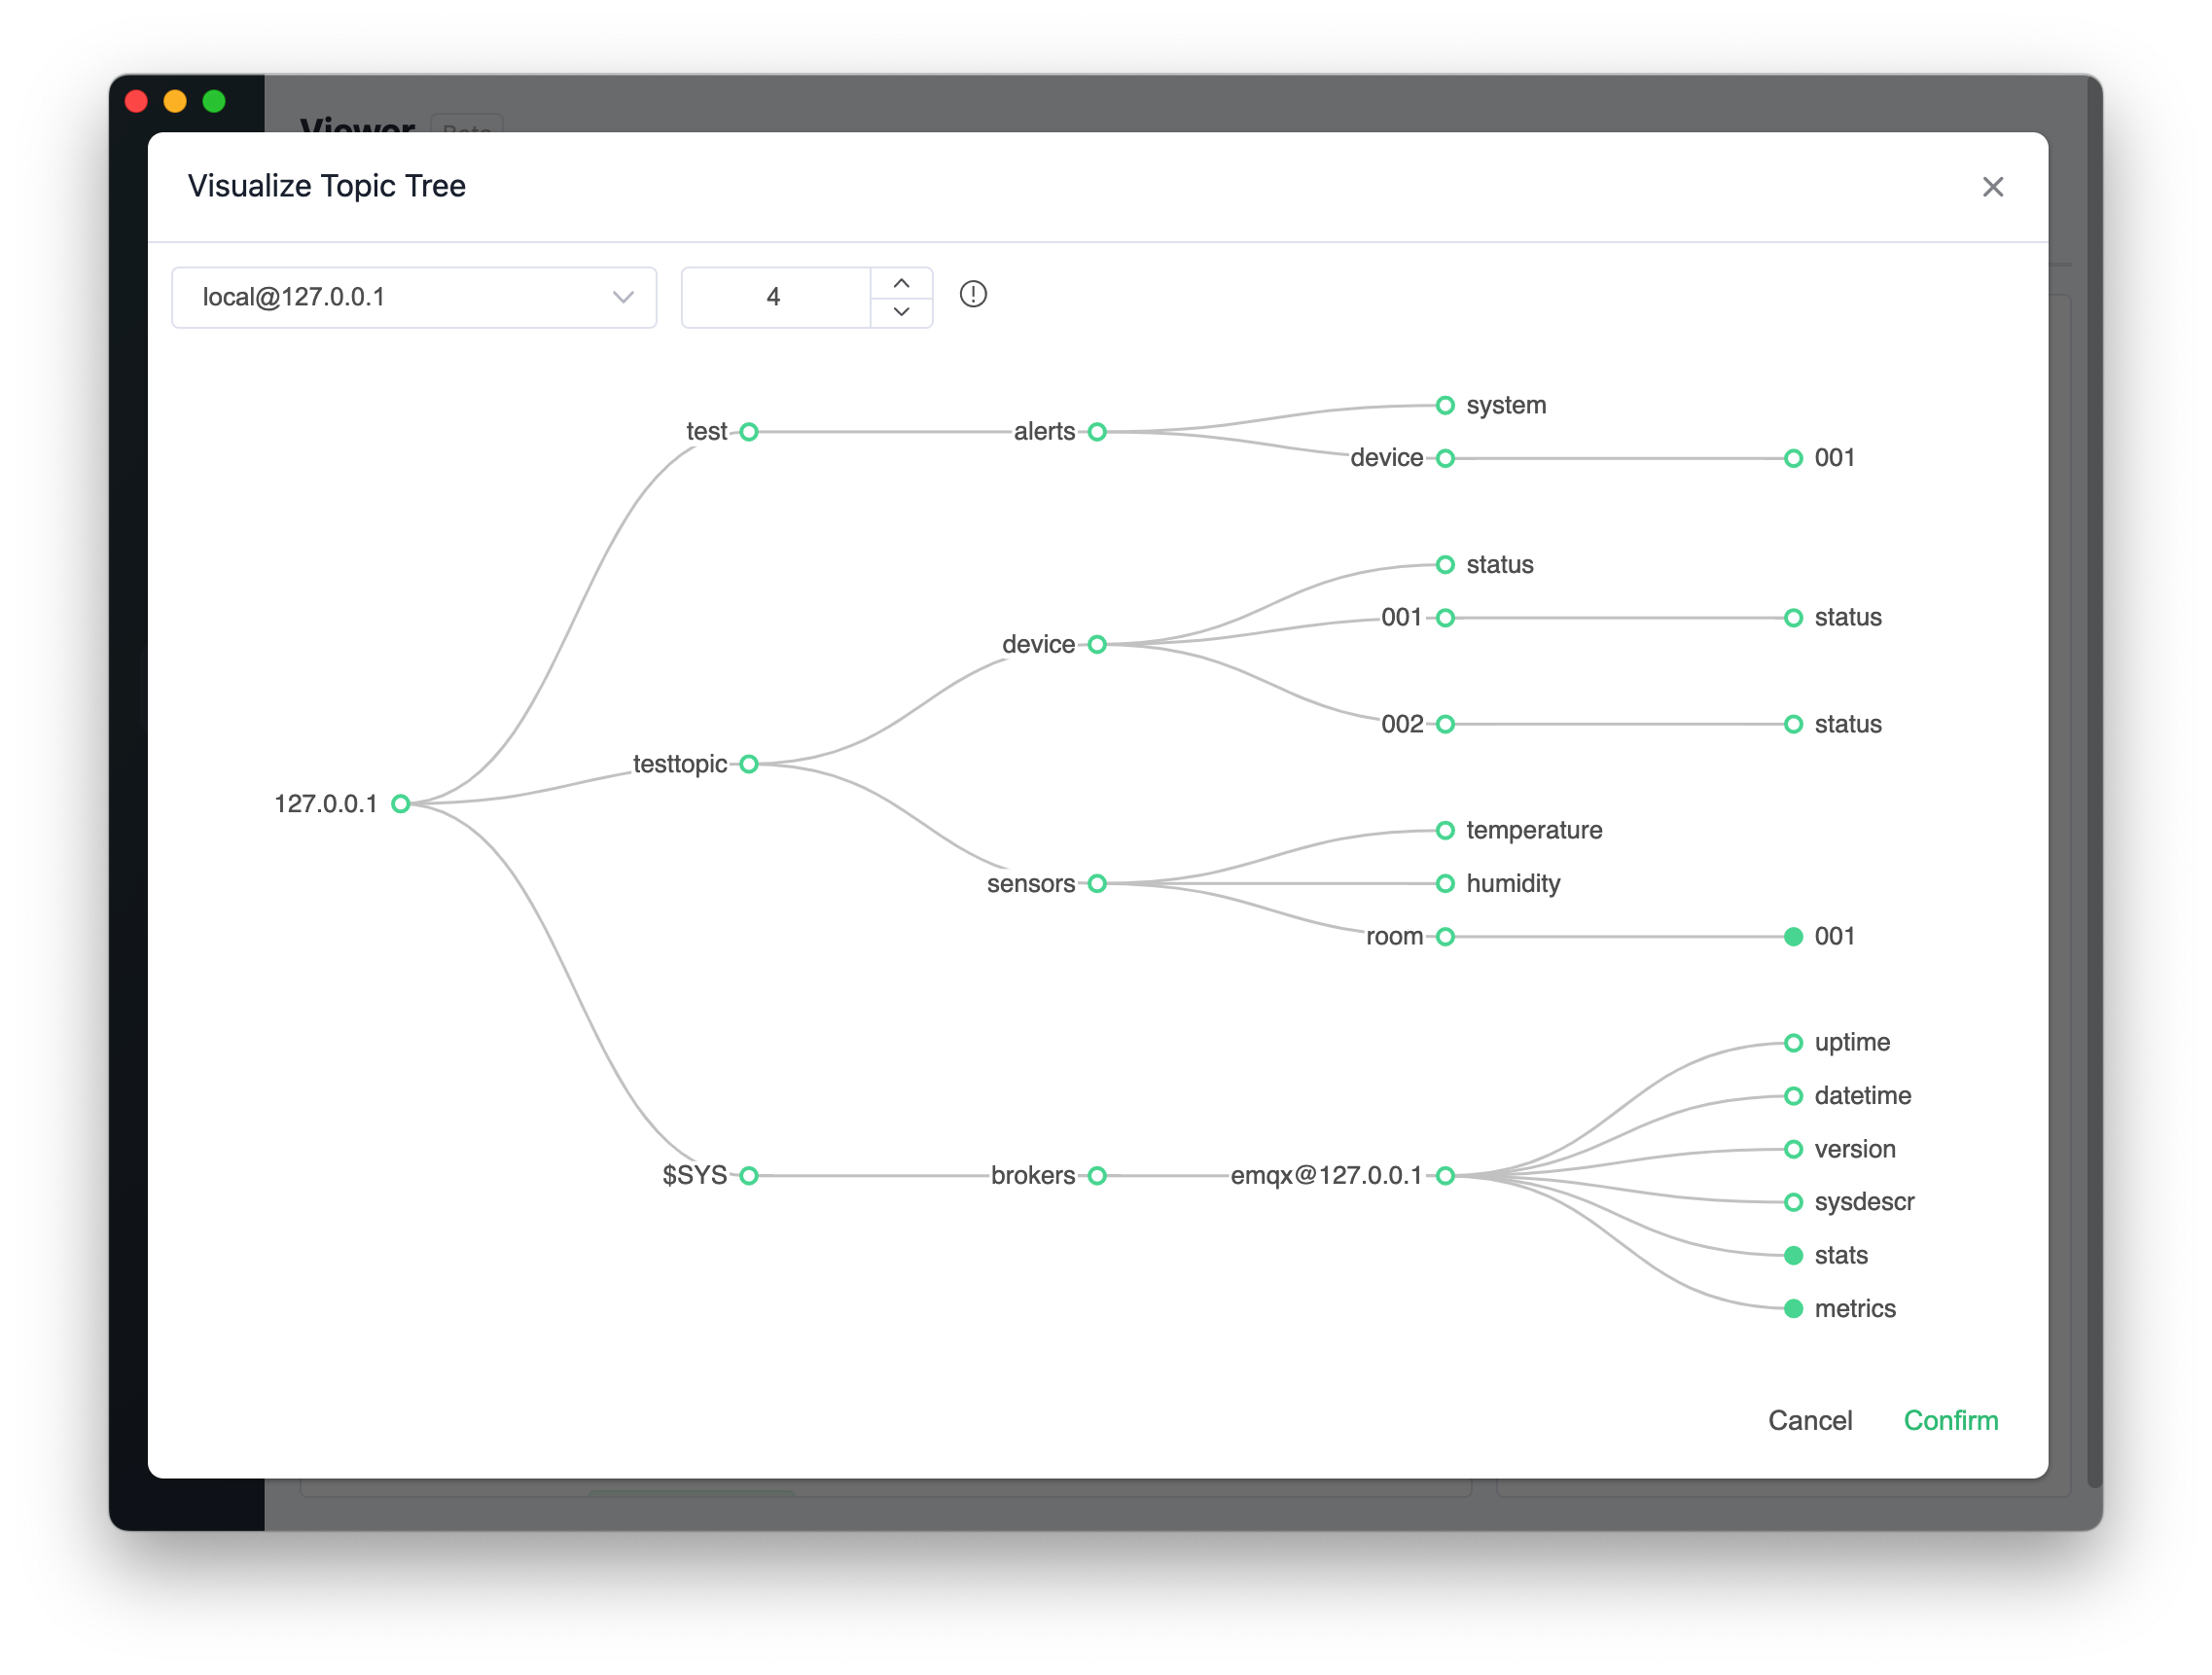
You can select different Host nodes at the top of the pop-up box and adjust the default expansion level (default is 4 layers). You can adjust the depth of the view at any time using the expand/collapse button. Hovering over a node displays its topic path, message count, and sub-node count.
Note: If the data updates in real time, the visualized tree will refresh according to the current expansion level. To view deeper data changes, increase the number of expansion levels.
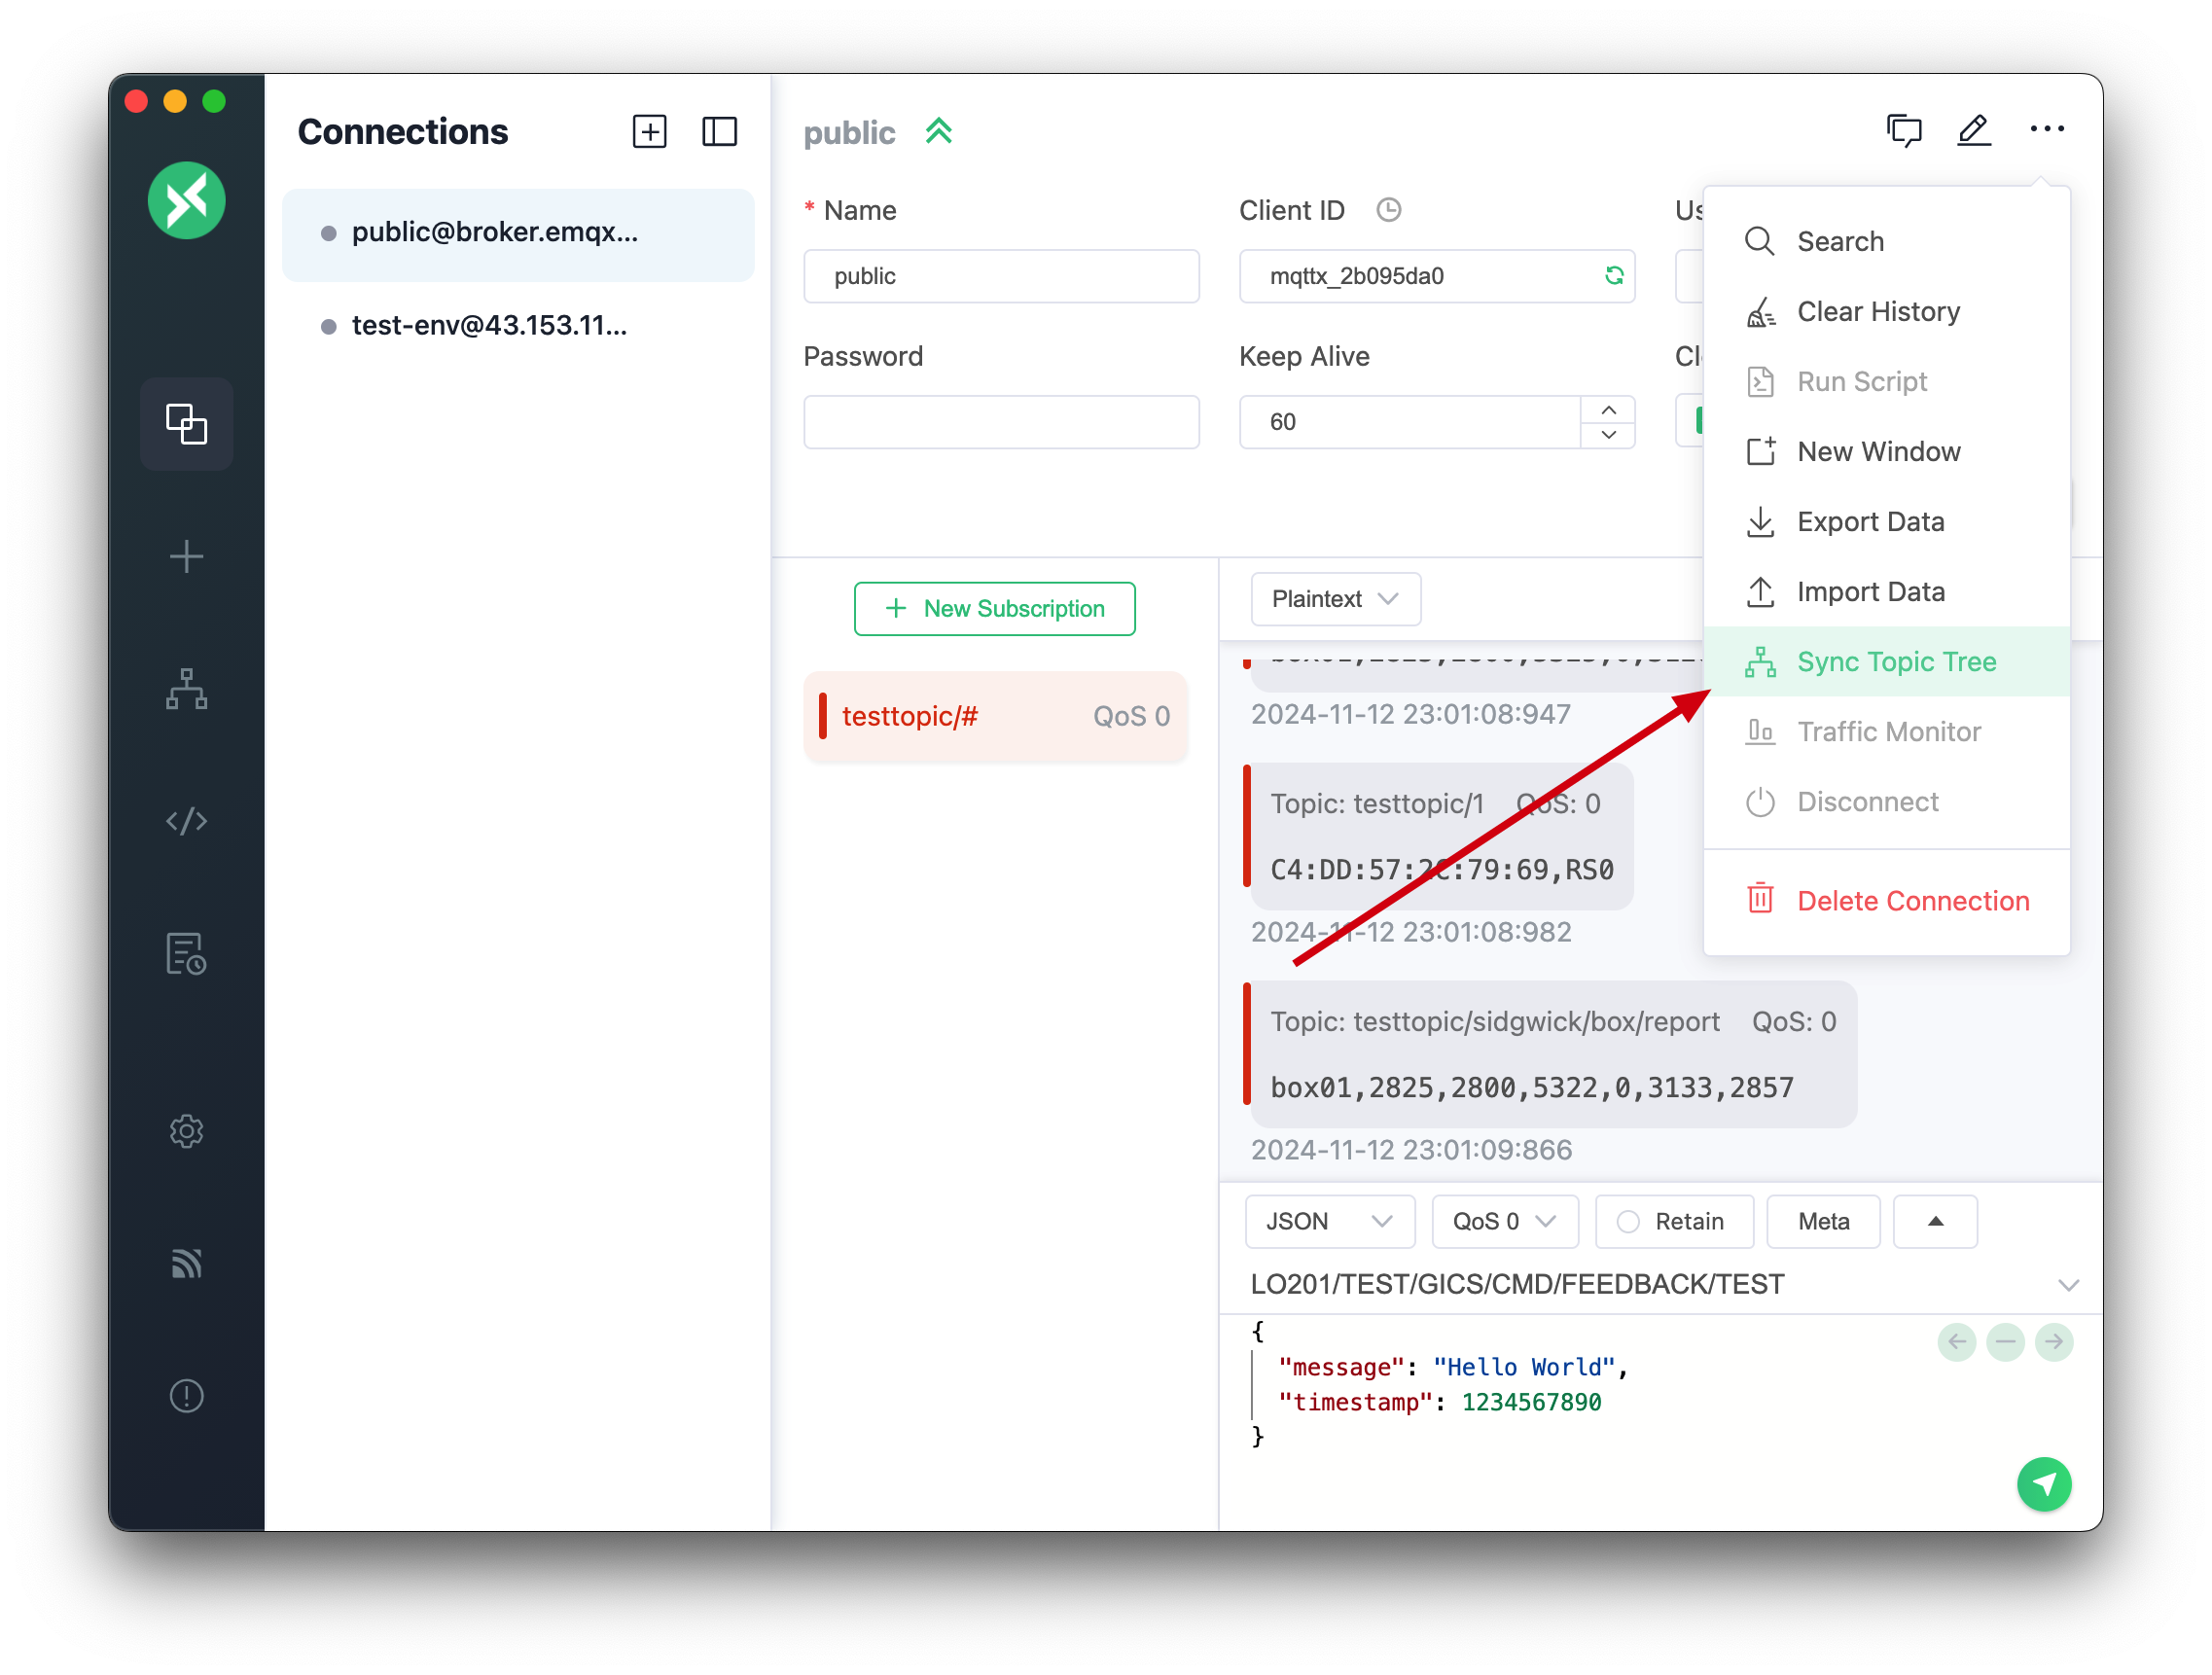
Synchronize Connection Data
When the topic tree receives new messages, it will be automatically synchronized to the message list on the connection page. MQTTX also supports manually synchronizing the historical message data from the connection page to the topic tree view. You can synchronize in the following two ways:
- On the connection page:
- Click the "Sync Topic Tree" option in the upper right corner drop-down menu
- Select the connection to synchronize
- The system will automatically convert the message records of the connection into a topic tree structure
- On the topic tree page:
- Click the "Sync Connection Data" option in the upper right corner drop-down menu
- Select the connection to synchronize
- View the synchronized topic tree view

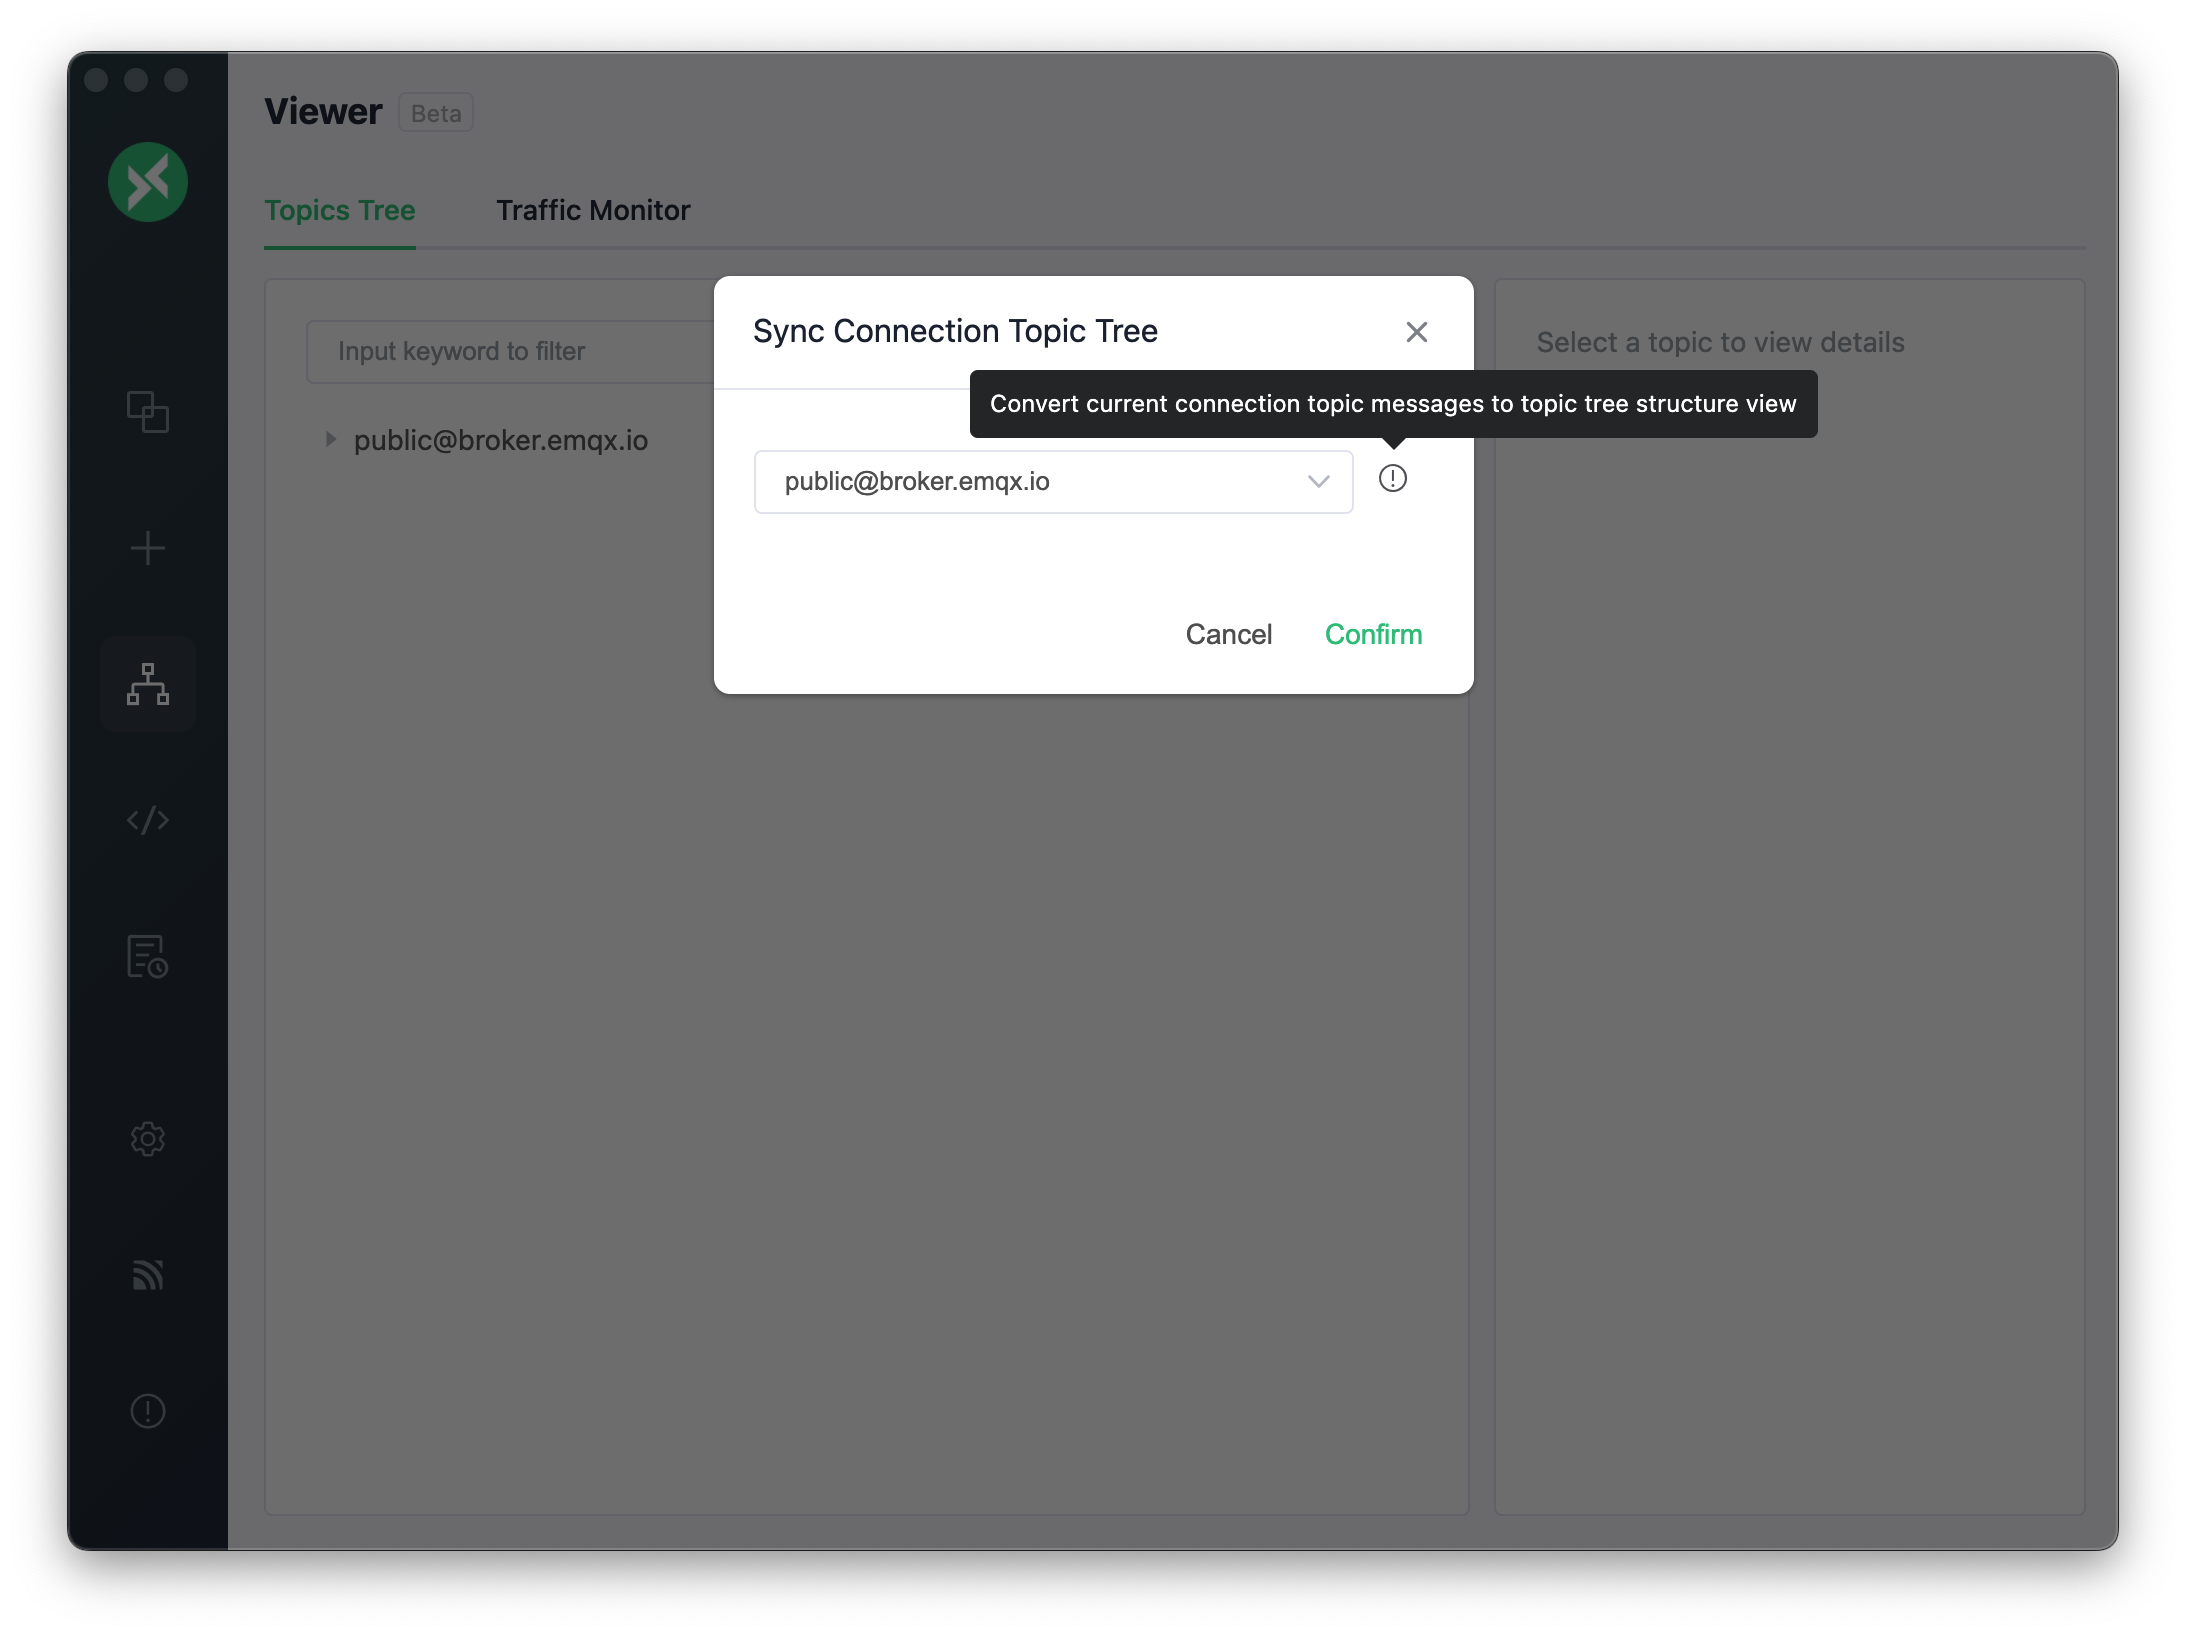
Note:
- It is recommended to synchronize data when the connection is idle to ensure data accuracy
- The synchronized topic tree will display the latest messages for each topic
Clear Topic Tree
Selecting the Clear Topic Tree option in the More Operations menu clears the content of the Topic Tree for the current connection.
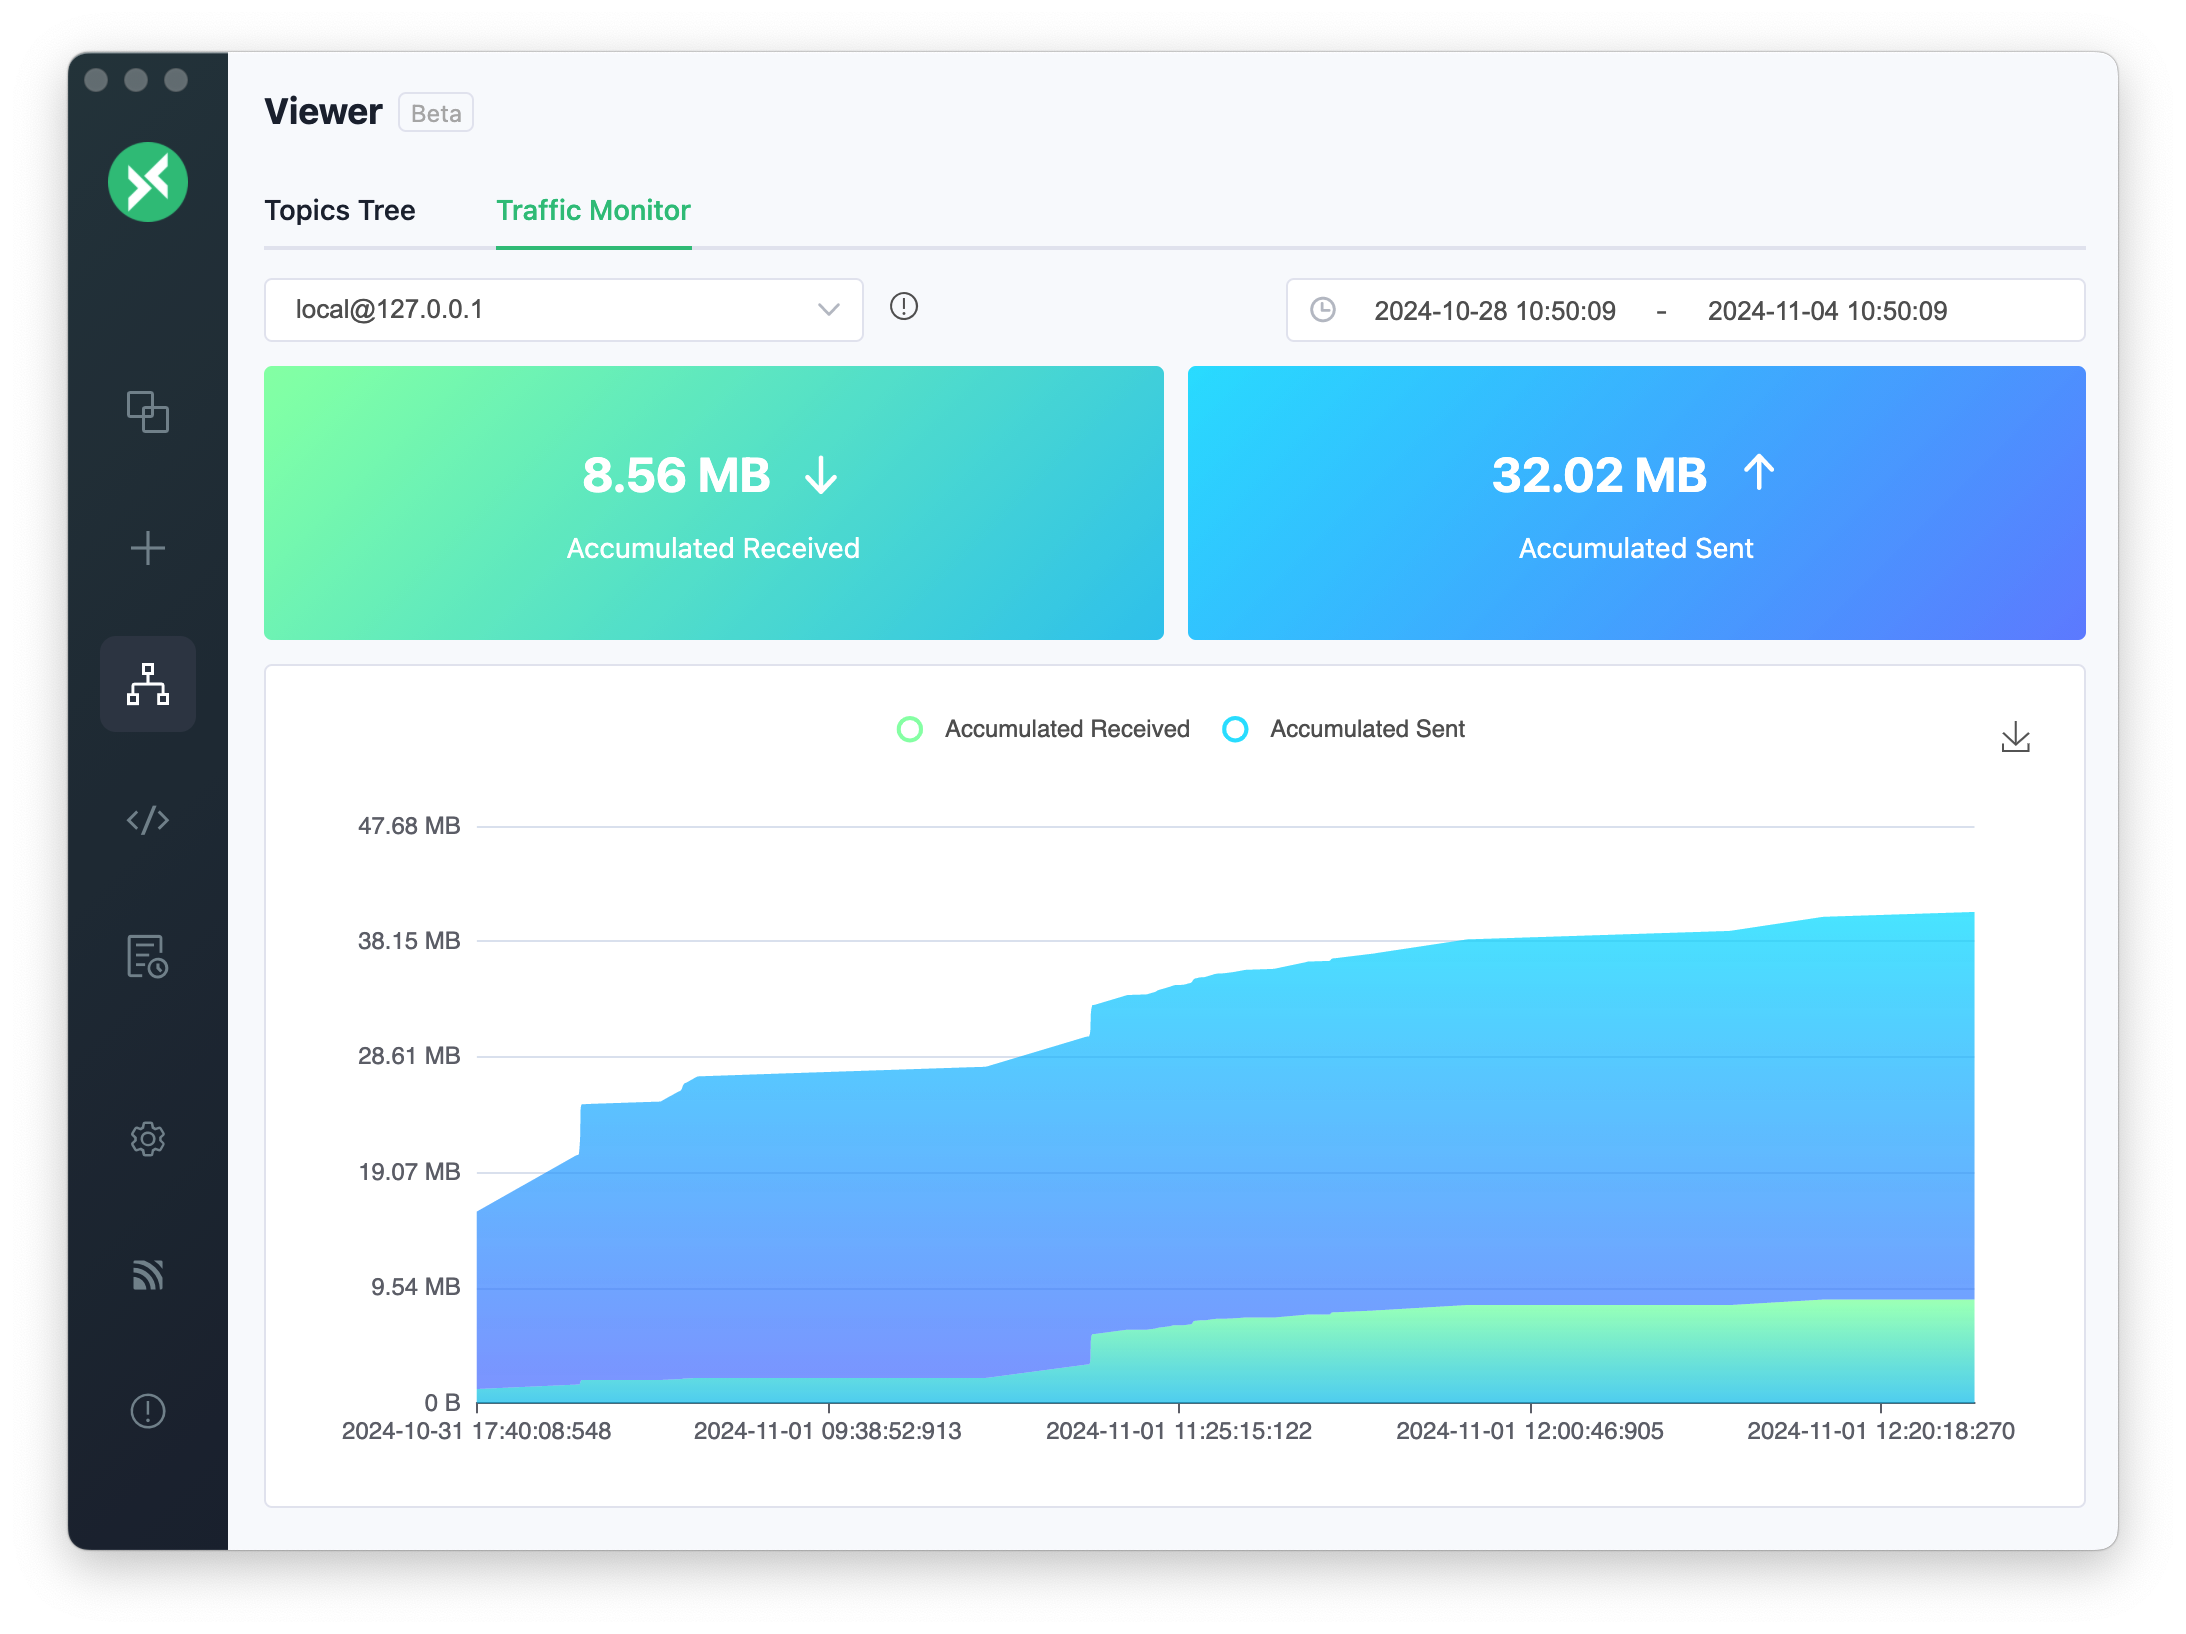
Traffic Monitor
Starting from v1.11.1, the current bytes statistics function has been migrated to the Viewer menu and renamed Traffic Monitor. Visualizing the traffic data of the MQTT Broker helps users monitor the connection's data sending and receiving status in real-time, analyze the traffic trends and peaks, and identify potential network issues promptly, optimizing system performance and resource configuration.
There are two convenient ways to access the traffic monitor:
- Click the traffic monitor icon in the upper right corner of the connection page to enter directly
- Select
Viewer->Traffic Monitorfrom the left menu bar
When entering from the connection page, MQTTX will automatically subscribe to the $SYS/# system topic for you with no need to operate manually. If you are accessing directly from the menu, you need to manually subscribe to the system topic to see the monitoring data.
Note: EMQX defaults to allowing only clients on the localhost to subscribe to the $SYS topic. If you encounter subscription failures when accessing EMQX remotely, you must modify the ACL rule settings. Please refer to the built-in ACL rule description in the EMQX documentation for specific configurations.
Top Control Bar
There is a connection selector on the top. When jumping from the connection page, it will automatically select the corresponding connection, and you can switch to monitor the connection and view its connection status. On the right is the time range selector, which displays data for the past 24 hours by default.
The time selector provides time ranges such as the past 5 minutes, 30 minutes, 1 hour, 1 day, and 1 week. Clicking on them lets you switch time ranges to view monitoring data for different periods.
Accumulated Value Statistics
The card displays the latest accumulated value, and the following is a line chart indicating the growth trend of the accumulated value.
Rate Statistics
The following are the rate statistics. The card displays the latest rate information, and the following shows the current time average sending and receiving rate.
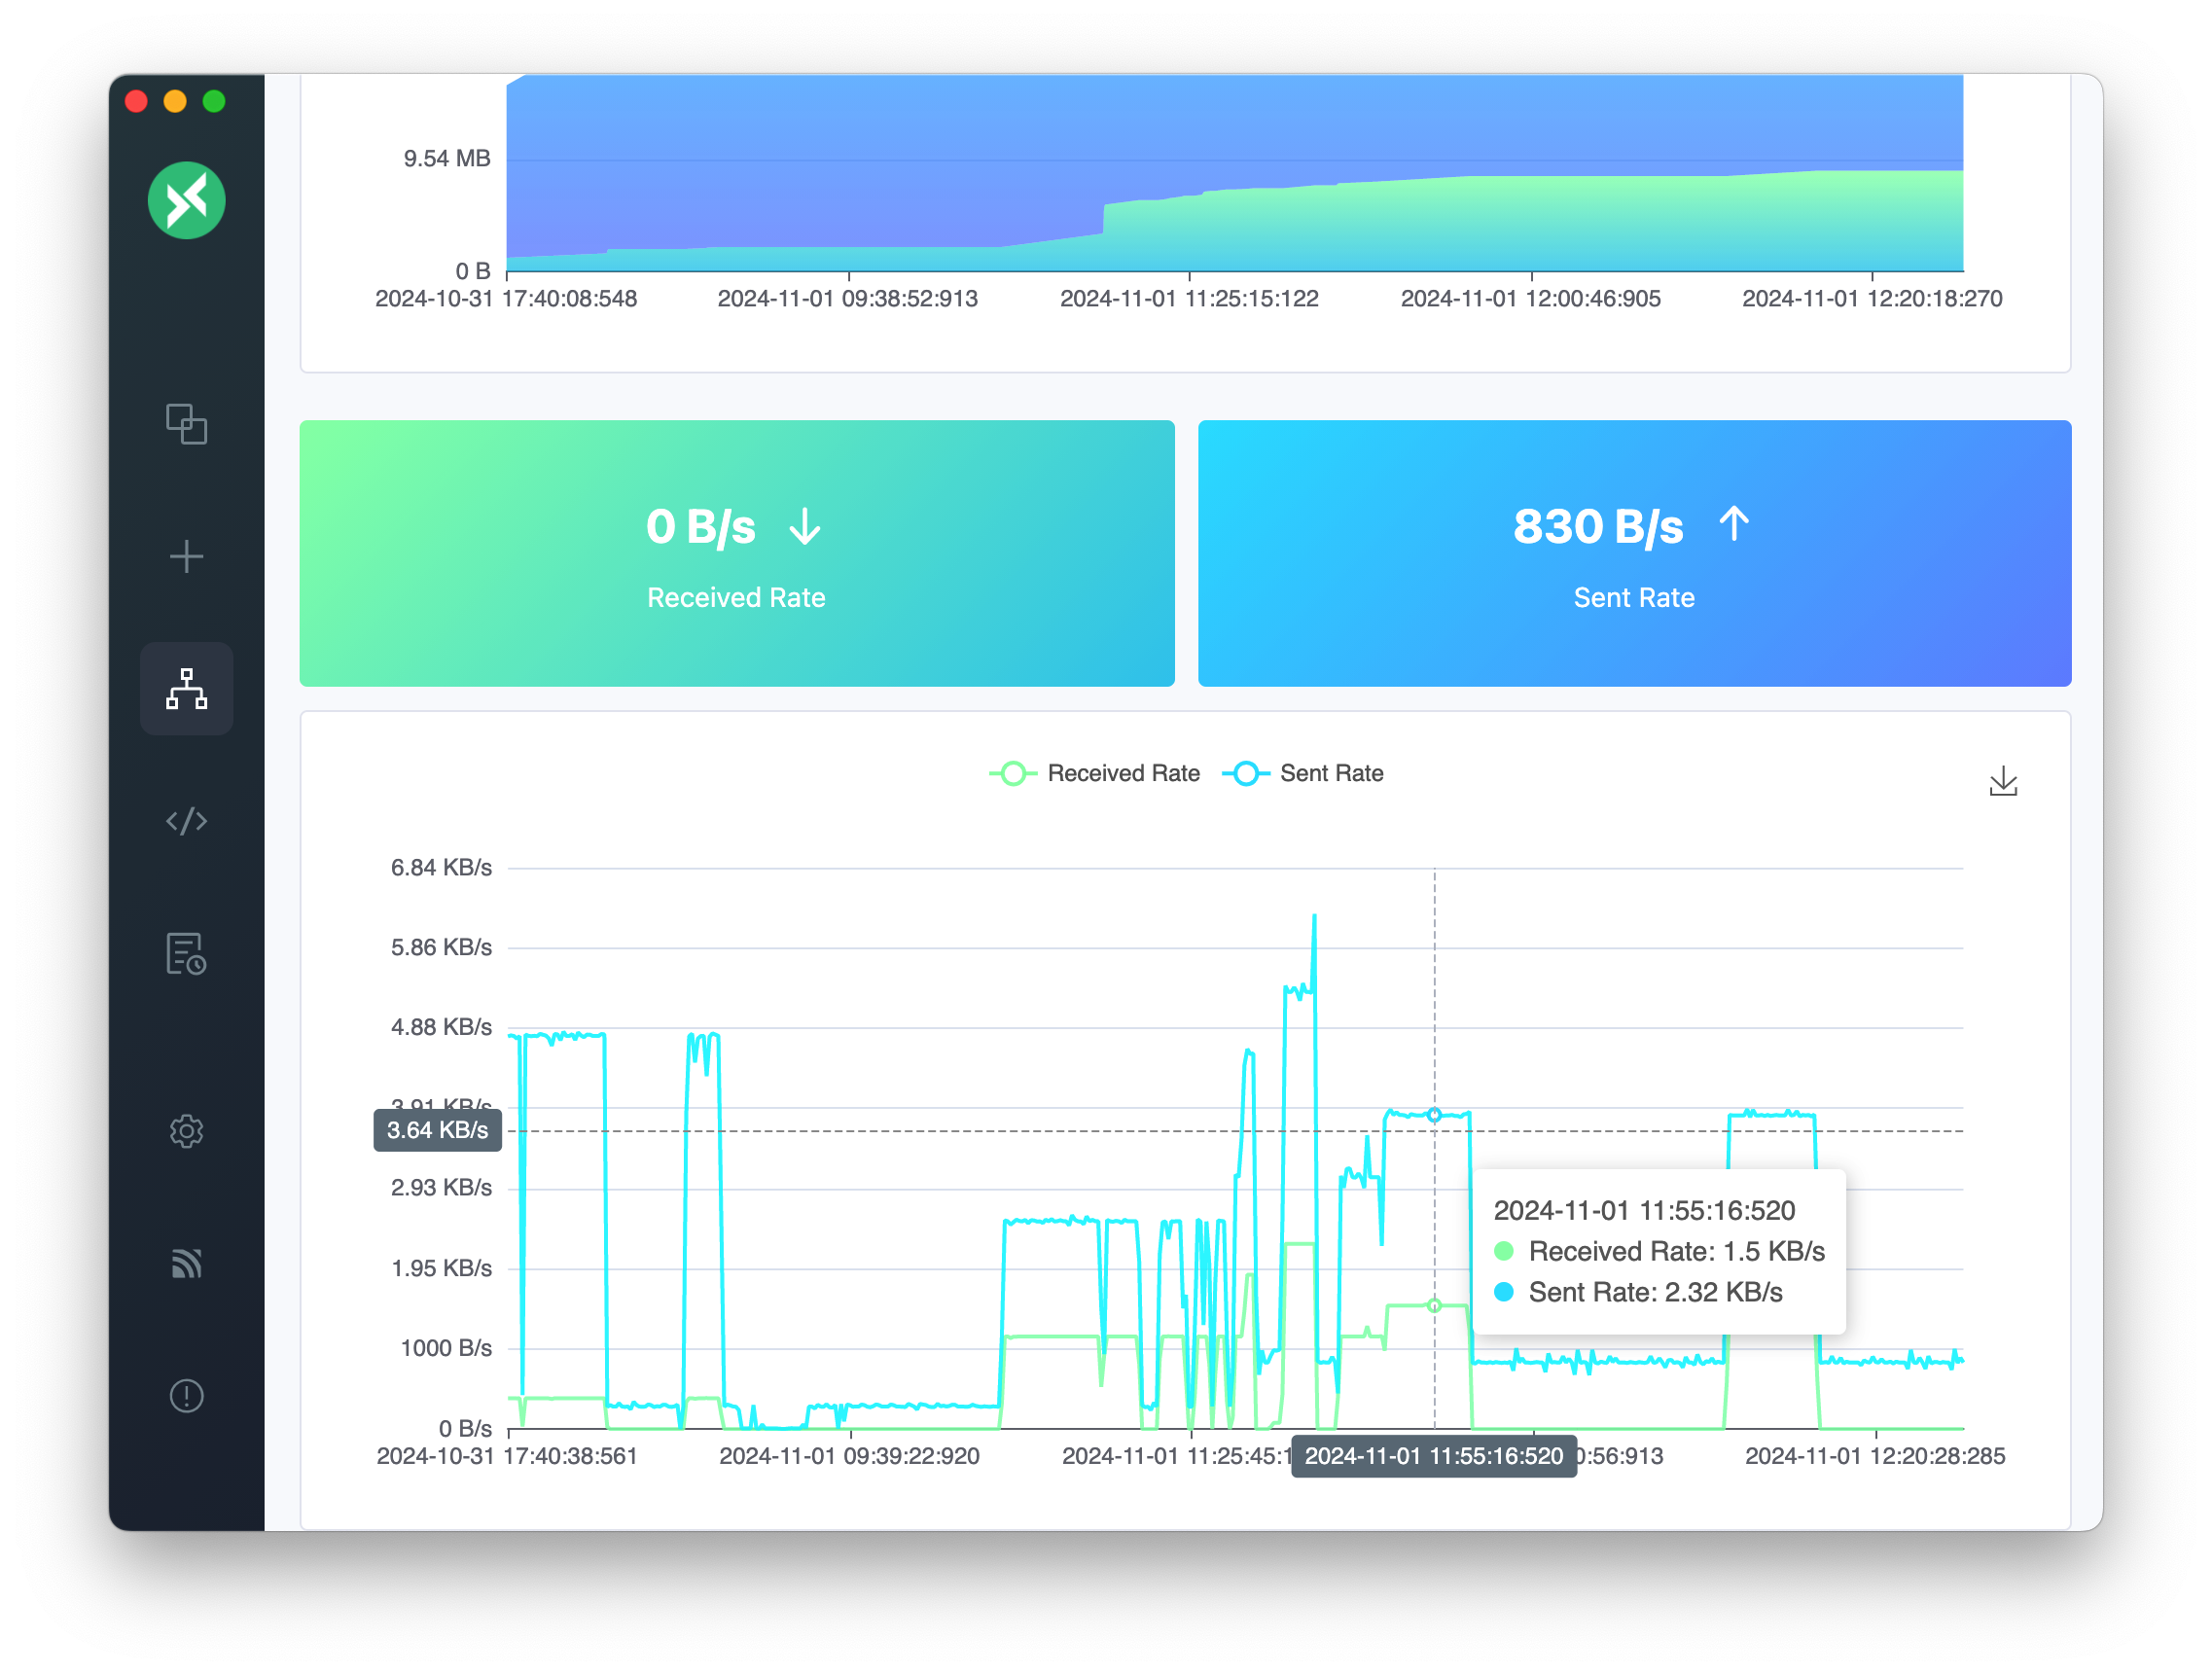
Note: The rate data is calculated based on the time interval the MQTT Broker sends the system topic. The shorter the sampling interval, the more accurate the data. You can adjust the sending interval of the system topic in the MQTT Broker configuration to obtain more accurate data.
Others
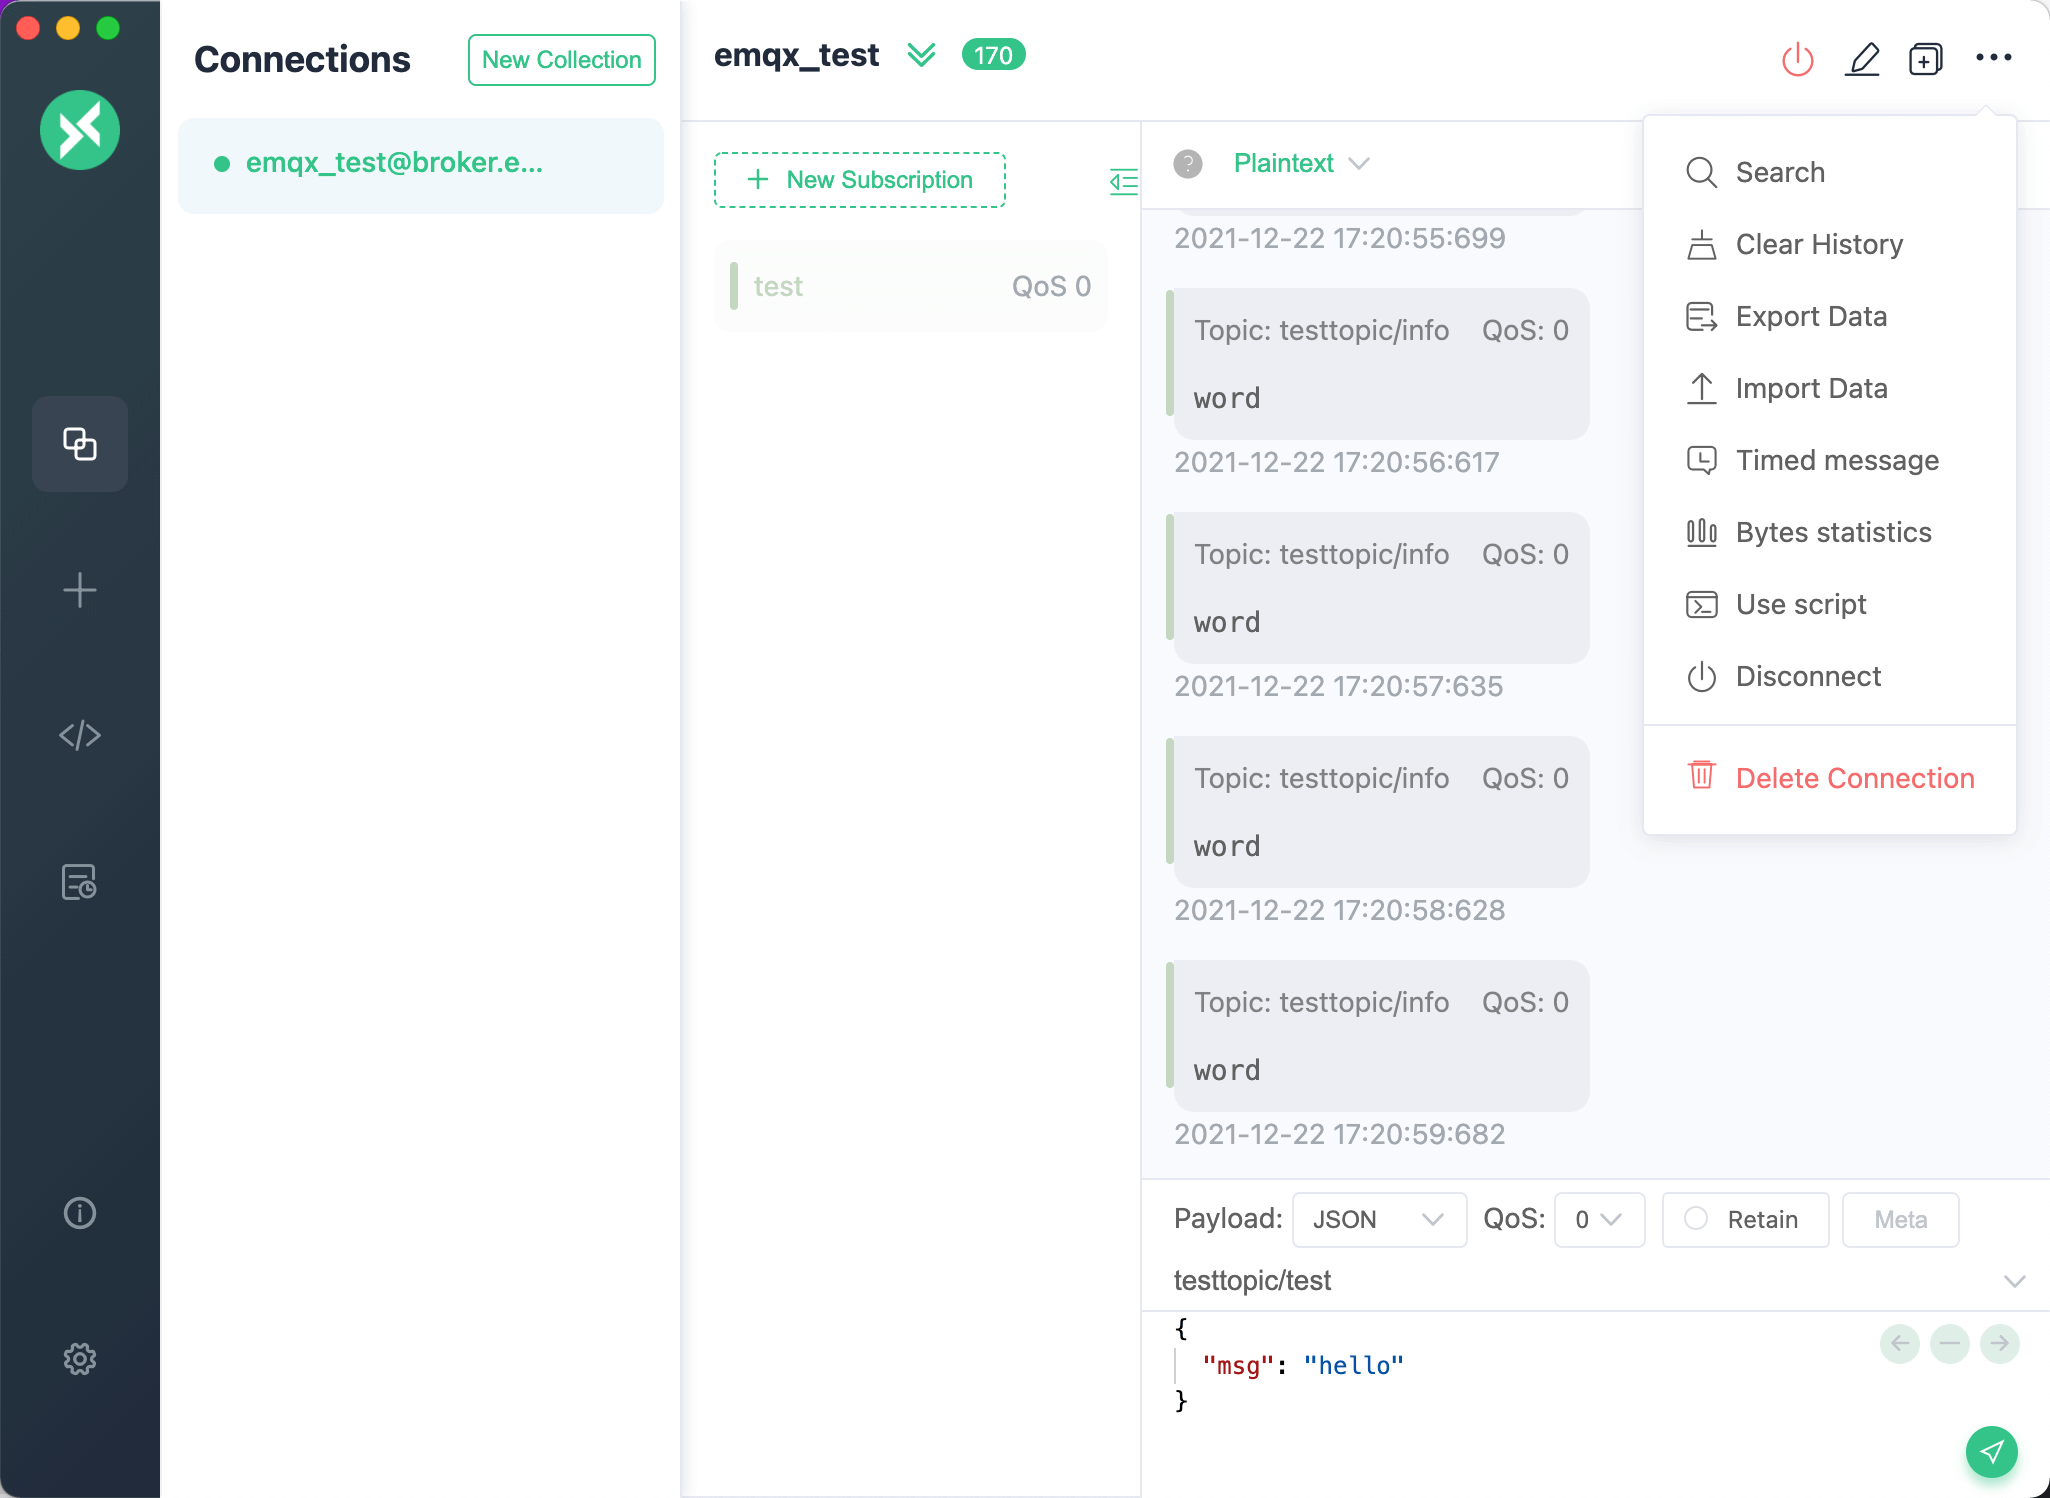
Connection Operations
By clicking the action bar button at the top, you can quickly perform various connection operations such as disconnecting, deleting the current connection, importing and exporting data, and managing timed messages and byte statistics.
Message Processing
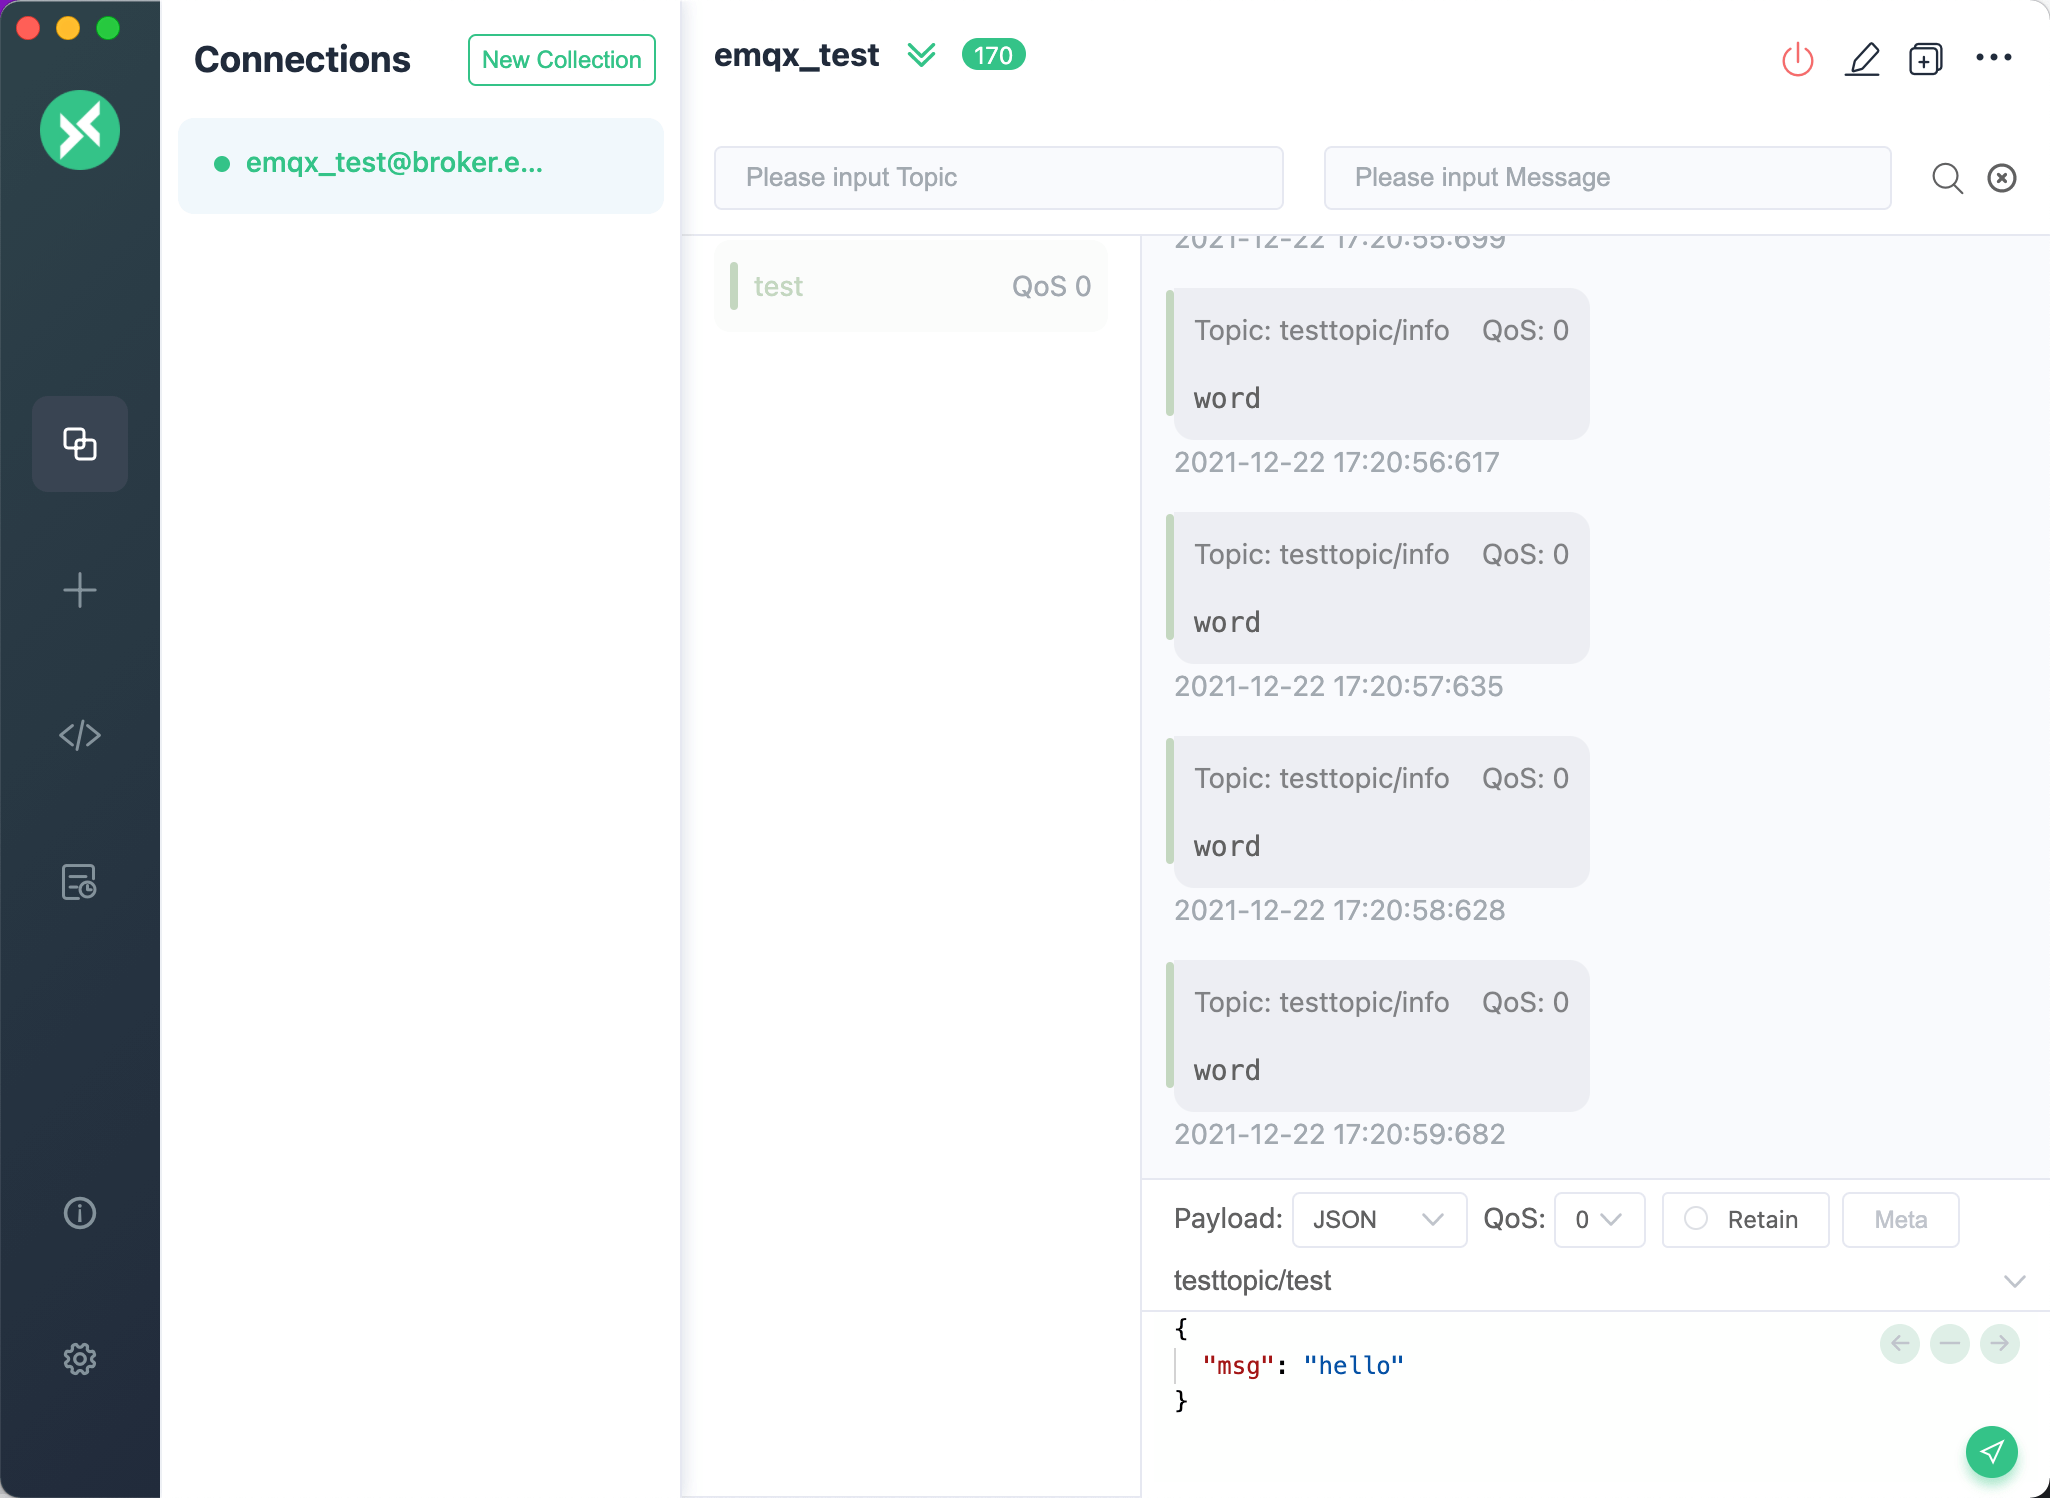
You can filter messages by selecting the "All", "Received", or "Published" buttons in the upper right corner of the message bar.
Click the action bar button at the top and choose the "Search" option, or use the shortcut. macOS users can use the command + f shortcut, while other users can use the control + f shortcut to open the topic search function, which allows for fuzzy queries of topics and payloads.
Click the action bar button at the top and select the "Clear History" option to quickly clear the sent and received messages of the current connection.
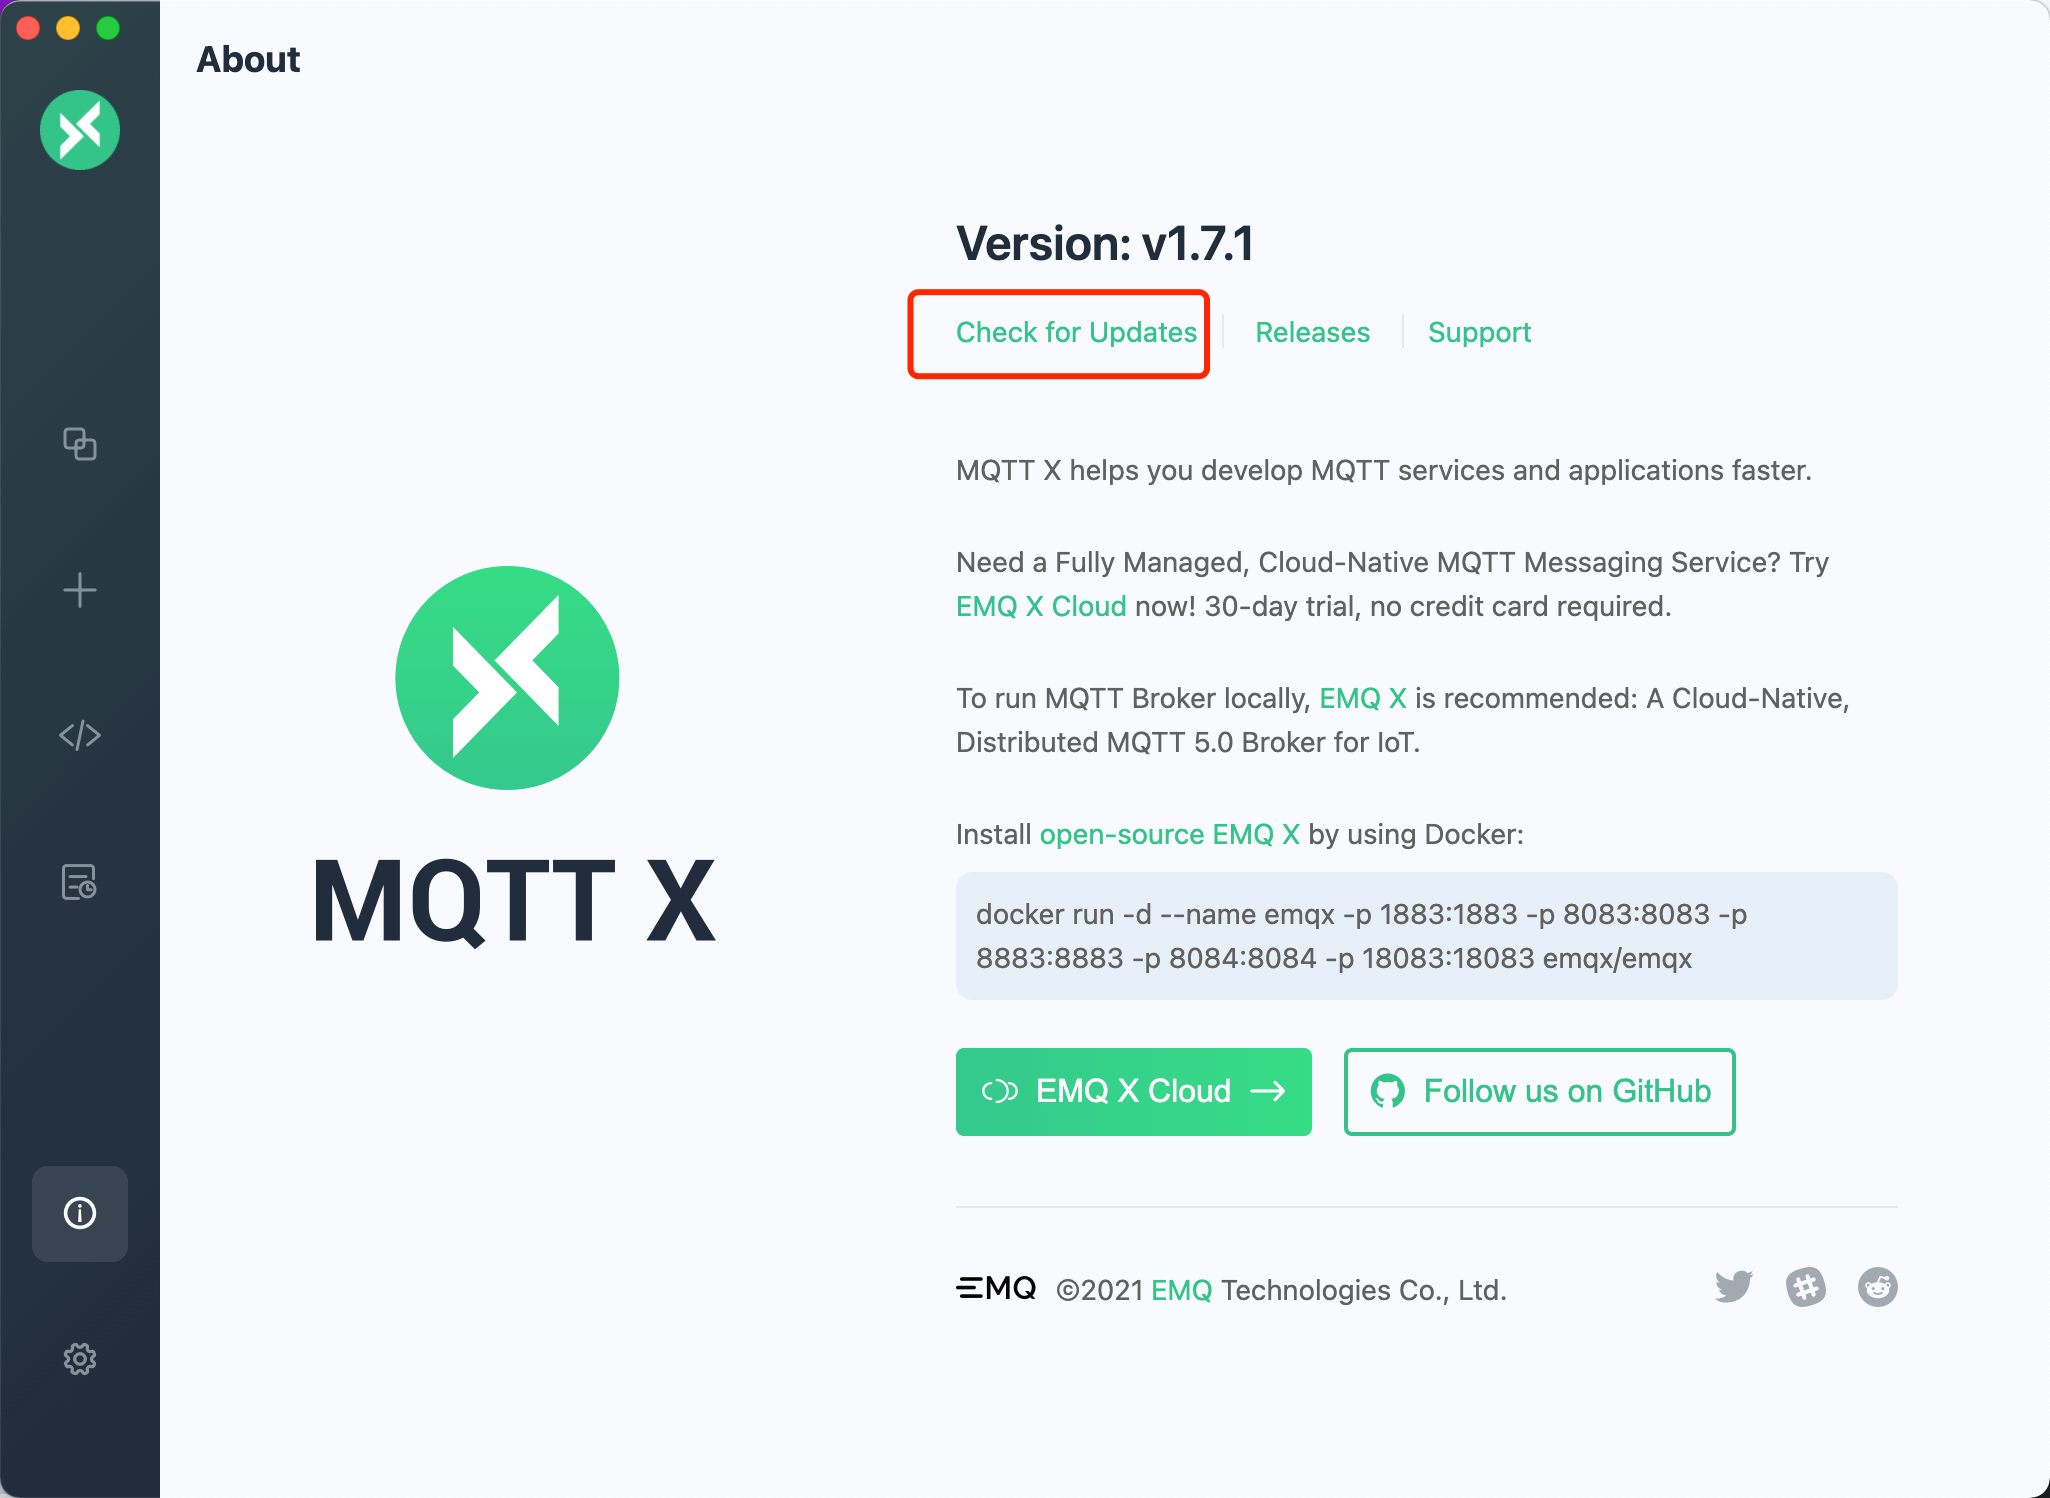
Check for Updates
Click the "i" button at the bottom left to access the "About" page, where you can find information about the version of MQTTX and related information about EMQX. Click "Check for Updates" to check if there are newer versions available.
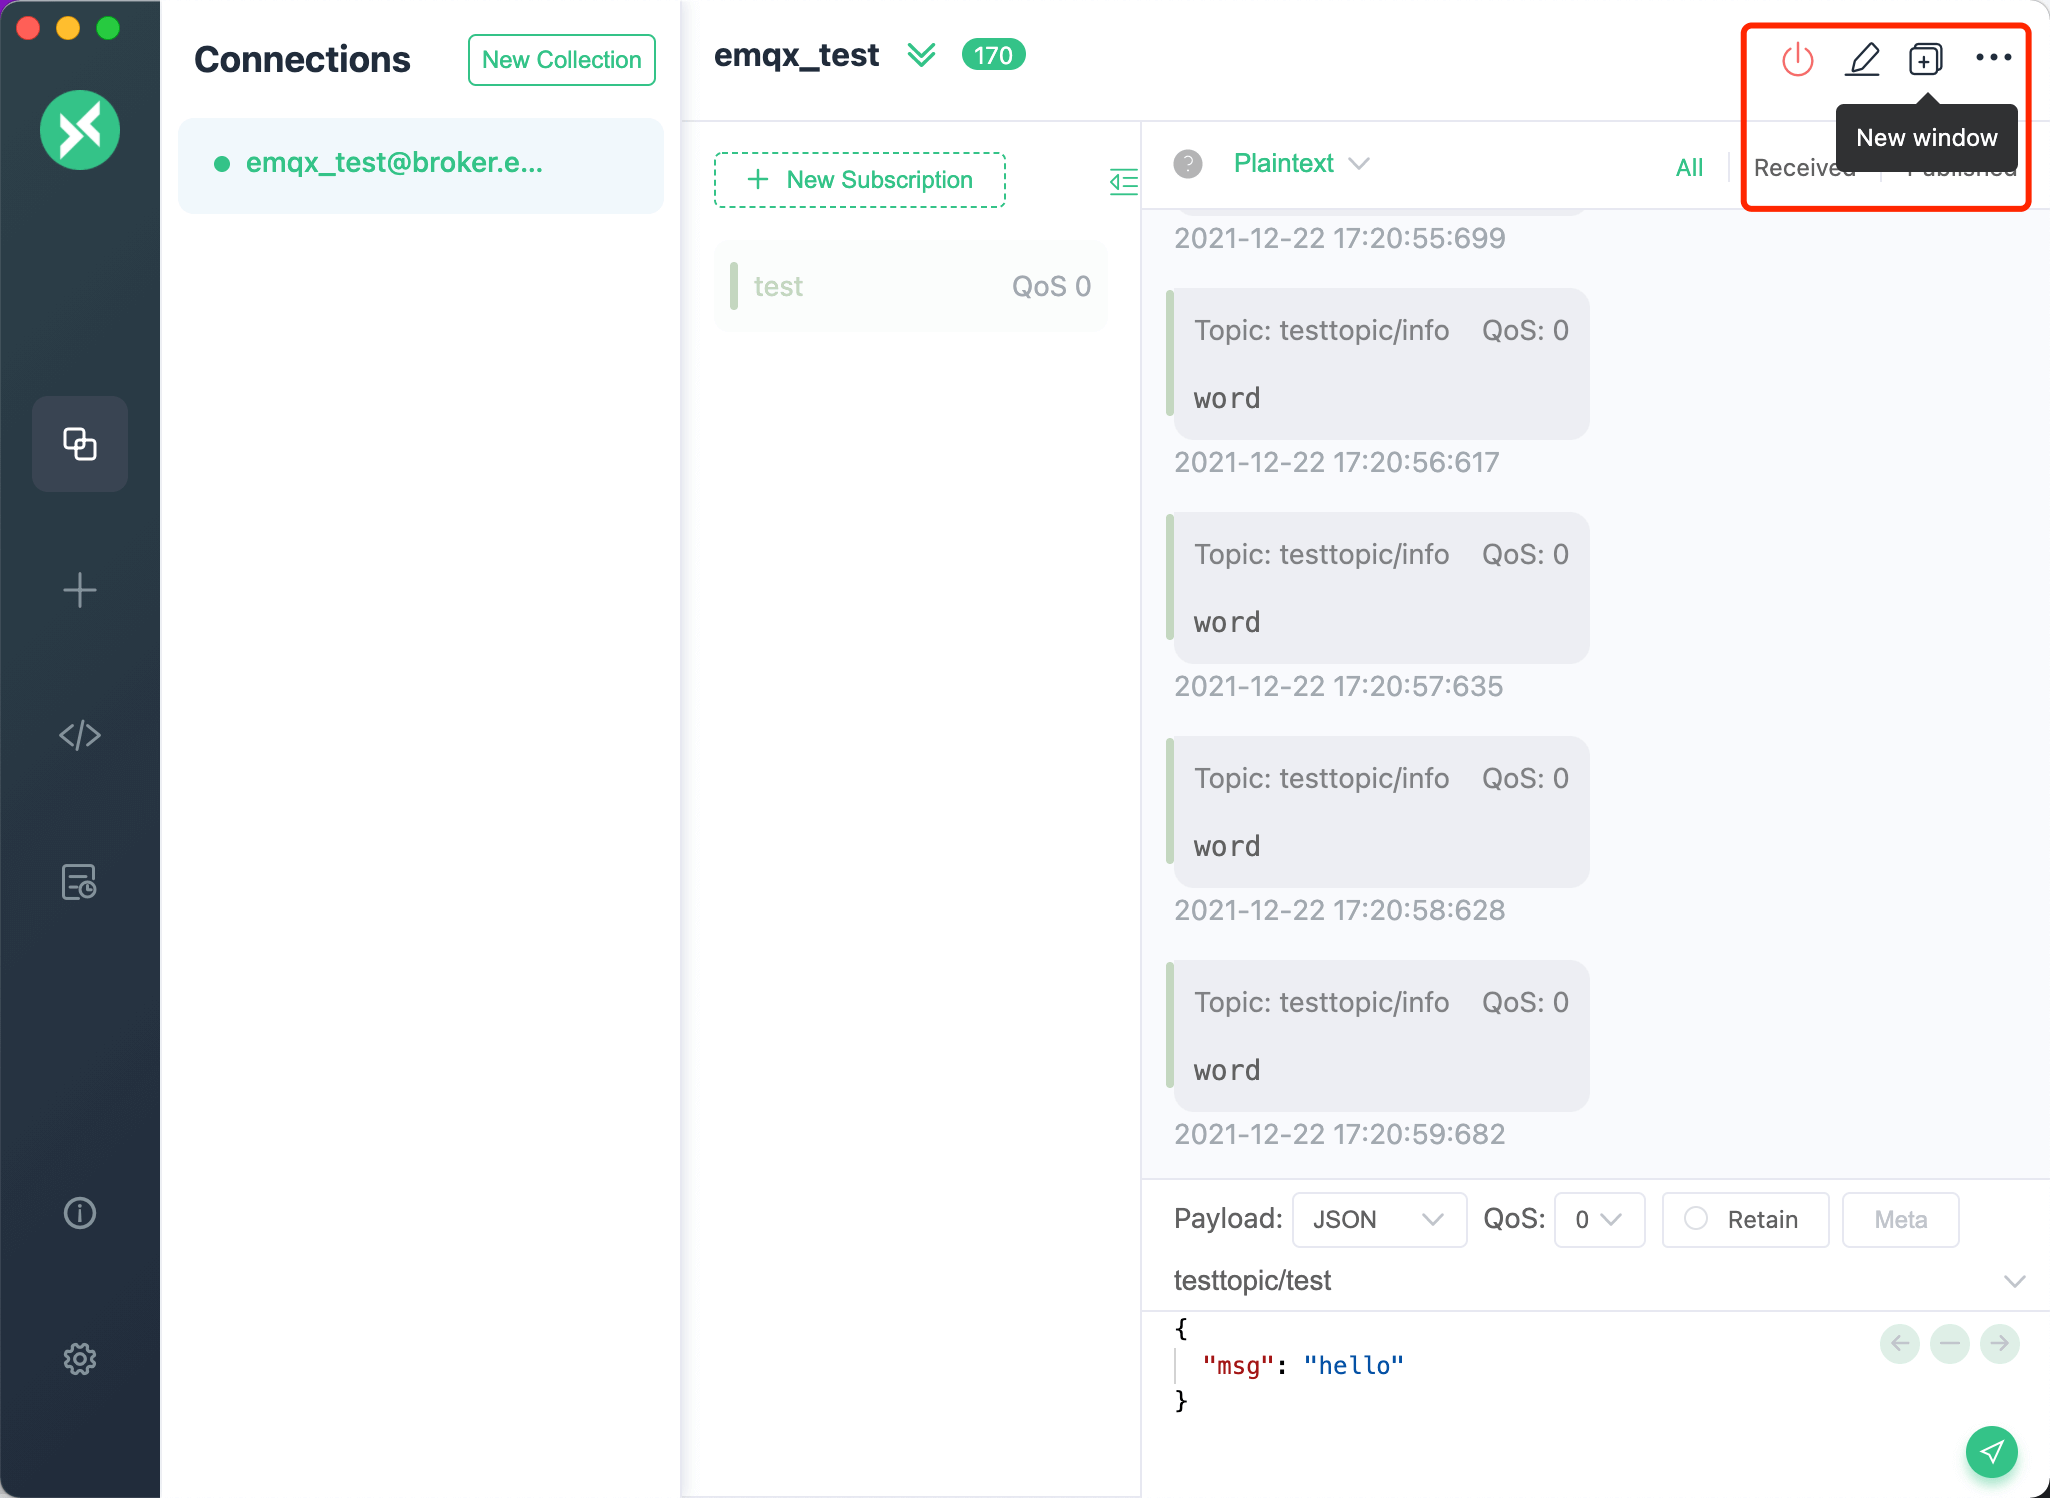
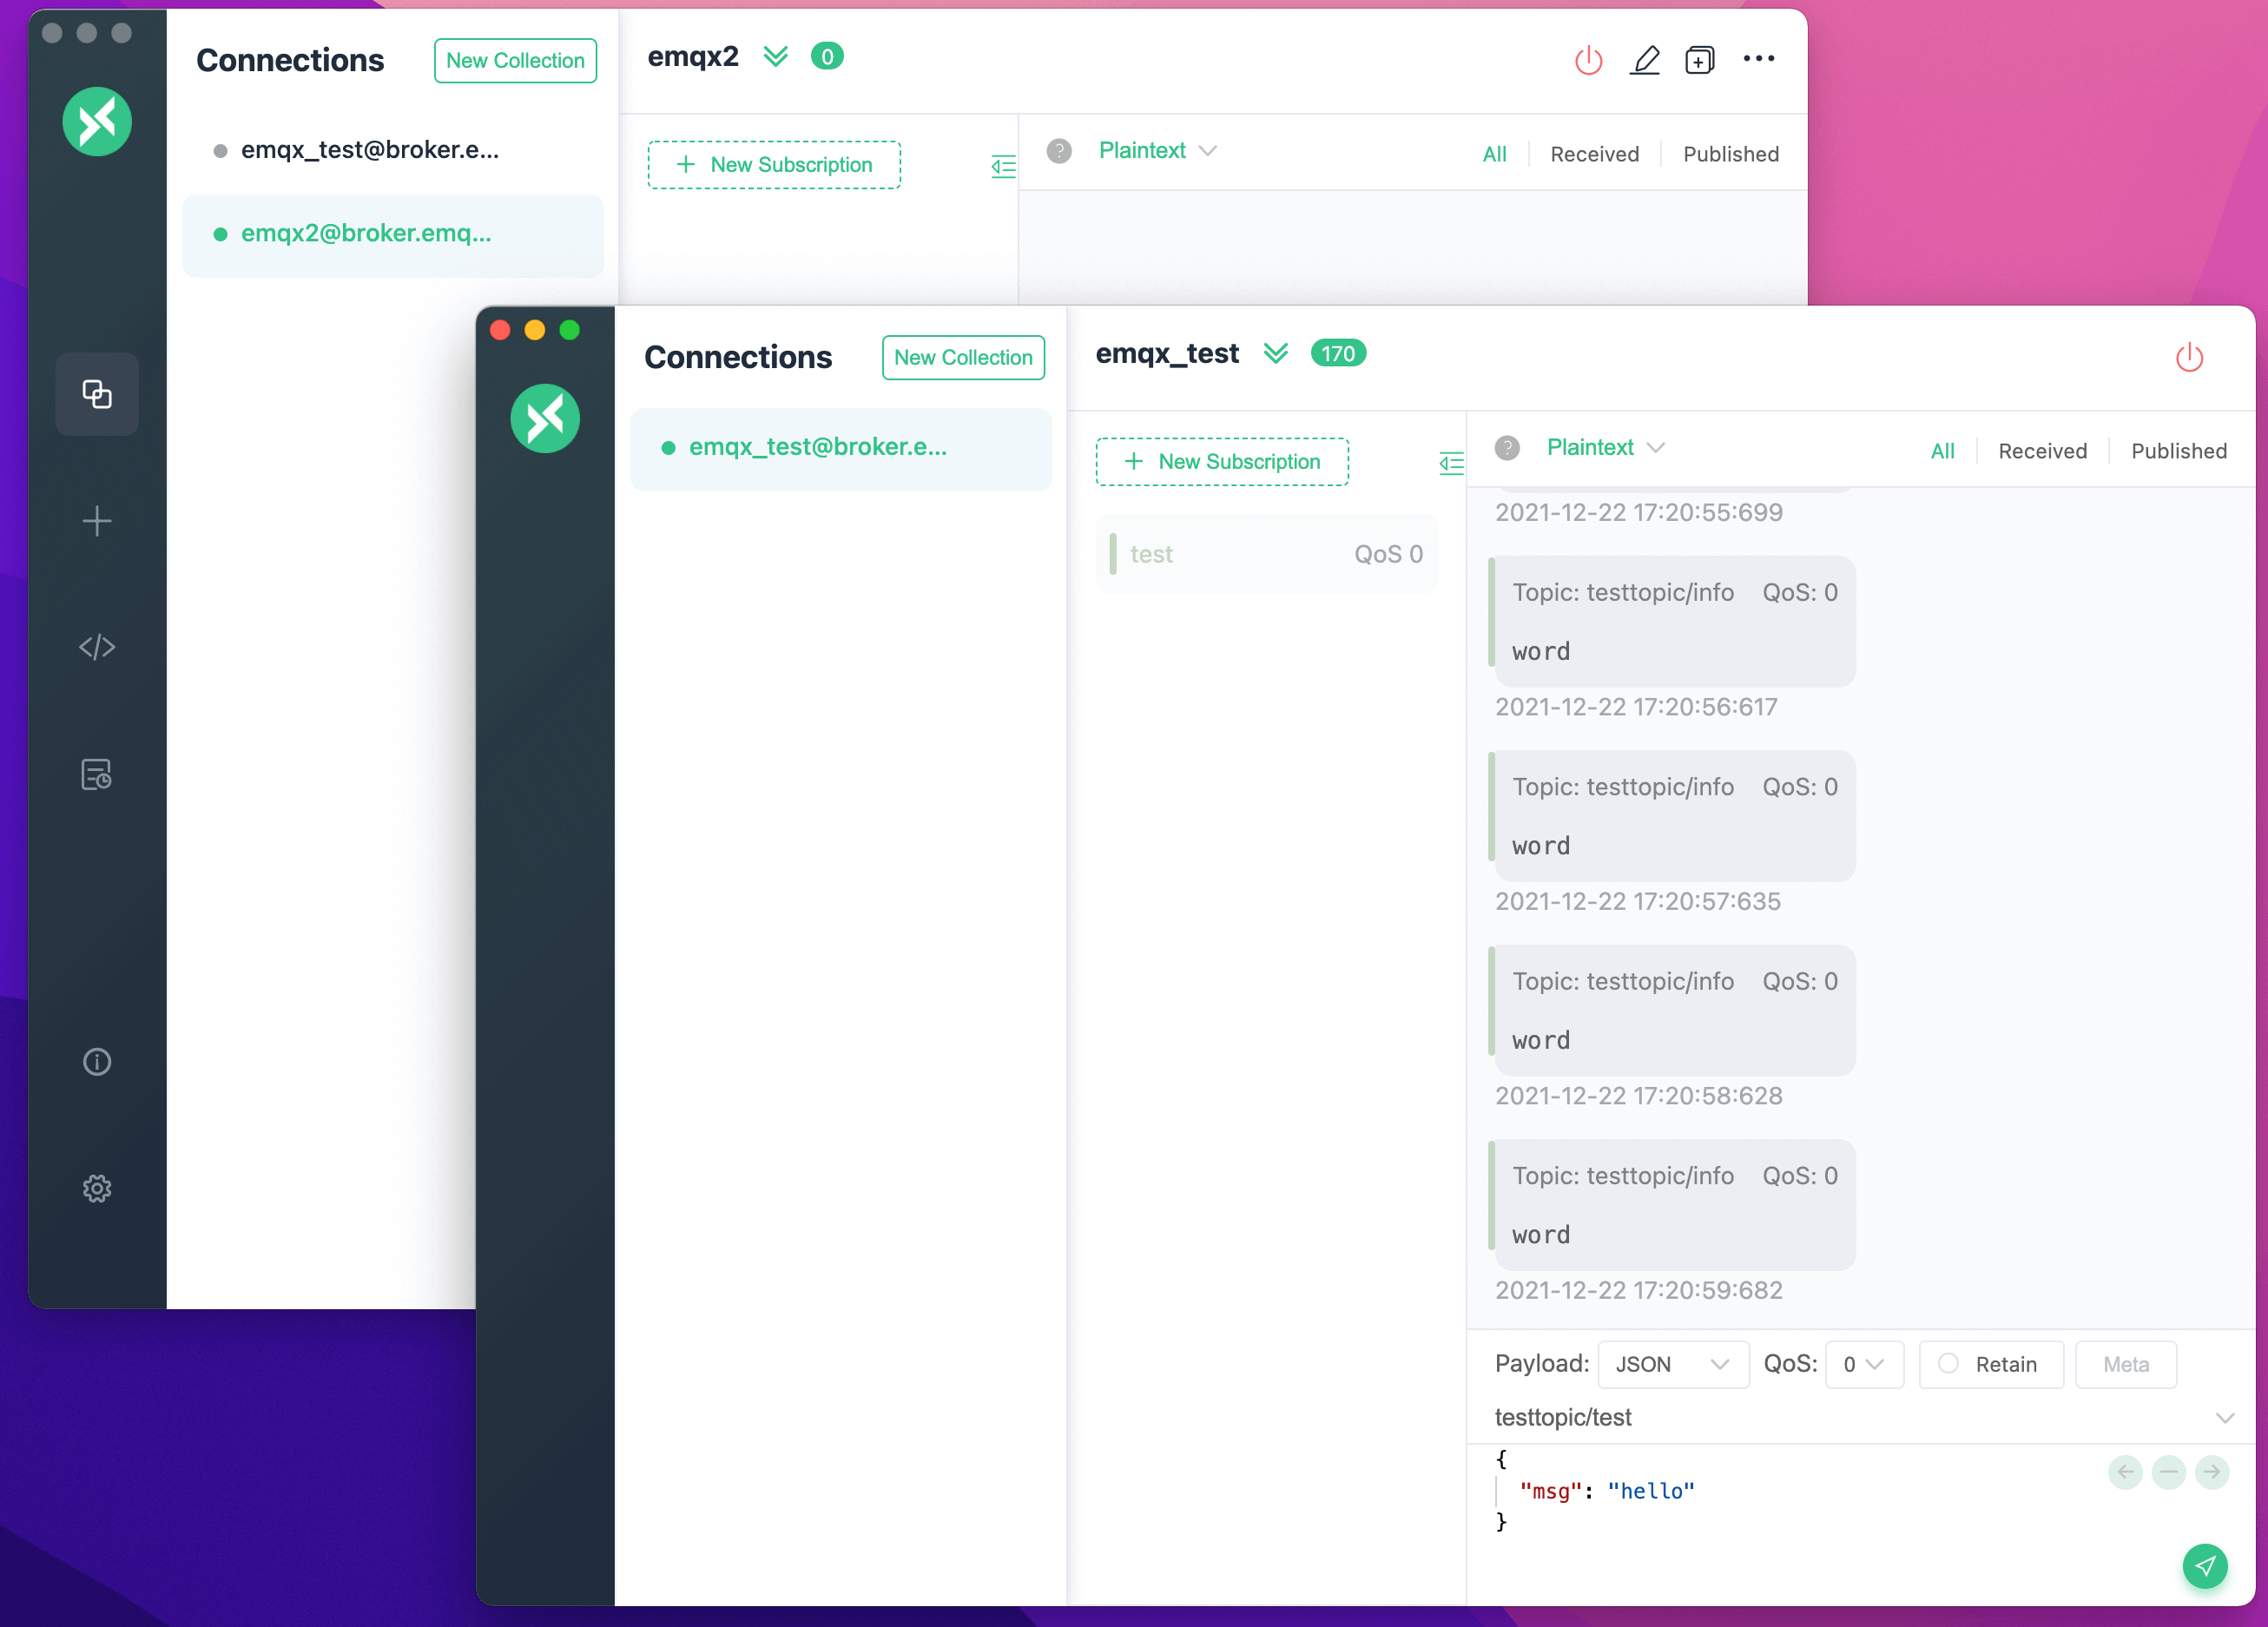
Multi-Window
In the connection list, you can right-click and select "New Window" to create a new window for the connection. In the new window, you can establish connections, subscribe to topics, publish and receive messages, and perform other operations. If you have multiple connections or need to view received messages simultaneously, you can create multiple view windows and display them side by side. Starting from v1.4.1, users can also click the window button at the top to quickly create a new window.
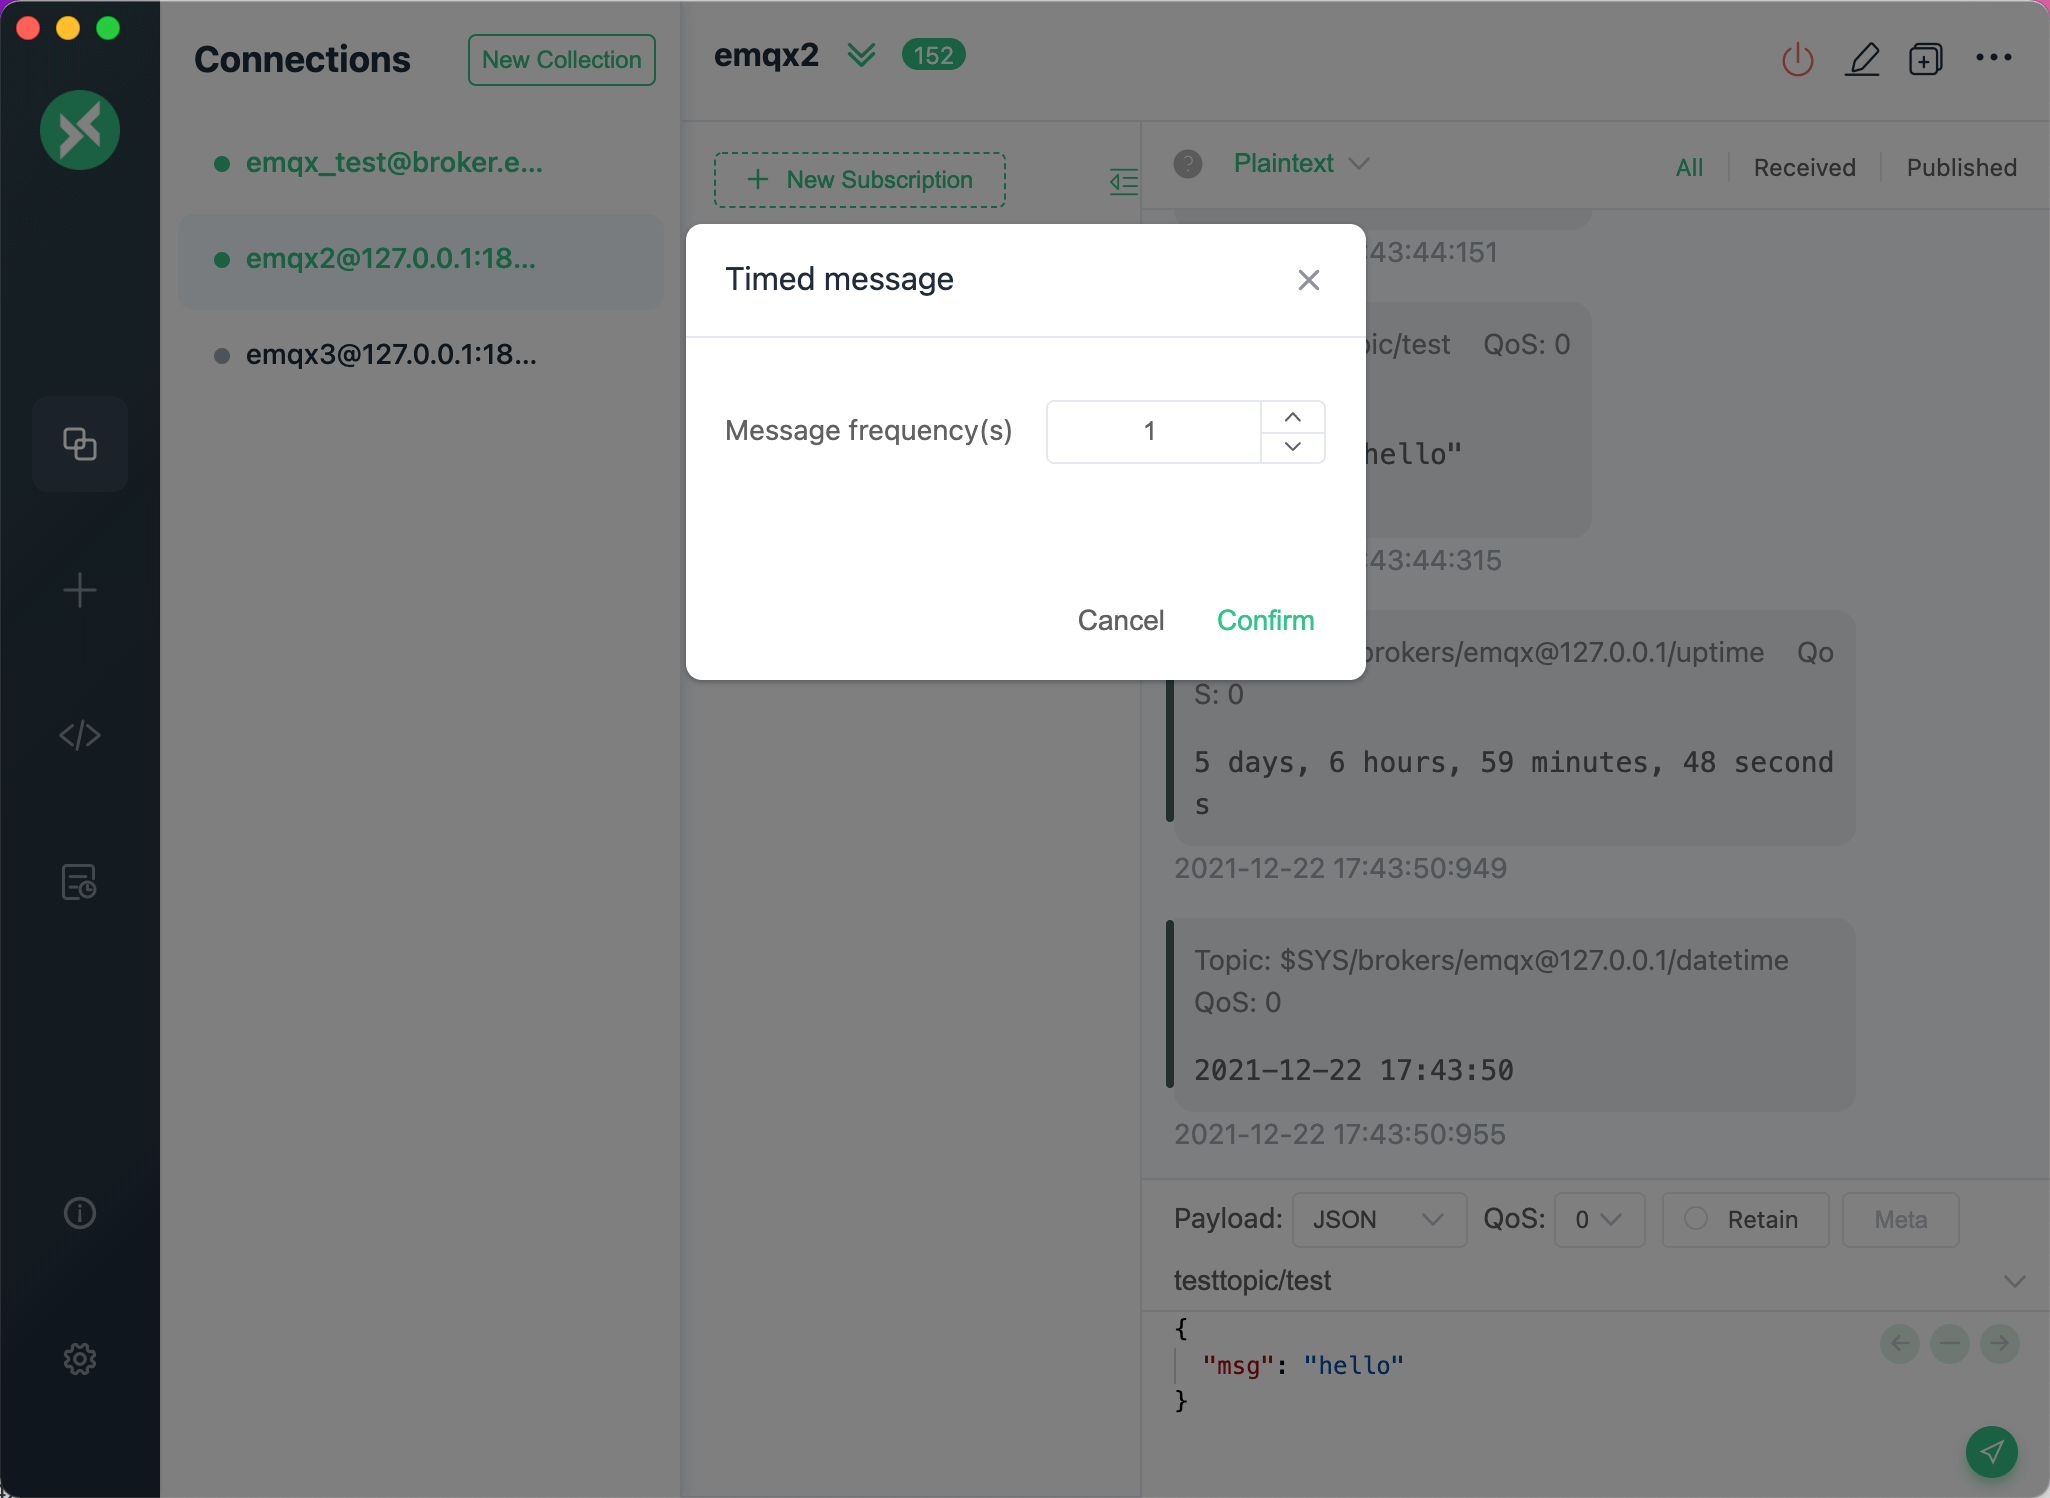
Timed Messages
In the drop-down menu in the upper right corner, you can select the "Timed Message" option to set the sending frequency in seconds. After the setting is completed, manually send a message, and MQTTX will automatically send the message according to the specified frequency.