MQTTX Agent
MQTTX Agent is an AI Agent built into the desktop client for operating MQTTX through natural language. Use this guide to configure a model provider, provide connection context, run MQTT tasks, and check their results.
Start with the provider and permission settings below. Then follow a task example to manage connections and messages, interact with a device using its supplied MQTT protocol, investigate traffic, or prepare code and payload processing. Keep tool results in the same conversation when continuing a task.
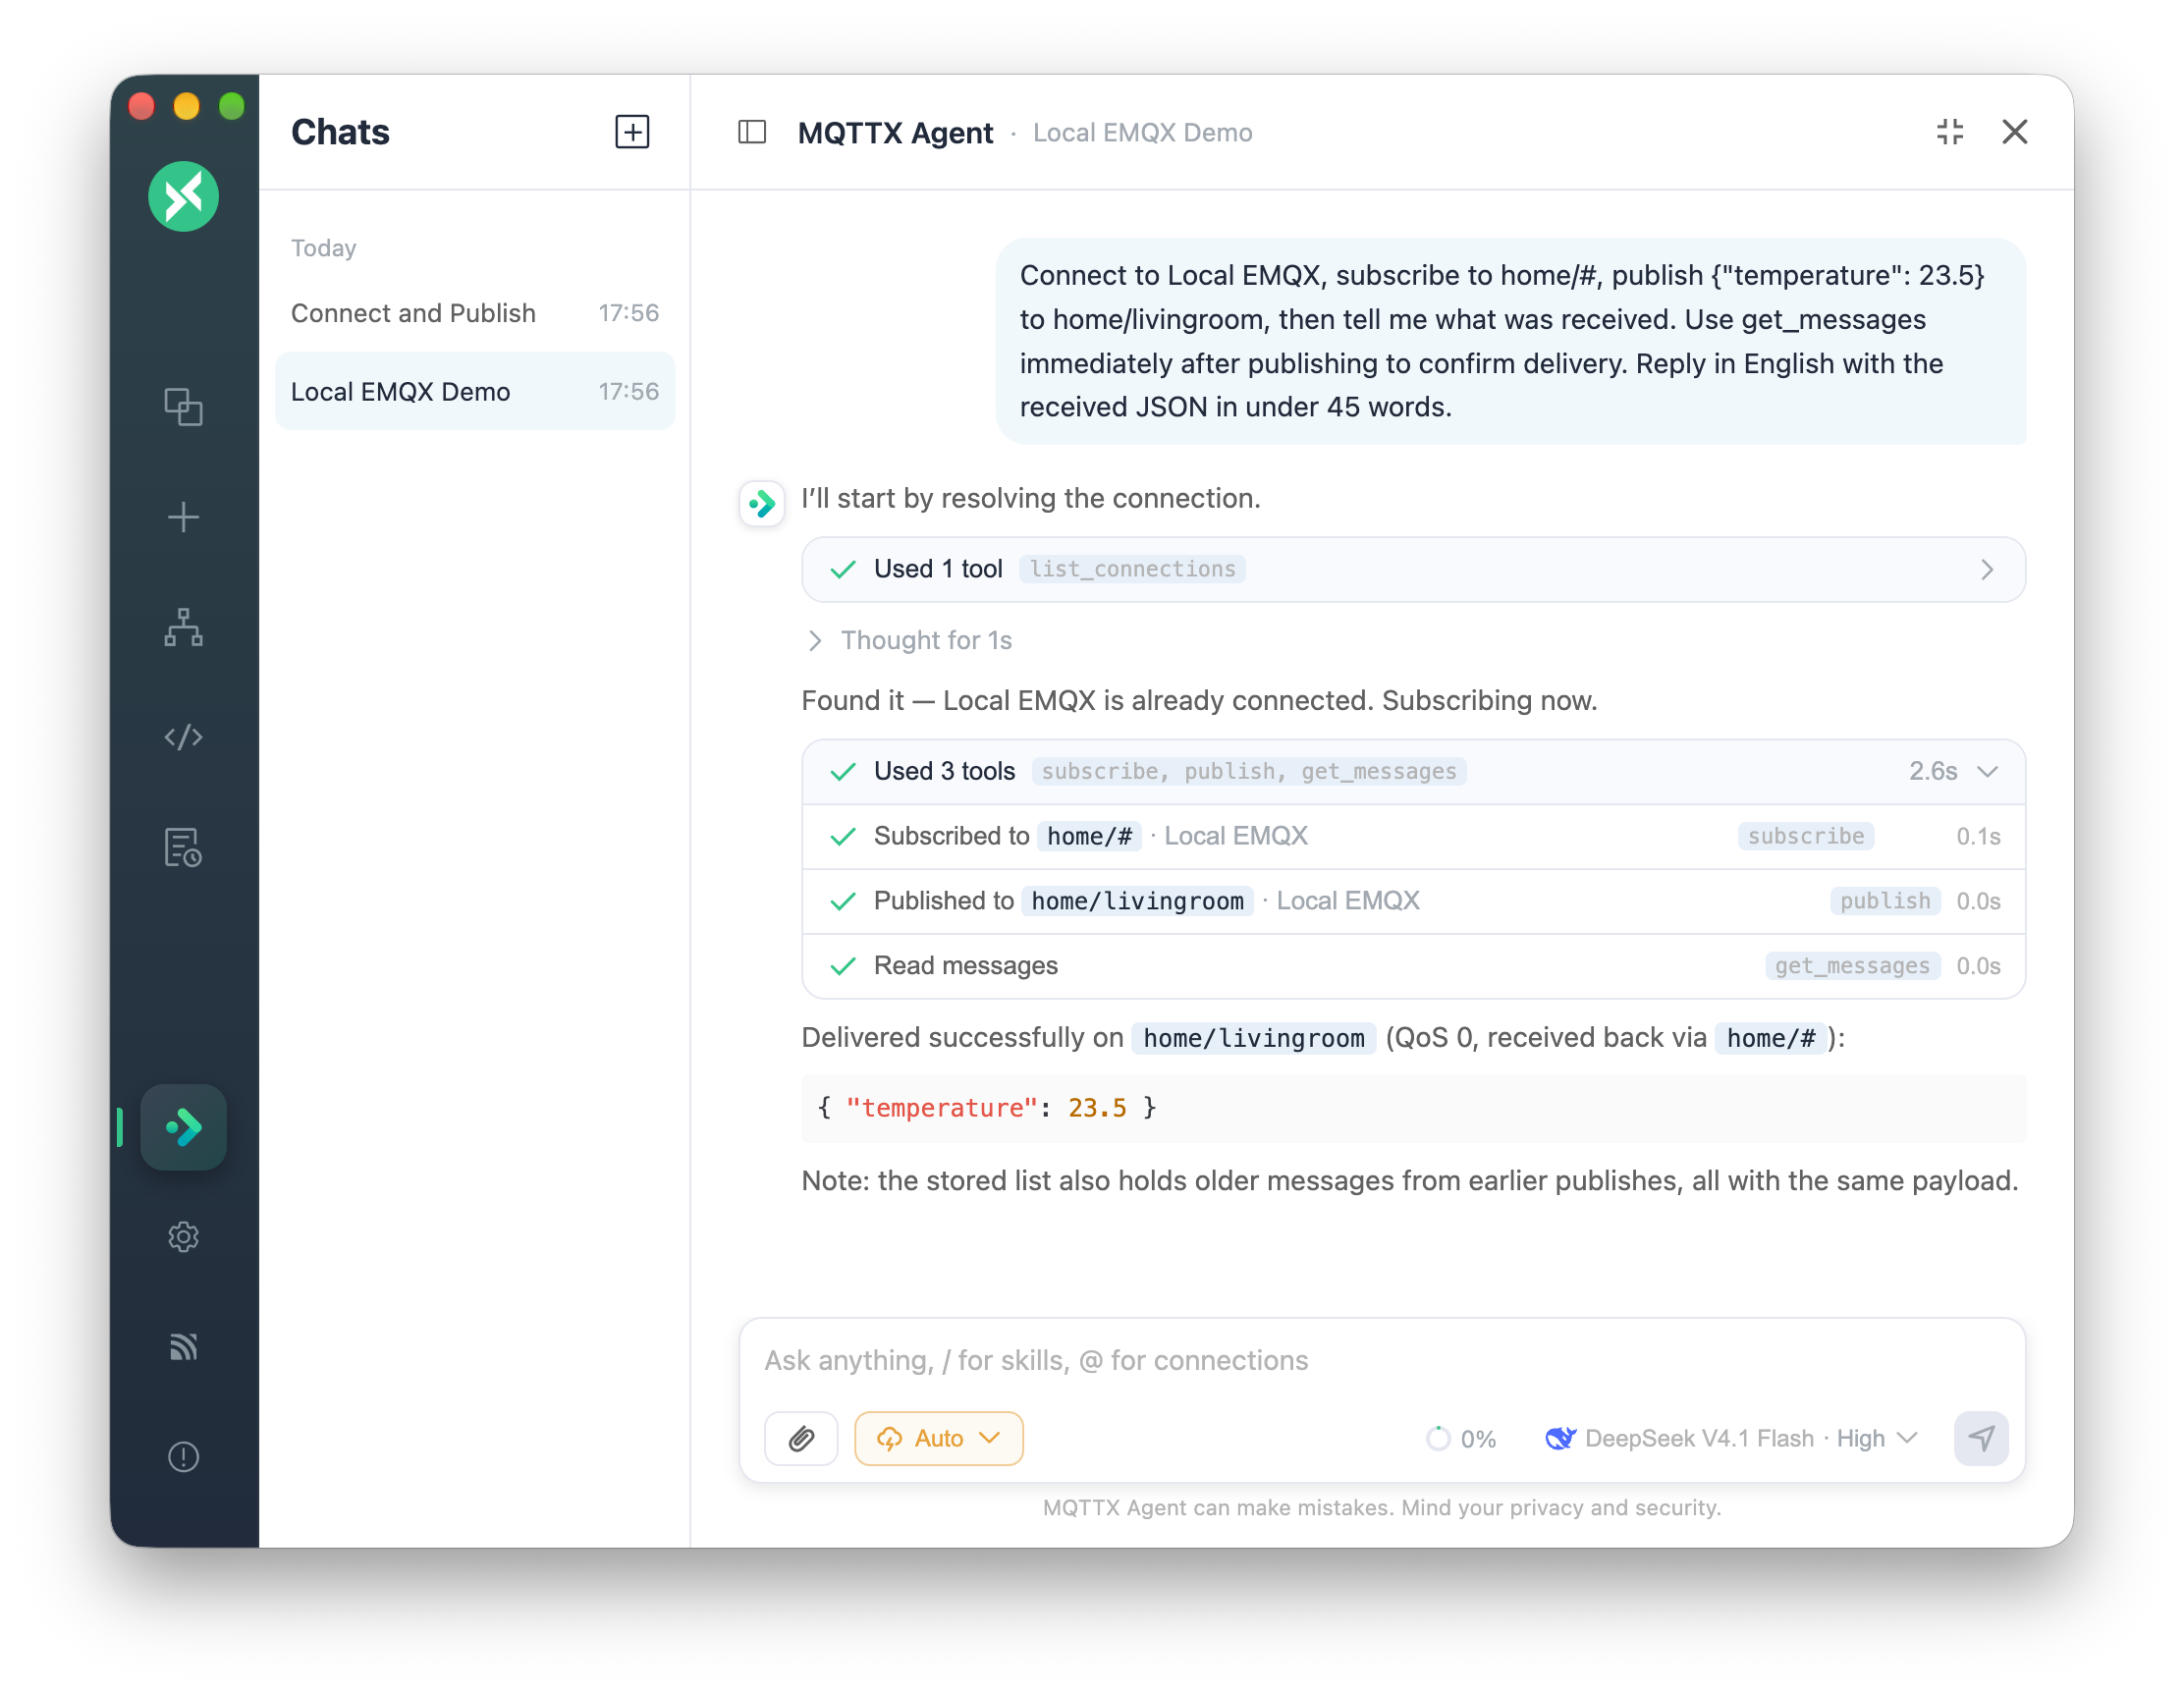
Set up your model provider
- Open Settings → MQTTX Agent and turn on Enable MQTTX Agent.
- Configure your provider's API Host, API Key, and Model. Choose a model that supports tool calls for operations in MQTTX.
- Open the Agent from the star button in the left sidebar. To use it alongside another view, open the floating window with
Cmd/Ctrl + Jor the MQTTX Agent button on a connection or script page. - Submit a read-only request, such as “List my existing MQTTX connections.” Check that the reply includes a tool result. If the request fails, check the provider endpoint, credentials, and tool-call support before running a task.
Common API hosts are listed below. Use the endpoint and credentials supplied by your provider.
| Provider | API Host |
|---|---|
| OpenAI | https://api.openai.com/v1 |
| DeepSeek | https://api.deepseek.com/v1 |
| Anthropic | https://api.anthropic.com/v1 |
| xAI | https://api.x.ai/v1 |
https://generativelanguage.googleapis.com/v1beta | |
| SiliconFlow | https://api.siliconflow.cn/v1 |
| Azure OpenAI | https://<resourceName>.openai.azure.com |
Choose how to work
Use full screen for a longer conversation, or the floating window to keep the Agent beside messages, scripts, or a Dashboard. Active connections can continue receiving and saving messages while the full-screen conversation is open.
Drag the floating window's title bar to move it, or an edge or corner to resize it. MQTTX remembers its position and size. The expand button switches to full screen. Esc closes the floating window or returns from full screen to the floating window. Selecting another page in the left sidebar leaves full screen.
Choose reasoning strength
Configure a supported reasoning level in Settings → MQTTX Agent → Reasoning strength, or in the composer's model menu below the model list.
- Auto uses the provider's default.
- Off disables reasoning.
- Low through Max request increasing reasoning effort.
The menu only lists levels supported by the selected model. Models without this control hide the setting. If a model does not support the level you selected previously, MQTTX uses the nearest supported level. The current level appears next to the model name.
Give the Agent useful context
Mention a connection
Type @ in the composer and select a connection with ↑ / ↓ and Enter. The connection you are viewing appears first, and connected entries have a green dot. The Agent reads the mentioned connection before acting on your request.
A connection mention identifies the target when a conversation involves several devices or brokers. Include the topic, payload field, or expected result in the same request.
Choose a Skill
Type / to choose a built-in Skill for client code, test data, schemas and codecs, custom functions, MQTT/EMQX knowledge, connection diagnostics, MQTTX CLI, or Zero EMQX. A Skill supplies guidance for the selected task.
The MQTTX CLI Skill prepares commands for manual execution in a terminal. The desktop Agent does not execute shell commands.
Generated code projects appear as ZIP file cards with controls to download the archive or show it in its folder. Files are stored under agent-files in the app data directory and are removed when you delete the conversation.
Add a screenshot or file
Paste a screenshot, drop files onto the panel, or use the 📎 button to add context to a request. For example, include the payload you need to decode or the files used by a TLS connection.
Images are sent to the model. Text files are sent as text, with only the first 64 KB included for larger files. Certificate and key files are referenced by path; their contents are never sent to the model. The Agent can use their paths to configure TLS:
Connect to broker.example.com on port 8883, using
ca.crtas the CA,client.crtas the client certificate, andclient.keyas the private key.
Review actions as the Agent works
Choose the permission mode before running a task. During execution, inspect each tool step and its result. Use the approval card to allow or deny a requested action:
- Ask before actions is the default. Reads run automatically. Creating, connecting, subscribing, publishing, deleting, syncing the Topic Tree, stopping timed publishing, and every MCP tool call wait for your approval. Choose Allow once, Always allow this tool in this chat, or Deny on the request card.
- Auto runs most actions without the approval prompt.
Deleting, clearing, and saving, testing or applying scripts always require approval, including in Auto mode. Always allow this tool in this chat does not apply to these operations.
Switch the current conversation's mode from the pill in the composer. Set the default for new conversations in Settings → MQTTX Agent → Default permission mode. MQTTX asks you to confirm the risk the first time you select Auto.
Continue a task that reaches the step limit
One reply can use up to Max steps per reply tool steps. The default is 50, and Settings supports values from 10 to 200. A reply that reaches the limit pauses and shows Continue. Select it to resume the work.
Use MQTTX through conversation
Manage connections and messages
Select an existing connection with @, or include the broker address, port, and required connection settings when requesting a new one. State which operations to perform: organize groups, configure TLS, connect or disconnect, manage subscriptions, or publish messages. For example:
Connect Factory Demo, subscribe to
factory/+/telemetry, and show the latest messages it receives.
Replace Factory Demo with the connection to use. Approve the requested actions, then open the connection and check its status, subscription list, and received messages. Keep using the same @ connection context for further configuration or traffic checks.
Interact with devices through natural language
Provide the device's MQTT protocol before requesting status checks or control. Include its telemetry topic, command topic and payload format, and state-report topic. Use the resulting messages to check what happened.
The following example assumes a study temperature sensor and fan implement this protocol:
| Purpose | Topic | JSON payload |
|---|---|---|
| Temperature telemetry | home/study/temperature | {"temperature":29.4} |
| Fan control command | home/study/fan/set | {"power":"on","speed":2} |
| Reported fan state | home/study/fan/state | {"power":"on","speed":2} |
- Connect MQTTX to the devices' broker and subscribe to
home/study/temperatureandhome/study/fan/state. - Confirm that temperature and fan-state messages are arriving. Provide the protocol definitions above in the Agent conversation and select the connection with
@. - Submit the request:
Check the study temperature and fan state. If the temperature is above 28°C, set the fan to speed 2 and inspect the new device report.
- In Ask before actions, approve the control-command publish when the temperature condition is met. Check the tool result to confirm that the message was sent.
- Inspect a new
home/study/fan/statereport after the command. Confirm that its power and speed values match{"power":"on","speed":2}. Without a matching new report, leave the device outcome unconfirmed.
Use the protocol implemented by the target device. This example follows the supplied protocol for this single request; it does not configure continuous control.
Investigate unexpected behavior
Mention the connection and describe the unexpected behavior, the relevant topic, and the expected payload. Request the subscriptions, stored or newly arriving messages, and logs needed for the check. For example:
Check the recent messages from Factory Demo. Explain which fields are present and point out any readings with a different payload structure.
Compare the explanation with the message and log entries returned by the tools. If the required messages are absent, check the connection and subscriptions, then receive new messages before repeating the request. For TLS issues, request local certificate inspection. Certificate and private-key contents stay local.
Prepare code, data, and payload processing
Specify the language or payload format, the target topic, and an example input or expected output. Request client code, test messages, a Protobuf or Avro schema, or a JavaScript payload transformation. For example:
Generate a Node.js MQTT client that subscribes to
factory/+/telemetryand prints each message as JSON.
Review generated code and data against the requested topic and format. For transformation functions and schemas, request a test with representative input and check the output before applying the result. Script tests require approval in every permission mode. Applied transformation functions affect all connections, so review their scope before applying them.
Explore and present your data
Connect and subscribe to the relevant topics, then confirm that messages are arriving. Request a Topic Tree, a summary of received messages, or Dashboard widgets for specific payload fields. For example, specify a temperature Line chart and humidity Gauge, along with the connection, topic filter, and field names.
Open the resulting view and compare it with the received topics and payloads. To configure widgets manually, follow the Dashboard guide. Dashboard works independently of the Agent.
Check the result of a task
After the reply finishes, open the relevant MQTTX view and compare it with the tool results:
- For connection or subscription changes, check the connection status and subscription list.
- For publishing, inspect the publish result and, when the task needs a device response, a new received message.
- For generated code, schemas, or scripts, compare the output with the supplied examples and review any test results before use.
- For a data view, compare its fields and readings with messages received by the selected connection.
If a step failed or the required evidence is missing, include that result in the next request. Specify what remains to be checked rather than treating the task as complete.
Continue an investigation across a conversation
Conversation history preserves earlier questions and tool results for later review. In full screen, conversations appear on the left. In the floating window, open them with the header's history button. Double-click a title in full screen or use its ··· menu to rename it. Deleting a conversation also deletes its messages and generated files.
For longer conversations, MQTTX Agent summarizes earlier turns automatically and continues with that summary. Select the Earlier conversation compacted divider to read it. The panel displays Compacting the conversation… while the summary is being prepared.
The context bar below the composer shows how much of the model's context window is in use. Hover over it for token counts and the compaction threshold. Counts from the last reply are exact; values marked ~ are estimates.
Use tools from your MCP servers
MCP connects tools from external systems to the same conversation. Configure your servers in Settings → MQTTX Agent → MCP Server Configuration. Streamable HTTP and SSE URLs are supported:
{
  "mcpServers": {
    "weather": { "url": "http://127.0.0.1:8000/mcp" },
    "legacy": { "url": "http://127.0.0.1:8001/sse" }
  }
}
After saving the configuration, request an operation supported by one of the servers and inspect the tool result. Available external operations depend on the configured servers. Every MCP tool call asks for approval in Ask mode.
Capability reference
The Agent can:
- Read connection configuration, TLS certificate information, and groups; create, update, and delete connections.
- Create a free temporary Zero EMQX broker and save its connection.
- Connect and disconnect, subscribe and unsubscribe, and publish Plaintext, JSON, Base64, or Hex messages.
- Start and stop timed publishing, read stored messages, wait for new messages, and clear a connection's messages.
- Inspect certificates and private keys locally, without sending their contents to the model.
- Write, test, and apply transformation functions and schemas; generate client code and test data.
- Build and read the Topic Tree; create Dashboards and widgets and change their grid position and size.
- Read logs, change supported application settings, and call configured MCP tools.
Message history and privacy
MQTTX can keep receiving and saving messages while the connection and its subscriptions remain active, including after you leave the connection page. Available history depends on the messages MQTTX actually received and saved.
Your conversation and tool results are sent to the model provider you configure. When tools read a connection, saved passwords are masked and certificate or private-key files are returned as paths, without their file contents. Text entered directly in the conversation is sent as written, so keep credentials out of your requests.
Example: connect MQTT operations to a data view
- Configure the model provider and open the Agent. Type
/and select the Zero EMQX Skill. - Submit this request:
Create a temporary Zero EMQX broker, save its connection as Factory Demo, connect, and subscribe to
factory/+/telemetry. Publish 12 JSON messages withdeviceIdand varyingtemperature,humidity, andpressurevalues tofactory/line-01/telemetry, one at a time. Create a Factory Overview dashboard with the three current readings and a temperature trend chart, then open it.
- In Ask mode, review and approve the requested creation, connection, subscription, publishing, and Dashboard actions. Creating the saved connection and connecting to the broker are separate steps; the request includes both.
- Open Factory Demo. Confirm that it is connected, that the subscription exists, and that separate JSON messages arrived on the specified topic.
- Open Factory Overview and compare its current readings with the latest received message. Select a history range that includes the messages to inspect the temperature trend.
The Zero EMQX broker is isolated and free, expires according to the lifecycle returned by the service, and is intended for testing. Check the returned lifecycle when using it. Its password stays in the saved connection rather than being returned to the model. Dashboard displays data received by the connection. See Dashboard for the manual setup and data-source controls.